Adjusting the sound level, tone and balance
Volume control
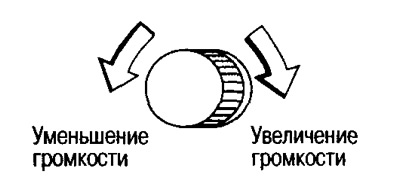
The sound volume is adjusted by turning knob A.
Tone and balance control
Switching the tuning mode is carried out using the B SOUND button. Each time this button is pressed, a beep sounds and the setting mode switches in the following sequence:

Note: If the control is interrupted for 10 sec. during adjustment. and more, the system automatically returns to its original state.
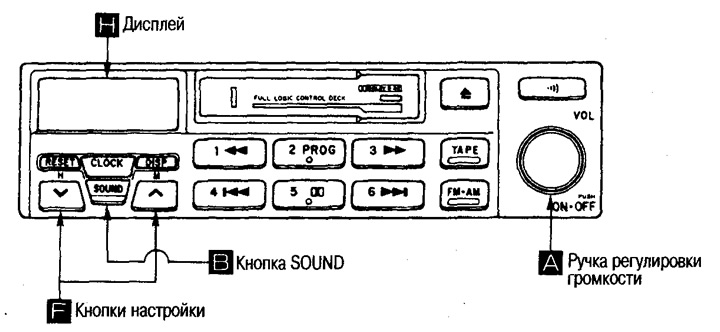
In each mode, adjustment is made by pressing the F settings buttons.

* Icon is displayed during setup
Listening to the radio
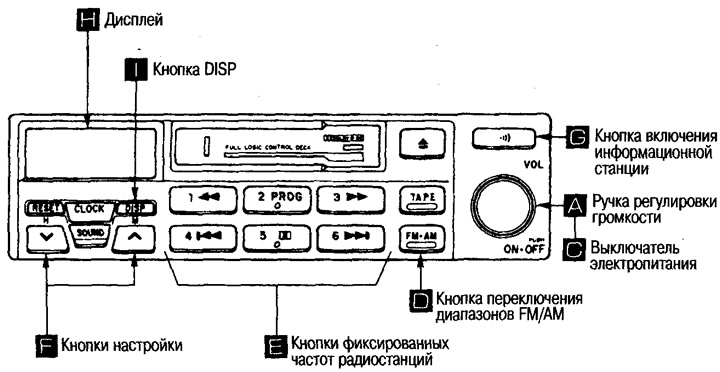
1. Turn on the power.
Turn the ignition key to the Ace or ON position and press the FM/AM switch button D or the power switch C.
2. Select the desired broadcast band.
Press button D to switch FM/AM broadcast bands. Each press switches from FM to AM and vice versa (the display will show the selected FM or AM band).
3. Select the desired radio station.
To select a radio station previously stored in the memory, press one of the buttons E (the display will show «ch» and the number of the pressed button).
To listen to radio stations not stored in memory, press one of the F tuning buttons (the frequency of the received radio station will be displayed on the display).
To turn off the radio, press button C.
Note: When the battery is removed, the previously recorded radio frequencies are erased from the memory, so you need to re-enter the frequencies of the desired radio stations into the memory.
Switching on the information station
Press button G to turn on the information station. To turn off this station, press the button again.
Note: The information station operates on a frequency of 1620 kHz in AM mode and is stored in the radio's memory.
Tuning into a radio station
When you press the F settings buttons, the radio reception frequency changes, l - the reception frequency increases V - the reception frequency decreases
Automatic setting
If you press the F button for tuning A or V before a beep sounds, the frequency will change until a radio station is received.
Manual setting
If you briefly press one of the buttons F settings (A or V), the reception frequency will change while the button is held down.
Note: If the received signal is weak and you are unable to automatically tune into a radio station, then manually tune into that station.
Entering the frequency of receiving a radio station into memory
Tune to the station whose reception frequency you want to memorize, press one of the E memory buttons (1-6) and hold it until you hear a beep (the display will show «ch» and button number).
Note:
One button can enter one AM and one FM radio station.
When the battery is removed, the data recorded in the memory will be erased. After replacing the battery, re-enter the radio frequencies into the memory.
Display indication H
The display shows the frequency of the received radio station, as well as the following information:
- AM: AM reception
- FM: receive FM band signal
- ST: FM stereo reception (with good sensitivity)
- ch: memory button number
Determining the frequency of the received radio station
If you press the I DISP button (display change), the display of the frequency of the received radio station and the current time will be switched.
Listening to a tape recorder
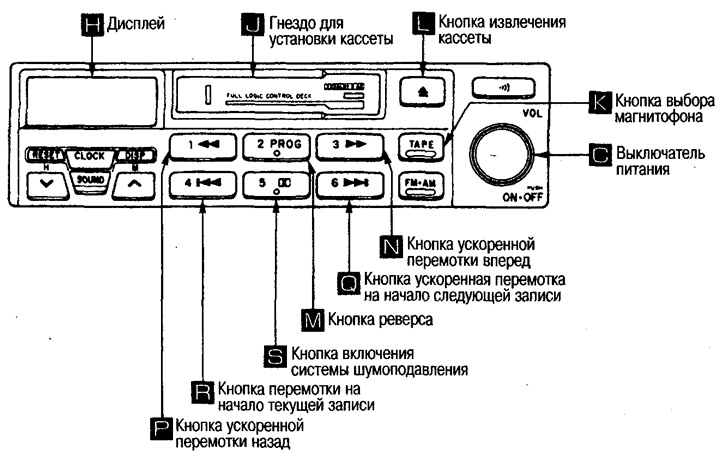
Playback is possible when the ignition key is in the Ace or ON position. Playback starts as soon as a cassette is inserted into slot J.
If the cassette is already loaded, press the K button.
To stop playback, press the K button again.
Playback can also be stopped by pressing the C button. If this button is pressed again, playback will resume.
Press the L button to eject the cassette.
To change the film direction, press the M button.
Fast forward and rewind
To fast forward, press the N button, to fast rewind, press the P button.
To stop, press the same button again or press the K button.
Listening with skipping recordings
To find the next entry, you must fast-forward to the beginning of the next entry. To do this, press the Q button.
To listen to the previous track, press the R button.
To stop playback, press the K button.
Note. If the pause between recordings lasts less than 3 seconds. or there is noise in the pauses, the system may work with errors.
Listening to recordings with Dolby NR noise reduction
Press the S button to turn on the noise canceling system (
To turn off the system, press the same button again.
Meaning of the symbols on the display H
The display shows the current playback status.
- TAPE: displayed during switching.
- FR is displayed during fast forward and flashes when the next track is being searched.
- REW: Displayed during fast rewind and flashes when the previous track is being searched.
 : Displayed while the noise reduction system is in operation.
 : The icon moves from left to right during playback and fast forward, and from right to left during rewind.