General information and recommendations for using the audio system
The audio system works when set to «Acc» or «ON» key or ignition switch. An antenna is recommended to improve radio reception. The antenna can be turned out of its socket located on the roof of the car.
In cold weather or rainy weather, normal operation of the CD player (CD) may be violated. In such cases, remove the disc and dry or ventilate the system. When driving on rough roads, CD playback may be interrupted. For proper performance of the CD player, use blank quality discs. The player may not play non-copyable discs properly (CCCD), as well as written (CD-R) and rewritable (CD-RW) disks. To prevent the player from malfunctioning, do not use discs with a diameter of 8 cm, discs that are not round, or discs with paper labels.
Audio block
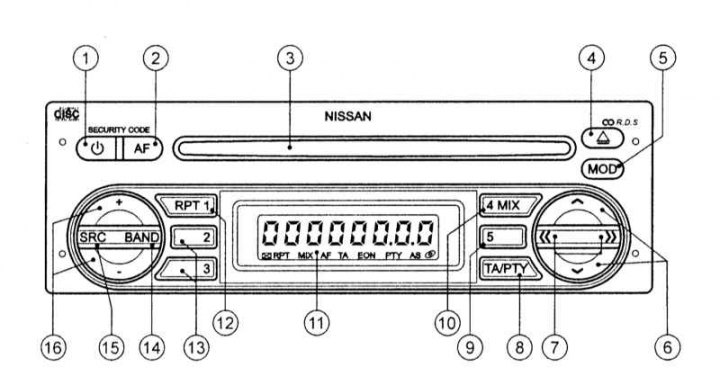
1 - Audio power switch
2 - Switch for the selection of alternative frequencies (AF) radio signal
3 — CD boot slot
4 - CD eject button
5 - Button for setting the sound of the audio system
6 - Manual tuning of the radio in the upper and lower ranges, buttons for selecting sound tuning modes
7 — Radio: automatic adjustment in the upper and lower ranges; CD player: consecutive transition between records on CD; buttons for setting adjustable sound parameters
8 - Button for receiving traffic information (TA) /type of radio program (PTY)
9.13 - Buttons for selecting pre-programmed radio stations
10 — Radio: button for selecting a pre-programmed radio station; CD player: Random playback mode switch
11 - Display
12 — Radio: button for selecting a pre-programmed radio station; CD player: switch of the recording replay mode
14 - Radio band switch LW, MW, FM
15 - Switch type of work (SRC)
16 - Volume control
The audio unit includes a digital radio receiver operating in the ranges of long (LW), medium (MW) and ultrashort waves (FM), and a CD player. The audio unit is equipped with an anti-theft system and a traffic announcement function.
The main functions of the audio system can be controlled using the buttons located on the steering wheel. To do this, the key or ignition switch must be in position «Acc» or «ON», and the audio system must be turned on. The description of the operation of the buttons is given in a separate subsection.
When installing a CB radio, mobile phone or other electronic equipment on a vehicle, the following recommendations must be observed, otherwise the installed equipment may adversely affect the operation of the fuel injection system or other electronic components of the vehicle. The CB radio antenna should be located as far as possible from the vehicle's electronic control units (including the radio). The antenna cable must be located at least 20 cm from the electrical wiring of the fuel injection system. Do not run the antenna cable near vehicle wiring harnesses. To eliminate standing radio waves, follow the recommendations of the manufacturer of electronic equipment. Connect the wire between the body of the CB radio and «weight» car.
Anti-theft system
Without knowing the individual code of the audio system, it will not be possible to turn it on after installation in another car, which significantly reduces the risk of its theft.
During normal use, the audio system is unlocked and can be used normally. When the audio system is disconnected from the on-board electrical network, the anti-theft system is activated, which blocks the subsequent activation of the audio system. To unlock it, you need to enter an individual code. This code cannot be changed and is only used for a specific vehicle.
The individual code of the audio system is shown on the map, which is given together with the operational documentation for the car. Keep the code card in a safe place and never leave it in the car. If you lose your audio code card, contact your authorized Nissan dealer.
Removing the blocking of the audio system and turning on the service mode
If the audio system is locked, the message appears on the display for two seconds when it is turned on «CODE», which is then replaced with characters «0000».
For unlocking using the preset radio buttons, enter your individual four-digit code. For example, to enter code 5169, press first (1) button for selecting pre-programmed radio stations five times in a row, then the second, third and fourth buttons 1, 6 and 9 times respectively. Finally, confirm the code entry by pressing the ↑ button. If the correct code is entered, the audio system will turn on; otherwise the display will not change and the audio system will not turn on.
When servicing a vehicle, remove security code audio system, which will disconnect the battery (for example, for maintenance, etc.) without blocking the inclusion of the audio system. To do this, turn off the audio system and, while holding down the 1st and 4th buttons for selecting pre-programmed radio stations, turn on the audio system again. Release the preset radio buttons.
The vehicle should not be left unattended or placed in an unguarded parking lot if the audio system code has been removed. Activate the security code immediately after finishing servicing the car, proceeding in exactly the same way as when deactivating it. The anti-theft system is now active.
Basic audio control functions
Power switch
Turn the key or ignition switch to position «Acc» or «ON», then press and hold the audio power switch for at least two seconds. The audio system will start working in the same mode (radio or CD playback), in which she worked immediately before the shutdown. The sound volume will be set to the level that was previously programmed to turn on the audio system (personalization modes). If no CD is loaded, the display will show the message «NO DISC». The audio system turns on automatically when you load a CD into it, after which the disc starts playing.
To turn off the audio system, hold down the power switch for at least two seconds or turn off the ignition.
Volume control and mute
Pushing the buttons «» or «–» knob to set the desired volume level.
The sound is turned off by briefly pressing the power switch of the CD audio system. The message appears on the display «MUTE». To turn the sound back on, briefly press the power switch again.
Operation switch (SRC)
This switch allows you to select between radio or CD player. Each time you press the switch, the active mode of the audio system is shown on the display. If no CD is loaded, the display shows the message «NO DISC».
Sound settings (MOD)
Click on the button «MOD» and hold it in this position for at least two seconds to enter the audio settings menu. The indicator will light up on the display «MENU ↑ ↓». Each time you press the ↑ or ↓ button, the sound setting modes are switched in a cyclic sequence: Bass (Bass Level), Treble (RF level), Fader (Front/rear balance), Balance (Balance left/right), Loudness (Tone compensation), REG (Reception of local radio stations), Bass, etc. Set the desired sound parameters using the << or >> buttons in the selected mode.
Note. Bass and treble levels are adjustable from -7 to 7, and balance values from -9 (back/left) up to 9 (forward/right). Tone compensation is used to enhance the bass boost function. In REG mode, use the << or >> buttons to turn this mode on or off.
After adjusting the sound, press the button again «MOD», in order to fix the set adjustment levels in the memory of the audio system.
When switching the type of audio system operation (radio or CD player) set the sound settings (bass/treble levels and tone compensation), that have been preset for the corresponding audio source. At the same time, the front/rear and left/right balance settings are independent of the sound source.
Radio
Radio band switch (BAND)
At every short (less than two seconds) pressing the button «BAND» the radio bands are switched in a cyclic order: FM1, FM2, FMT, MW, LW, FM1, etc.
If you turn on the FM band and for a long time (at least two seconds) click on the button «BAND», the radio's automatic memory programming function will be activated. In this case, the radio will automatically find the five FM stations with the strongest signal and enter their frequencies into the cells (from first to fifth) storage device (FMT range). During automatic programming of the radio receiver's memory, the display shows the message «T-STORE» and symbol «AS», and the sound is muted.
When the traffic announcement function is turned on (TA), then only those radio stations that transmit traffic announcements are selected for memorization.
Manual radio tuning
Manual tuning of the radio receiver is done using the buttons ↑ (increase in frequency) and ↓ (frequency reduction). The tuning frequency changes discretely, the step of changing the tuning frequency depends on the included radio range and is 100 kHz in the FM ultrashort wave band, 9 kHz in the MW medium wave band and 3 kHz in the LW long wave band.
If you press the ↑ or ↓ button and hold it down for more than 0.5 s, the radio tuning frequency will continuously increase or decrease until the button is released.
Automatic radio tuning
Automatic tuning can be carried out at different levels of sensitivity of the radio receiver. If the sensitivity level is set to high «DX», the receiver will tune in to the nearest broadcasting station regardless of the received signal level. If low sensitivity is enabled «LO», then tuning will only occur on radio stations with a sufficiently strong signal, that is, local radio stations.
At single pressing the button >> or << the radio receiver starts searching for a working station in the upper or lower subband, respectively, relative to the current tuning frequency. The search stops as soon as the radio tunes in to the nearest station in frequency. The sound is muted during automatic tuning of the radio.
If the radio, operating at a low sensitivity level «LO», could not tune in the entire radio range to any broadcasting station, then the radio will automatically switch to a high level of sensitivity «DX». The radio will then continue searching for broadcast stations on the same band. If the radio still does not detect any broadcasting radio stations, then automatic tuning will stop.
When the traffic announcement function is turned on (TA) or select the type of radio program (PTY), then the radio is automatically tuned only to those radio stations that respectively broadcast a traffic program or whose programs correspond to the previously selected type.
Selecting preset radio stations
Tuning the radio to pre-programmed stations is done with a short (less than two seconds) by pressing the corresponding buttons (from first to fifth). With a long (longer than two seconds) pressing the button, the corresponding memory cell of the radio receiver is reprogrammed, that is, the current tuning frequency of the radio receiver is entered into the memory cell, the number of which corresponds to the number of the pressed button.
Up to 15 FM radio stations can be programmed (5 each on FM1, FM2 and FMT). In the MW and LW bands, you can also program 5 radio stations each.
Station scan mode
To turn on the scan mode, press and hold the SRC type switch for at least two seconds. The radio will tune in to all broadcasting stations one by one, starting from the current tuning frequency. While searching for radio stations, the indicator will light on the display «SCAN». After tuning to the next radio station, reception continues for 10 seconds, and the display shows the name or broadcast frequency of that radio station. To turn off the scan mode, press the SRC type switch again.
When the traffic announcement function is turned on (TA) or select the type of radio program (PTY), then the radio is automatically tuned only to those radio stations that respectively broadcast a traffic program or whose programs correspond to the previously selected type.
Radio Data System (RDS)
The RDS system allows you to transmit additional information in encoded digital form along with the main FM radio signal. The RDS system supports a variety of information service functions, such as displaying the name of a radio station, receiving traffic and local news, automatically searching for a radio station broadcasting a program of a certain genre, etc.
Alternative radio frequencies (AF)
Alternate radio frequency selection function (AF) can work in the FM radio band, as well as when playing records on a CD.
The AF function is activated short (up to two seconds) by pressing a button «AF».
When enabled «AF» the following service functions are performed:
Function automatic retuning of the radio consists in the fact that the radio receiver, comparing the power of radio signals at all alternative frequencies (from the AF frequency list), automatically selects and tunes to the broadcast frequency that provides the best radio reception conditions.
EON extended network data update. This function also works when the AF function is off. Receiving EON data allows you to automatically retune the frequencies of pre-programmed stations to the same radio network. In addition, it becomes possible to use additional service functions provided by the network, such as receiving traffic reports. When the radio is tuned to an RDS station that is part of the EON extended network, the indicator lights up on the display «EON».
RDS features
PS function (displaying the name of the radio station). Once the radio tunes in to an RDS radio station (manually or semi-automatically), RDS data reception starts and the name of the received station is displayed immediately.
Function to interrupt the current mode by an alarm [ALARM INTERRUPTION – EBU (European Broadcasting Union) SPEC FOR INFO]. If the radio receives an alarm code «PTY 31», the current mode of the audio system is automatically interrupted and the message broadcast starts. At the same time, the indicator lights up on the display «ALARM». After the warning message ends, the audio system will immediately return to its original mode.
REG mode (reception of local radio stations). If you turn on the REG mode when the radio is on the FM band and is tuned to a local radio station broadcasting local programs, the radio tune will be saved and you will not switch to other local radio stations.
TA function (receiving traffic messages). This function can be used when the FM band is on, as well as when playing CD recordings. The TA function is activated with a short (no longer than two seconds) by pressing a button «TA». The TA function can be performed regardless of whether the AF function is on or off. When the TA function is on, the indicator lights up on the display «TA». In short (no longer than two seconds) click on the button «TA», the traffic announcement function will turn off and the indicator «TA» will go out. If the function «TA» is turned on and the radio is operating in the medium MW or long LW bands, the radio will automatically switch from the MW or LW band to the FM band and tune in to a station broadcasting a traffic announcement when it detects a traffic signal. If the function «TA» off and the radio is tuned to a station broadcasting a traffic announcement program, the «T». Pressing the switch «TA» and turning on the traffic announcement function instead of the indicator «T» indicator will light up on the display «TA».
Function to interrupt the current mode with a traffic announcement. If the function «TA» is turned on, the radio detects a traffic announcement and tunes in to the radio station that is broadcasting the announcement, and the volume is set to the preset level. After the end of the traffic announcement, the audio system returns to the operating mode it was in when the traffic announcement was interrupted. The sound volume level is also set to the original level. Reception of a radio program from a station in the extended EON network is automatically interrupted if a traffic report is also broadcast by an EON radio station. When the traffic announcement ends, the radio will return to the station it was previously tuned to. The TA function is deactivated if one of the buttons is pressed during a traffic announcement «TA/PTY», «BAND» or «SRC».
Traffic program search function. If, with the TA function on, the radio is unable to tune in the entire range to a radio station that broadcasts a traffic program, it returns to receiving the preset station. At the same time, the message «NO TRAFFIC».
Sets the sound volume level for broadcasting traffic announcements. You can preset the volume level for traffic announcements using the personalization menu.
Selecting the type of radio program
Function «PTY» allows you to select a radio station broadcasting a program of a certain genre in the FM band. With a long (more than two seconds) pressing the button «TA/PTY», when the radio is in the FM band and the function «PTY» off, the PTY type name of the received radio program is displayed. When the PTY function is on, the indicator lights up on the display «PTY».
Radio program PTY type selection mode. The selection of the PTY type of radio program is made using the ↑ and ↓ buttons for manual tuning of the receiver, or using the buttons for tuning the receiver to pre-programmed radio stations. The names of the first five PTY types of radio programs are stored in the corresponding memory cells of the radio receiver. However, the memory cells can be reprogrammed. To do this, display the name of the desired PTY type of radio program on the audio system display and then (at least two seconds) press one of the five buttons for selecting pre-programmed radio stations. In this case, the selected name of the PTY-type of the radio program will be entered into the corresponding memory cell of the radio receiver.
Radio program search function by specified PTY type switched on by pressing one of the radio's automatic tuning buttons (<< or >>). In the process of such a search, the display shows periodically replacing each other messages «SEARCH» and the name of the specified PTY type of the radio program. If the desired radio program cannot be found, the message appears on the display for 2 seconds «NO PTY». The radio will then continue to receive the program of the radio station to which it was previously tuned. If the radio is tuned in to a station that broadcasts a program of the specified PTY type, the name of that radio station appears on the display.
Personalized settings menu
To enter this menu, press the power switch with the audio system turned off, after pressing and holding the switch in this position «MOD». If you press the ↑ or ↓ button, the following setup mode indicators will cycle through the display in sequence: PTY lang (PTY language: English, German or French), TA volume (volume level for traffic announcements), ON volume (initial volume level when the audio system is turned on), HI CUT, PTY lang, etc. The parameters of the selected mode can be changed using the << or >> buttons. After setting the parameters to save them into the memory of the audio system, press the power switch and turn off the audio system.
Function «HI CUT» improves the sound quality of the audio system when receiving radio broadcasts in the FM band. In the presence of interference, the level of high frequencies is automatically reduced. It also helps to reduce the level of interference. Switching the function on and off «HI CUT» is done by pressing the << or >> button. State «HI CUT 1» corresponds to a decrease in the level of high frequencies, and the state «HICUT 0» – no sound correction.
CD player
Turn the key or ignition switch to position «Acc» or «ON» and insert the CD into the boot window of the working (without inscriptions) side down. The disc will automatically load into the player, after which the first track will start playing. If a CD is loaded while the radio is on, radio program reception will automatically stop and the disc will start playing.
Attention! Do not press on the disc while loading it, as this may cause the player to malfunction. To eject a disc from the player, press the eject button.
Sequential selection of the beginning of the recording
Click on the button >> or <<, in order to jump to the beginning of the next or current track on the CD, respectively. While searching for the start of a recording, the sound is muted.
Fast Track Listening
If you press the ↑ or ↓ button and hold it for more than two seconds, then continuous fast playback of the recordings will begin, respectively, in the forward or reverse direction. The sound is muted during fast playback. CD fast playback continues until the pressed button is released.
Recording repeat mode (RPT)
To enable repeat playback of the current recording, click the button «RPT». The indicator will appear on the display for two seconds «RPT TRAK», which then changes to the indicator «RPT». Recording repeat playback mode is turned off by pressing one of the buttons: «SRC» (press for at least two seconds), «RPT» or «MIX».
Random sequence recording playback mode (MIX)
To turn on the mode of playing all records on a CD in random order, press the button «MIX». The indicator will appear on the display for two seconds «MIX DISC», which then changes to the indicator «MIX». This mode is turned off by pressing one of the buttons: «SRC» (press for at least two seconds), «RPT» or «MIX».
Disc Browse Mode
If long (at least two seconds) click on the button «SRC», the audio system will play the initial 10-second segments of each CD track in sequence. Disc browsing mode is turned off when you press one of the buttons: «SRC» (press for at least two seconds), «RPT» or «MIX».
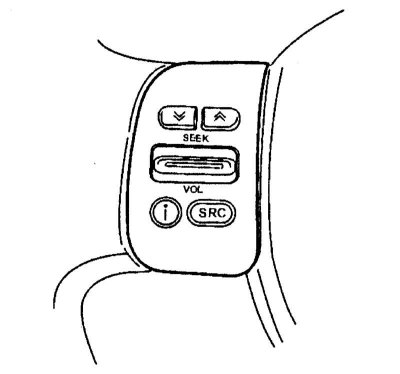
Audio control buttons located on the steering wheel
Steering switch kind of work (SRC)
Successive button presses «SRC» lead to cyclic switching of the audio system operation modes: MW, LW, FM1, FM2, FMT, CD, MW, etc. If the CD is not loaded, the display will show the message «NO DISC».
Note. Buttons for automatic radio tuning or CD sequencing (↑ and ↓)
By pressing these buttons in radio mode, you can sequentially tune the radio receiver to pre-programmed radio stations.
When playing a CD, if the mode «MIX» off, then with a short (no more than two seconds) pressing the ↑ or ↓ button moves to the next or previous track on the CD; otherwise (mode «MIX» included) The tracks on the CD will play in random order.
Audio Volume Control (VOL)
Set the desired sound volume by pressing the control button up (+) or down (–).