Controls and interior equipment
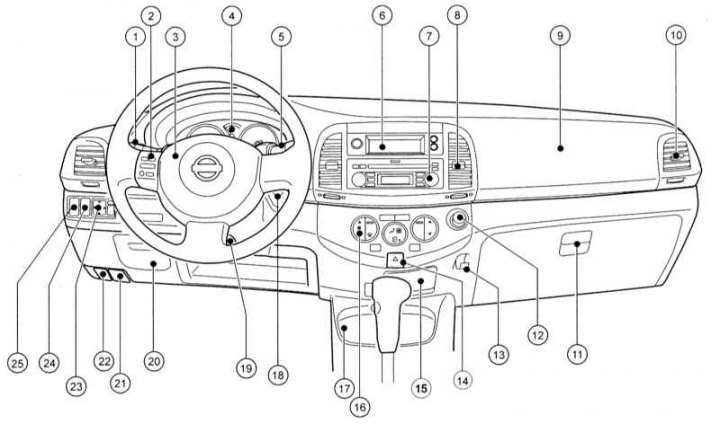
1 - Left stalk switch; 2 - Audio system and trip computer control panel; 3 - Horn switch and driver's front airbag unit; 4 - Instrument cluster; 5 - Right steering column switch; 6 - Multifunction display; 7 - Audio and navigation system; 8 - Central deflector; 9 - Front passenger airbag unit; 10 - Side deflector; 11 - Glove box; 12 - Cigarette lighter; 13 - Luggage hook; 14 - Alarm switch; 15 - Ashtray; 16 - Control panel for ventilation, heating and A/C systems; 17 - Front cup holder; 18 - Lock or ignition switch; 19 - Handle for releasing the fixing of the steering column; 20 - Fuse mounting block; 21 - Hood release handle; 22 - The handle for unlocking the cover of the hatch of the filler neck of the fuel tank; 23 - Control unit for external rear-view mirrors; 24 - Headlight washer switch; 25 - Headlight range control
The components listed in the illustration are discussed below, except for the instrument cluster - its description is given in Section instrument cluster, as well as a trip computer with a multifunctional display and a control unit for ventilation, heating and air conditioning systems - they are described in Part Comfort devices. This section also covers the controls located on the ceiling (they are not shown in the figure). The controls located in the doors are described in Part Access, protection.
Switches and controls located on the steering column
Note. The audio system and trip computer control panel is described in Part Comfort devices.
Left stalk switch
Note. Do not leave outdoor lights on when the engine is off to avoid draining the battery.
Left stalk lever positions
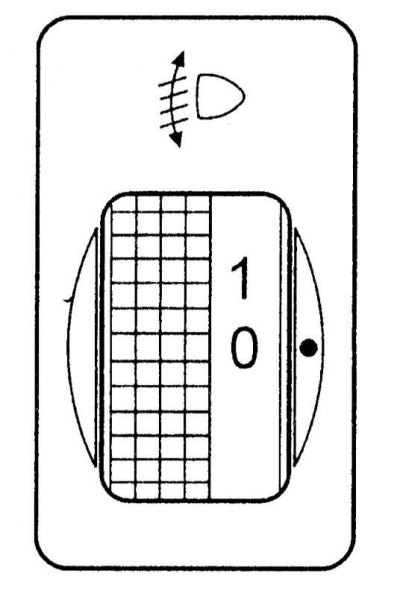
The left steering column switch is designed to control the direction indicators, switch the dipped and main beam headlights, turn on the side lights, fog lights, rear fog lamp, and high beam signaling.
On some models, there is a function of outdoor lighting when driving during daylight hours (DRL), which lies in the fact that when the ignition is turned on, the side lights, the backlight of the license plate and instruments, as well as the dipped headlights, are automatically turned on. This function is active even if the outdoor lighting rotary switch is (located at the end of the left steering column switch) set to position «OFF», however, it is not possible to turn on the headlights in high beam mode. On other models, when set to position «OFF» outdoor lighting rotary switch, the outdoor lights are turned off.
When the switch is turned to the
When the switch is turned to the
To enable distant headlights, move the left stalk lever away from you. The inclusion of high beam headlights is accompanied by the inclusion of the corresponding K / L in the instrument cluster (see Section instrument cluster). To switch back to low beam mode, return the lever to its original position (pull it towards you).
To signal high beam headlights, pull the switch lever towards you. In this position, the high beam will turn on regardless of the position of the key or ignition switch, and will remain on until the switch is released.
To enable left or right turn with the ignition on, pull the stalk lever down or up respectively. At the same time, in the instrument cluster, the indicator for turning on the corresponding direction indicator lights up in a flashing mode. After completing the turn, the switch automatically returns to the neutral position.
When rebuilding, you can use rebuilding indicators, to turn them on, slightly pull the switch up or down, without pushing it all the way, and hold it in this position. When released, the switch will automatically return to the neutral position.
Some models have a function headlight off timer which makes it possible to use the headlights even after the key or the ignition switch is turned to the «LOCK». To use this feature, pull the lever towards you on one or more (up to 4) once. The headlights will stay on for approximately 30 seconds (with a single click) up to 2 minutes (when pressed 4 times) and then turn off automatically.
Note. The timer function is disabled when the key or ignition switch is turned to «ACC» or «ON».
Some models have a power saving feature that prevents the battery from draining if the headlights or interior lights are left on and the ignition key or switch is turned to «OFF» or «LOCK». However, the next time the ignition is turned on, the lights will turn on again.
If the vehicle is equipped with fog lights, to turn them on, turn the exterior light switch to
To turn on the rear fog light, the exterior light switch must be in the
Right stalk switch
Note. To avoid damage to the wiper mechanism, do not turn them on if the glass being cleaned is dry, and also move them by hand. In frost, before turning on the windshield wipers for the first time, you should check if the brushes are frozen. To prevent damage to the wiper blades, do not allow them to come into contact with gasoline or other solvents. To avoid damage to the windscreen washer pump, do not operate it with an empty washer fluid reservoir or continuously for more than 30 seconds.
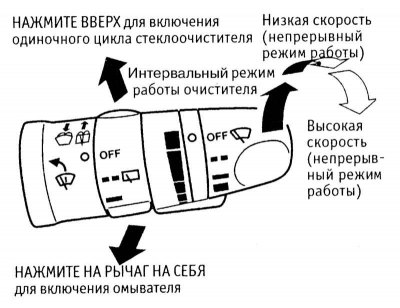
The right steering column switch is designed to control the wipers and washer. The windshield wipers and washer only operate when the ignition is on. The switch lever has an end and two ring rotary knobs.
When rotating end rotary knob out of position «OFF» (turned off) clockwise (Push) windshield wipers will be switched on first in interval mode (first fixed position of the handle), then at low speed (second position) and finally at high speed (last position).
The duration of pauses in the intermittent operation of the wipers depends on the position of the annular rotary knob closest to the end of the lever (pause time controller), as well as the speed of the car.
Control tailgate glass cleaner (with appropriate equipment) is performed using a ring rotary knob located closer to the base of the lever. When moving from position «OFF» (turned off) clockwise (Push) The rear window wipers will be switched on first in interval mode and then in continuous mode.
To turn on the windshield wipers for one cycle, pull the lever on the right stalk up. To turn on the windshield/rear window washer, pull the lever towards/away from you. When you turn on the washer, the windshield wipers turn on at the same time (for several cycles).
Installed on some models Rain sensor, which is activated when the intermittent windshield wipers are switched on. In this case, when water drops appear on the glass, the cleaner will turn on automatically. The frequency of wiper cycles depends on the intensity of the rain.
Horn switch
The horn activation button is built into the steering wheel pad, press it without much effort, because. The horn switch is integrated with the driver's front airbag unit.
Steering column release handle
The steering column should be adjusted so that the steering wheel is opposite the driver's chest. Positioning the steering wheel against the driver's face is incorrect as it reduces the protective function of the driver's front airbag.
Do not adjust the position of the steering column while driving, because. this may result in loss of control of the vehicle.
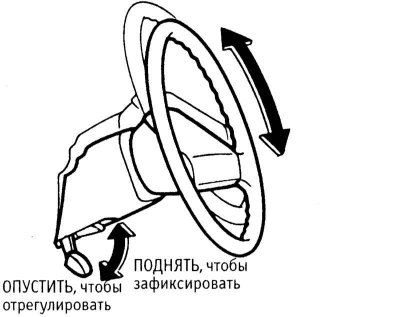
To smoothly change the height and angle of the steering column, press the lock down. Set the steering column to the desired position and return the latch to its original position to secure the steering column. Check the fixation by pulling the steering wheel up and down.
Ignition and steering wheel lock/switch
Note. On some models, instead of a traditional ignition switch, an ignition switch is installed that does not require a key to turn. The ignition switch only works if the NATS key fob code is accepted. Both the lock and the ignition switch have a mechanical steering wheel lock function.
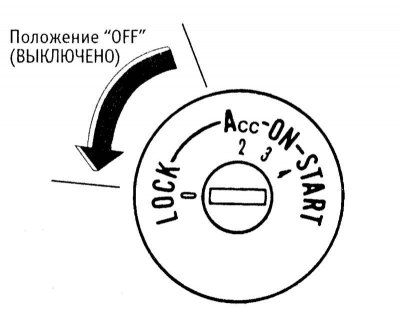
Ignition switch positions
Egnition lock located on the steering column, on the right and has the following 4 positions:
0 (LOCK) — This ignition switch position is used to lock the steering wheel and remove the key from the ignition. The steering wheel lock is activated when the steering wheel is turned about 1/6 turn with the ignition key removed. On models with AT, the lock cannot be moved to this position until the mode is selected «P». After removing the key from the ignition lock, the AT mode selector lever is locked in the position «P». You can remove the lever from this position by turning the key to position 2, or to position 3 and at the same time depressing the brake pedal.
OFF - This position is not fixed (it is not labeled) and is between positions 0 and 2. In this position, the steering wheel is not locked.
2 (Acc) - In this position, the steering wheel is unlocked, the ignition is turned off, the power to the auxiliary consumers of the vehicle's electric power is turned on.
3 (ON) - In this position, the ignition and all consumers of the car's electricity are on. This is also the normal position after starting the engine. Before starting the engine, when the key is turned to this position, check the short-term operation of the control lamps built into the instrument cluster (see Section instrument cluster).
Note. Do not leave the ignition key in the «ON» with the engine off, because this results in a rapid discharge of the battery.
4 (START) - Used to start the engine. Holding the ignition key in this position will cause the starter to crank the engine. While the starter is operating, some electrical components are disabled, making it easier to start the engine. When released, the key returns to position 3.
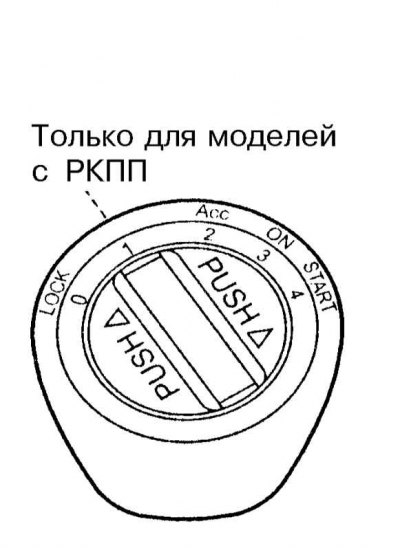
Ignition switch
The ignition switch is installed in place of the ignition switch.
The logic of the ignition switch is the same as the logic of the ignition switch. On models with a manual transmission, under the ignition switch is a button labeled «PUSH», it should be pressed to move the switch to the position «LOCK». If this is done with the button not pressed «PUSH», turn on the K / L of the ignition switch (see Section instrument cluster) and the beep will sound twice. This also happens when the switch is turned to the position «LOCK», if on models with AT the AT mode selector lever is not set to the position «P». When using the spare key to turn the ignition switch to «LOCK» you should also press this button, although otherwise the K/L and the buzzer will not work.
Controls located under the instrument cluster
Note. This subsection describes switches #23-25 shown in the illustration Controls and interior equipment. The handles for unlocking the hood and the cover of the fuel filler hatch are described in Sections Access to the underhood space and Fuel filler access respectively.
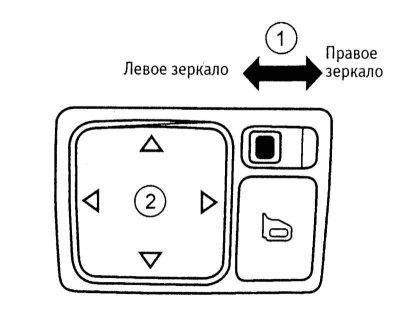
External mirror control unit consists of a square 4-position switch (2) and switch (1) to select an adjustable mirror. Adjustment of exterior mirrors with e / drive is only possible when the key or ignition switch is in position «Acc» or «ON». On models without e/drive of external mirrors their adjustment is carried out by means of the lever located in a forward lower corner of a window of the corresponding door.
Attention! Do not adjust mirrors while driving.
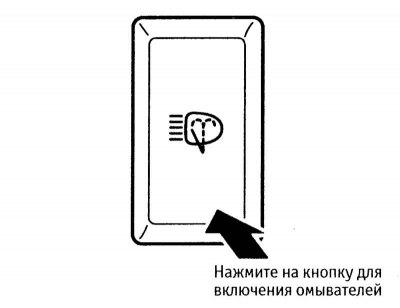
Headlight washer switch functions only when the key or ignition switch is in the «Acc» or «ON»; in addition, side lights or dipped headlights must be switched on.
Note. Do not operate the headlight washers for more than 30 seconds or without washer fluid.
headlight range control (with appropriate equipment) allows you to adjust the range of illumination of the road at different values of vehicle load. If the car is not heavily loaded and when driving on a flat road, the regulator should be set to the position «0». When turning the knob from position «0» the light beam descends.
Controls and interior equipment on the center console
Note. Description of ventilation, heating and A/C systems, audio and navigation systems, as well as a trip computer with a multifunctional display is given in Part Comfort devices; transmission controls are described in Section Using an automatic transmission (AT).
Hazard switch (14 in the illustration Controls and interior equipment) with built-in control lamp works in any position of the ignition switch. To turn on the alarm, press the switch button; to turn it off, press the button again. When the alarm is on, their indicators in the instrument cluster flash synchronously with all direction indicators.
luggage hook (13 in the illustration Controls and interior equipment) Designed for the convenience of transporting small bags and packages weighing up to 10 kg. To extend the hook, pull it up.
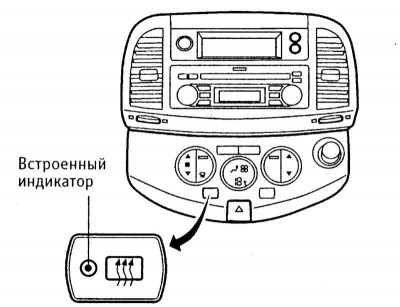
The switch of heating of glass of a door of a back and external mirrors (with appropriate equipment) is located to the left of the alarm switch and is equipped with a built-in light indicator for turning on the heating.
Turn on the heating to remove condensation and frost from glass and mirrors. The heating switches off automatically after 15 minutes after turning it on, however, if the desired result is achieved before this time, turn off the heating manually.
Note. Turn on the tailgate glass heating when the engine is running in order to prevent the battery from being discharged.
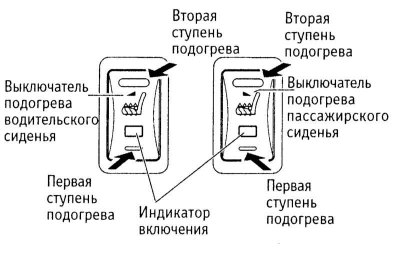
On models with heated front seats, the corresponding switches are located in the center console.
Light indicators of inclusion of heating are built in switches. The indicator lights up continuously until the switch is returned to the middle position. However, the heating temperature is controlled by a thermostat, which can turn the heating element on and off to maintain the set temperature.
Note. Do not turn on seat heating unless necessary.

Location ashtray and cigarette lighter indicated in the illustration. The cigarette lighter is installed in the power take-off and only works when the ignition key or switch is in the «Acc» or «ON». To use the cigarette lighter, press and release it. After the cigarette lighter reaches the required temperature, it will automatically return to its original position.
Attention! Do not keep the cigarette lighter pressed after it is ready for use, as this may cause it to overheat; for the same reason, the cigarette lighter should be removed from its socket if it does not automatically return to its original position for a long time. Do not use the ashtray to store any items, as burning cigarettes or matches may cause a fire if they come into contact with them.
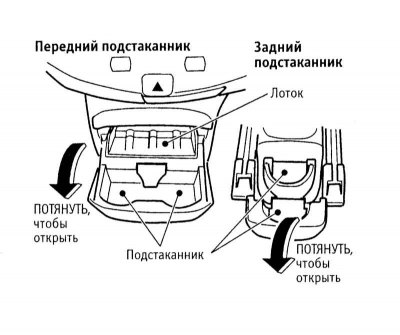
cup holders located in the center console and in the console between the seats. To bring the cup holder into position, pull on the edge of its lid. To remove the cup holder, lift the lid to its original position.
Warning! Do not use the cup holder while the vehicle is in motion, as objects installed in it during an accident, sudden braking or acceleration may cause injury to the driver and passengers. Moreover, you should not put unclosed containers with hot liquids into the cup holder when the car is moving, because. if the liquid is splashed, the driver can burn himself and lose control of the car.
Controls and cabin equipment located on the ceiling
Note. The description of the top hatch cover control switch is given in Section Sunroof and sunblind.
Luggage compartment lighting (with appropriate equipment) turns on when the tailgate is opened.
To provide local lighting turn the main saloon lamp.
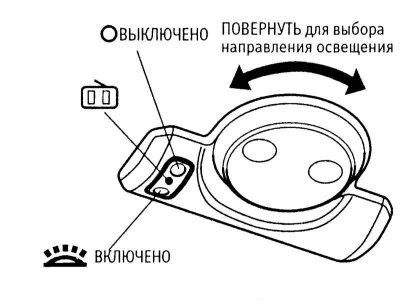
Job main saloon lamp determined by the position of the switch. Pregnant O the lamp is always off; in the middle position, the lamp turns on when one of the doors is opened; in the
Some models are equipped with an interior lighting timer. At the same time, the lighting remains on for about 30 seconds when the car door locks are unlocked, or when any side door of the car is opened and then closed. The timer is interrupted (lighting turns off) when locking the door locks, or when turning on the ignition.
From the back side interior rearview mirror there is a switch for night and day mode of the mirror. To enable night mode (mirror dimming) pull the switch towards you. To turn on the mode, pull the switch towards the windshield.
Storage boxes, luggage compartment shelf
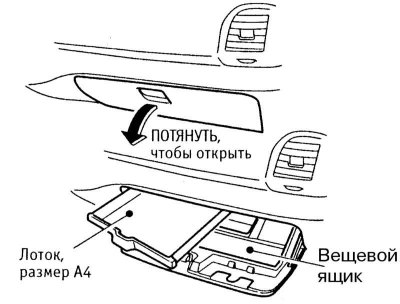
Main storage box located in the instrument panel opposite the front passenger seat. The box has a built-in tray for A4 sheets.
The recess for small items is located on the driver's side, next to the control unit for exterior mirrors.
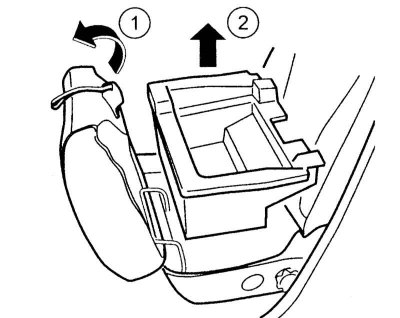
Another stowage box, which is convenient to use for storing a first aid kit or CDs, is located under the seat.
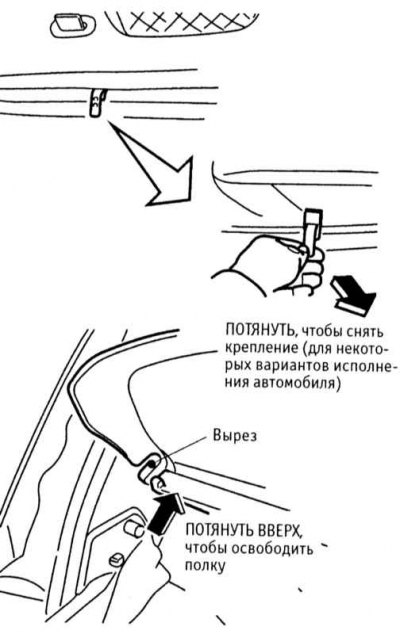
Refer to the illustration below for instructions on how to remove the luggage compartment cover.
Removing the luggage compartment shelf
Note. Do not put any items on the luggage compartment shelf, regardless of their weight, because. they can cause injury in an accident or emergency braking.