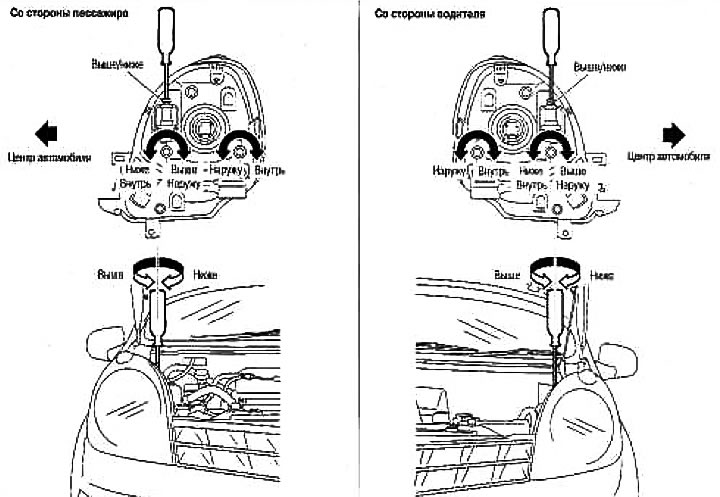
Adjust the headlight beam direction by turning the adjusting screws.
Refer to the figure for the location of the adjusting screws.
Attention: Tighten the adjusting screw first, and then adjust by loosening it. (If you want to adjust in the opposite direction, first loosen and then tighten the screw).
Preparation before adjustment
For more details, see the regulations in force in your country.
Before adjusting the headlight beam, check the following:
1. Bring the pressure in all tires to the required one.
2. Stop the car on level ground.
3. Make sure there is no additional cargo in the car (full charge of engine coolant, engine oil and fuel), except for the driver (or equivalent weight in the driver's seat).
Low and high beam headlights
Note: Adjust the beam direction of each headlight individually, obscuring the headlamp that is not being adjusted one by one so that the light from it does not fall on the screen.
1. Turn on the low beam headlights.
2. Adjust the headlight beam using the adjusting screws.
Tighten the adjusting screw first, and then adjust by loosening it.
Check the direction of the headlights if repairs have been made to the front of the vehicle or the headlight assembly has been replaced. Use the diagram shown in the figure.
Adjust the headlights so that the main axis of the light beam is parallel to the center line of the vehicle body and aligned with the point «R», shown in the figure.
The figure shows the headlight pattern when driving on the right side of the road; the opposite is true for the left side.
Dashed lines to a dot «R» the figure shows the centers of the headlights.
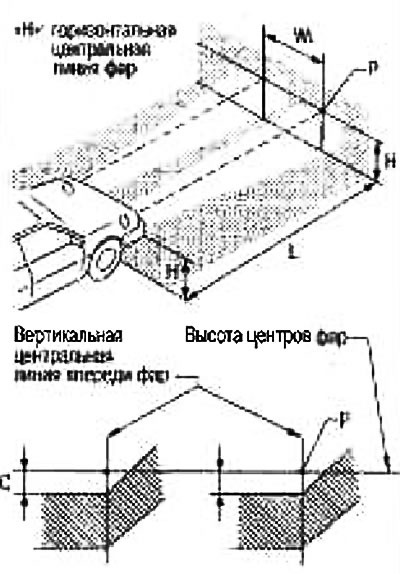
«H»: horizontal center line of the headlights.
«WL»: distance between headlight centers
«L»: 25000 mm
«WITH»: 250-310 mm
The kink point for left hand drive models must be 300 mm to the right of the point «R».
The kink point for right hand drive models should be 300mm to the left of the «R».
The base area of illumination to be adjusted must be within the range shown in the figure. Adjust the headlights accordingly.
Attention: When adjusting the headlight beam, set the headlight range control to «0».
Bulb replacement
Attention: After installing the light bulb, securely fix the plastic cap and bulb holder to ensure water tightness.
High/low beam headlights
1. Move the headlight switch to position «OFF».
2. Remove the cartridge connected to the light bulb.
3. Remove the cap.
4. Unlock the retaining spring and remove the bulb from the headlamp.
High/Low Beam: 12V - 60/55W (H4)
Parking (front clearance) flashlight
1. Move the headlight switch to position «OFF».
2. Turn the bulb socket counterclockwise and unlock it.
3. Remove the bulb from the socket.
Parking (front clearance) flashlight: 12 V - 5 W
Front turn signal light
1. Move the headlight switch to position «OFF».
2. Turn the bulb socket counterclockwise and unlock it.
3. Remove the bulb from the socket.
Front turn signal light: 12V - 21W (yellow)