


Table of contents: Removal ↓ Installation ↓
Caution: This section describes the procedures for removing and installing the front camshaft chain housing and associated components without removing the top of the oil pan.
If the upper oil pan is to be removed or installed, or if the rear camshaft chain housing is to be removed or installed, the lower and upper oil pan halves must first be removed. Then remove the front part of the timing chain housing, the parts related to the timing chain and the rear part of the timing chain housing (in exactly that order), and installation is carried out in the reverse order of removal.
Removal
- Place the car on a lift.
- Disconnect the negative cable from the battery.
- Remove the engine cover.
- Remove the radiator grille, intake duct, air cleaner and air duct.
- Remove the right and left valve covers.
Note: If only the main camshaft drive chain is being removed, it is not necessary to remove the valve covers.
- Remove the right mudguard.
- Drain the coolant from the radiator.
- Drain the engine oil by unscrewing the drain plug (1).
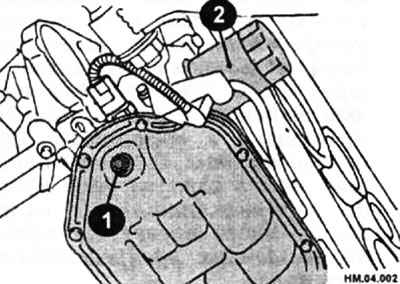
2 - oil filter.
- Remove the engine wiring harnesses.
- Remove the air conditioning compressor from the mounting bracket along with the pipes attached to it and temporarily secure it to the side.
- Remove the power steering pump from the mounting bracket with the attached pipes and temporarily secure it to the side.
- Remove the power steering pump mounting bracket.
- Remove the generator.
- Remove the idler pulley and bracket.
- Set the engine to TDC position (top dead center) the first cylinder in the compression stroke as follows:
Caution: If the camshaft drive chain is not removed and installed, this operation is not performed.
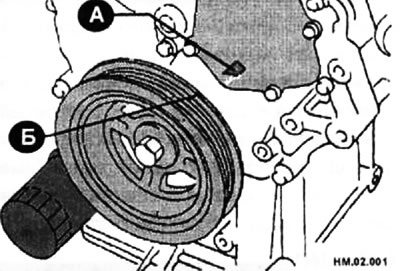
♦ Turn the crankshaft pulley clockwise until the timing mark (B) (a recess in the form of an unpainted pine) will not align with the pointer (A).
♦ Check that the camshaft cams for the intake and exhaust valves of the first cylinder (front side of the right bank of cylinders) directed upwards (arrows).
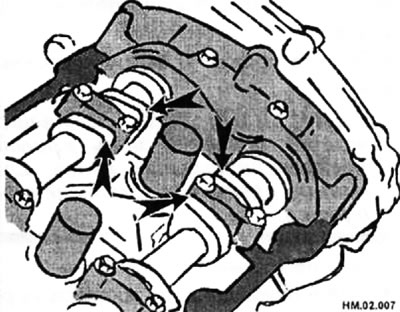
♦ If this is not the case, turn the crankshaft one more full revolution.
Note: If only the main camshaft drive chain is being removed, it is not necessary to remove the valve cover. To check that the piston of the first cylinder is at the TDC position of the compression stroke, remove the front part of the camshaft drive chain housing. After this, check the marks on the camshaft sprockets.
- Remove the crankshaft pulley.
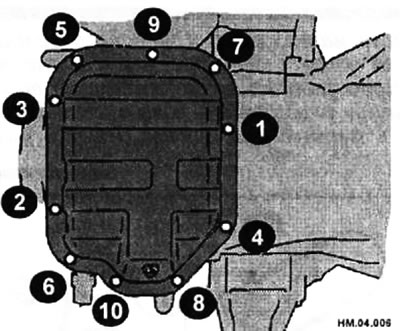
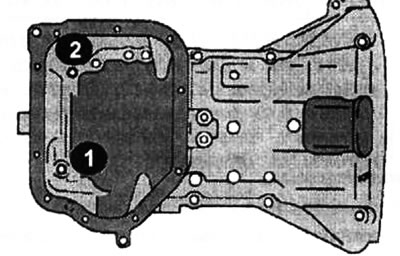
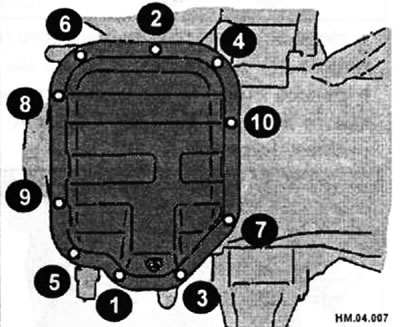
- Loosen the bolts in the sequence shown in the figure and remove the lower part of the oil pan.
- Remove bolts (1) and (2) located at the front of the top of the oil pan.
- Temporarily install the lower part of the oil pan. Support the bottom of the oil pan with a jack. Further operations are carried out with the front part of the engine supported by a jack.
- Loosen the cover bolts (A) and (B) in the sequence shown in the figure.
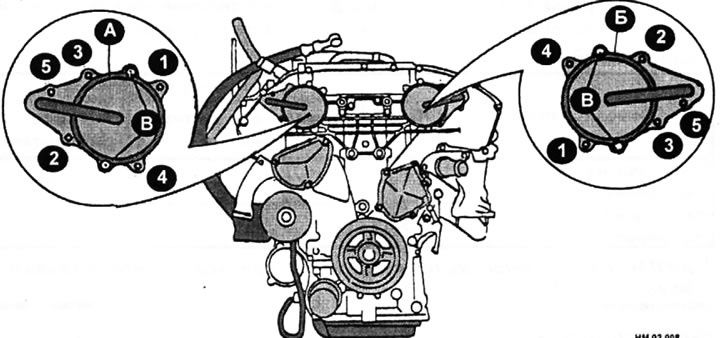
A - right cover; B - left cover; B — pin hole.
- Using a special cutter or a sharp knife with a thin blade, cut the sealant between the mating surfaces of the caps and carefully remove the caps (A) and (B).
Note: The intake camshaft is connected internally to the center hole of the sprocket. When removing, hold the camshaft horizontally until the parts are completely separated.
- Remove the right engine mount, mounting bracket and nuts.
- Raise the front of the engine with a jack (this will help provide space for removing the front portion of the timing chain housing).
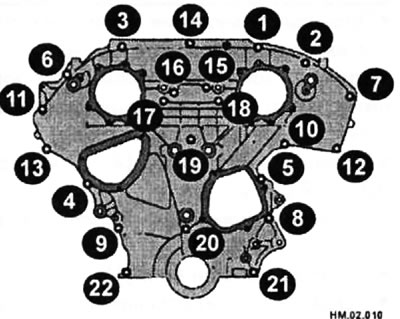
- Unscrew the mounting bolts in the sequence shown in the figure.
Note: Bolts #1 and #2 are M8, the rest are M6.
- Using a chain cutter or a sharp, thin-bladed knife, cut the sealant bead between the mating surfaces of the front and rear of the chain housing.
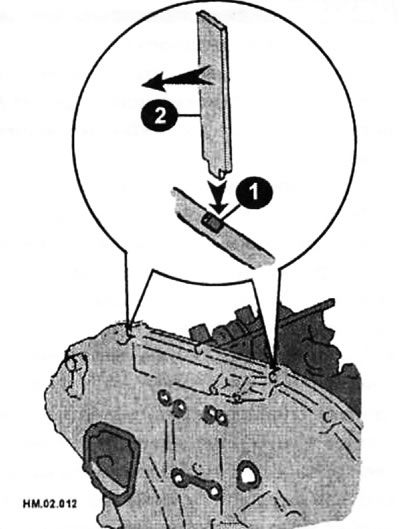
- Insert a suitable size tool (2) into the recess on the top side of the front part of the timing chain housing (1).
- Press the front part of the housing by tilting the tool (2) and remove the front part of the chain housing.
Caution: Do not use screwdrivers or similar tools. After removal, handle the front case with care and do not apply excessive force to it.
- Unscrew the bolts securing the water pump cover (2) and the chain tensioner cover (1).
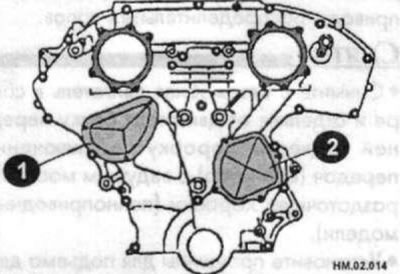
- Using a special cutter or a sharp knife with a thin blade, cut the layer of sealant between the mating surfaces of the covers and the front part of the housing.
- Remove the water pump cover and chain tensioner cover from the front of the timing chain housing.
- Using a suitable tool, remove the front crankshaft oil seal from the front of the chain housing. If you don't have a tool, you can use a screwdriver to remove it...
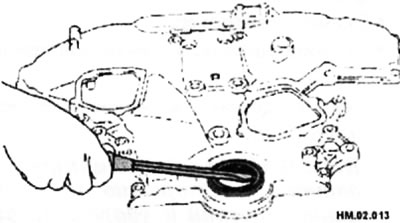
- ...or screw a self-tapping screw into the seal (arrow) and, using pliers, remove the seal.
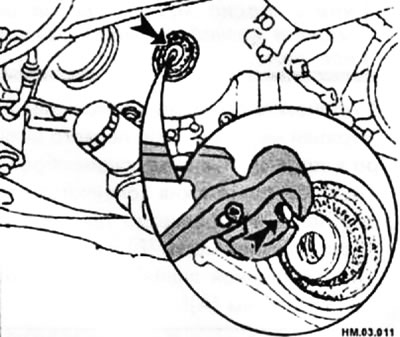
Caution: Be careful not to scratch the oil seal seat on the front of the timing chain housing and the crankshaft. The seal can be replaced without removing the front part of the chain housing.
- Remove any remaining gasket material from the mating surface of the front camshaft chain housing and any removed covers.
Caution: Be careful not to let any gasket pieces fall into the oil pan.
Installation
- Install the camshaft timing chain and associated components.
- Install the right and left guide pins (arrow) into the front of the camshaft timing chain housing and drive them in until they reach the tapered portion.
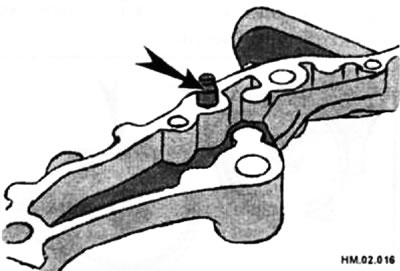
- Install the front crankshaft oil seal (1) into the front of the camshaft timing chain housing (2). Lubricate the oil seal lips with fresh engine oil.
- Install the oil seal so that the working edge of the oil seal (4) is directed towards the inside of the engine.
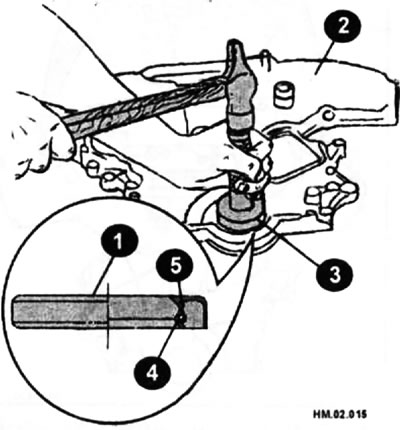
- Using a mandrel (3) or a piece of pipe of suitable diameter, drive in the seal (1) so that it is flush with the surface of the camshaft drive chain housing (2).
- Make sure that the oil seal tension spring (5) is in place and that the oil seal lip (4) is not twisted out.
- Apply to the front of the camshaft timing chain housing (on the mating surfaces with the water pump cover and the chain tensioner cover) a continuous layer of RTV silicone sealant with a diameter of approximately 3 mm.
- Install the covers on the front part of the housing and tighten the mounting bolts to a torque of 10-13 N·m.
- Install the front portion of the camshaft timing chain housing as follows.
♦ Apply 2.6-3.6 mm wide bead of RTV silicone sealant to the rear side of the front part of the timing chain housing as shown in the figure
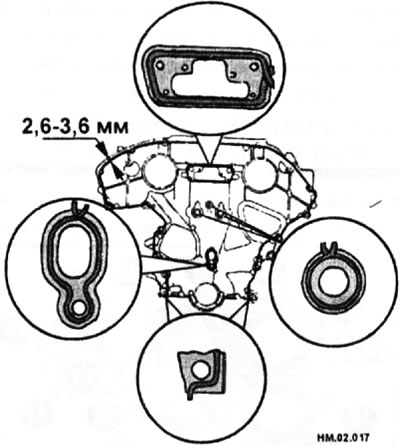
♦ Apply bead of RTV silicone sealant to the oil pan gasket as shown in the figure.
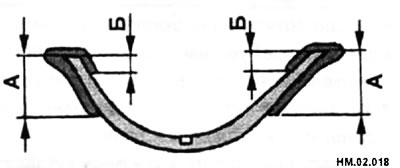
A 15 mm; B - 5 mm.
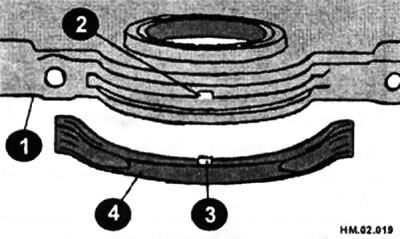
♦ Install the oil pan gasket by aligning the notch (2) on the front of the camshaft chain housing (1) with the projection (3) on the oil pan gasket (4).
♦ Apply 3.5-4.5 mm diameter bead of RTV silicone sealant to the top side of the upper part of the oil pan as shown in the figure (arrows).
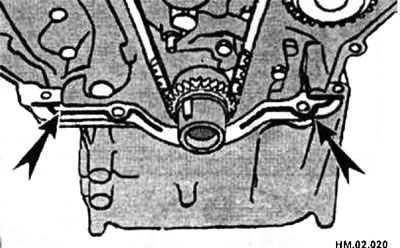
♦ Firmly install the lower end of the front portion of the timing chain housing onto the top side of the upper portion of the oil pan.
Attention: The front and rear parts of the camshaft drive chain housing must be fully contacted, and the installed oil pan gasket must be handled carefully.
- While pressing the front of the timing chain housing at its front and top, drive the pin in until its outer edge is flush with the housing surface. Stop the bolts and tighten them temporarily.
Note: Bolts #1 and #2 are M8, the rest of the bolts are M6.
- Tighten the bolts to the specified torque in the sequence shown in the figure.
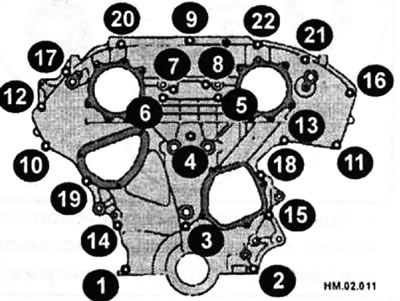
- After tightening the bolts, tighten them again to the specified torque in the sequence shown in the figure.
- Install the right engine mount, mounting bracket and nuts.
- Remove the lower part of the oil pan.
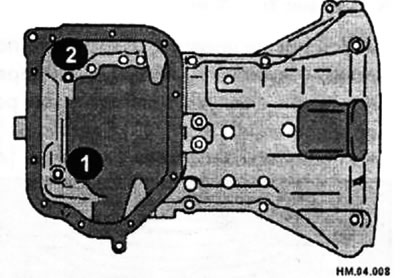
- Install the two mounting bolts (1) and (2) to the front side of the upper part of the oil pan, and tighten to a torque of 15.7-18.6 N·m.
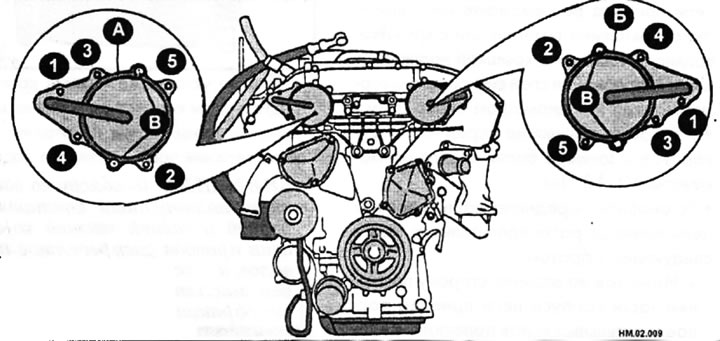
A - right cover; B - left cover; B - hole for guide pin.
- Install the lower part of the oil pan and tighten the bolts in the sequence shown in Figure HM.04.007 to the required torque.
- Install the right and left covers used to control the intake valve timing as follows:
♦ Install the sealing rings into the grooves.
♦ Apply 2.1-3.1 mm wide bead of RTV silicone sealant to the covers used to control the intake valve timing (arrows) as shown in the figure.
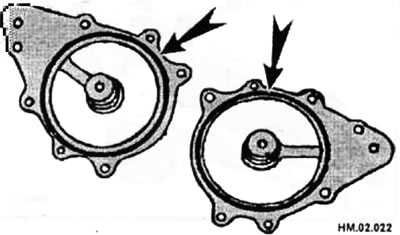
- Install the sealing ring with the bushing into the holes in the front part of the chain housing shown in the figure (arrow).
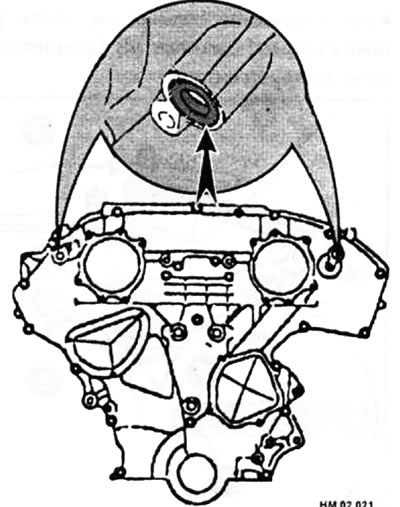
♦ Align the guide pins on the camshaft timing chain housing with the holes. Do not move the sealing rings located in the grooves.
♦ Tighten the bolts in the sequence shown in Figure HM.02.009.
- Install the crankshaft pulley.
- Further installation is carried out in the reverse order of removal.