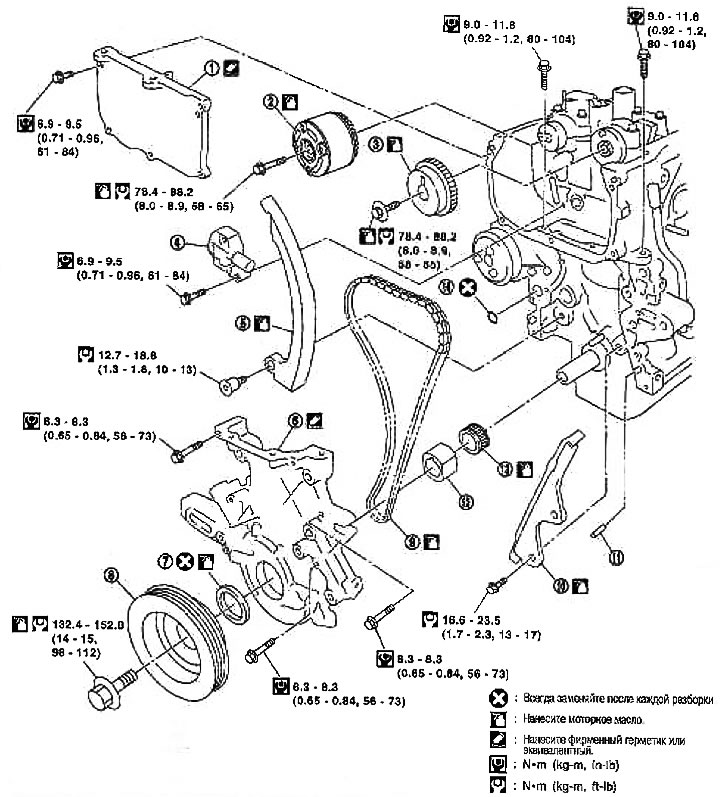
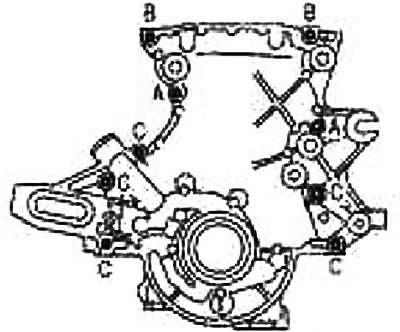
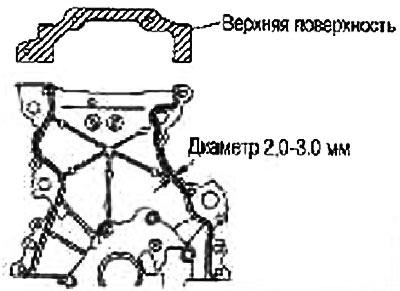
1. Front cylinder head cover; 2. Intake camshaft sprocket; 3. Exhaust camshaft sprocket; 4. Timing chain tensioner; 5. Chain guide at the bend; 6. Front cover; 7. Front oil seal; 8. Crankshaft pulley; 9. Timing chain; 10. Tensioner guide; 11. Locating pin; 12. Oil pump drive bush; 13. Crankshaft sprocket; 14. O-ring
Removing
Description of works
1. Remove the engine and transmission assembly from the vehicle. See section «Removal and installation».
2. Separate the engine from a transmission. See chapter Manual Transmission.
3. Remove the components remaining in step 3 and go to step 5.
Note: The reason for working on the engine itself is listed below.
When removing and installing the oil pan (top) you need to remove the gearbox.
For this reason, when removing and installing the front cover, the integrity of the engine support due to the supports is violated.
1. Remove the front right wheel and protective pad from the front right fender.
2. Drain the engine oil.
3. Remove the following components:
- drive belts and tension pulleys; see section «Drive belts»;
- valve cover; see section «Valve lid»;
- front exhaust pipe; see chapter Accelerator, fuel system and exhaust system;
- starter; see chapter electrical equipment;
- oil pan (lower and upper) and coarse oil filter; see above section «Oil pan and coarse oil filter»;
- right headlight; see chapter electrical equipment.
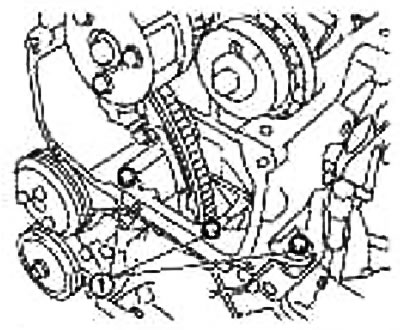
4. Perform the following operations and remove the right engine mount and right engine mount brackets (upper and lower):
- A. Fix the engine in one of the following ways;
- Install the lifting eyelets on the engine and hook with the winch. See section «Removal and installation».
- Support the bottom of the gearbox with a jack, safety stand, etc.
Attention: When supporting the bottom with a jack, do not scratch the gearbox.
- b. Remove right engine mount and right engine mount bracket (upper and lower). See section «Removal and installation».
5. Remove the generator. See chapter electrical equipment.
6. Remove the front cylinder head cover. See above section «camshaft».
7. Turn out auxiliary bolts (1) from the cylinder head.
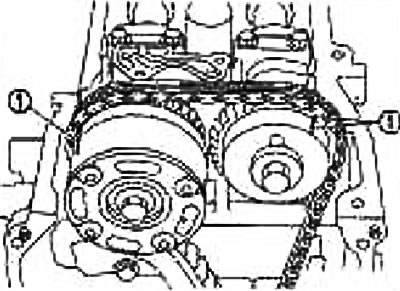
8. Set the piston of cylinder No. 1 to TDC on the compression stroke.
- A. Turn the crankshaft pulley clockwise
- b. Make sure the lobes on the intake and exhaust camshafts of cylinder #1 are facing outwards
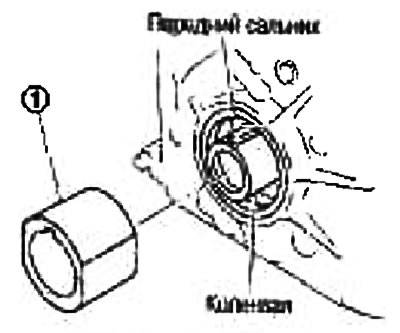
- With. Make sure the sync labels (1), knocked out on the sprockets of the intake and exhaust camshafts, have risen as shown in the figure.
Otherwise, turn the crankshaft pulley one more turn and align the marks as shown in the figure.
9. Remove the crankshaft pulley as follows:
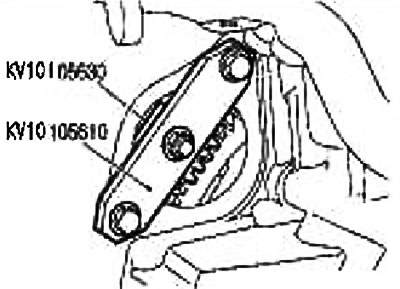
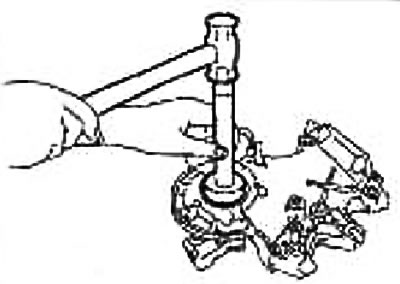
- A. Attach the ring gear holder (special tool) in the mounting holes for the starter and fix the crankshaft (see fig.).
After removing the oil pan (top) The crankshaft counterweight can also be fixed with a hammer handle, etc. Keep foreign particles out of the engine.
- b. Loosen the crankshaft pulley bolts so that they move away from their original position.
Attention: Do not unscrew the crankshaft pulley bolts, as they will serve as a fulcrum for the pulley puller.
- With. Enter grips (1) crankshaft pulley puller into the crankshaft pulley holes and remove the crankshaft pulley (2).
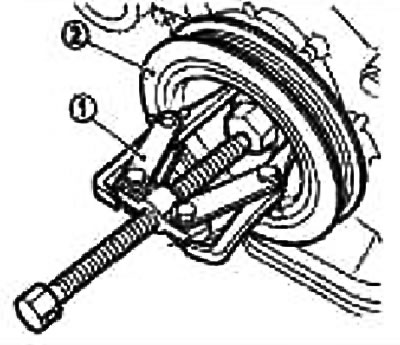
Attention: Do not catch the puller grips on the edges of the crankshaft pulley, because. Doing so will damage the internal dampers.
10. Remove the drive belt idler pulley bracket assembly from the front cover. See section «Drive belts».
11. Remove the front timing chain cover as follows:
- A. To free up space around the front cover during removal and installation, remove the oil pump drive bushing (2), around which the front seal is located (1).
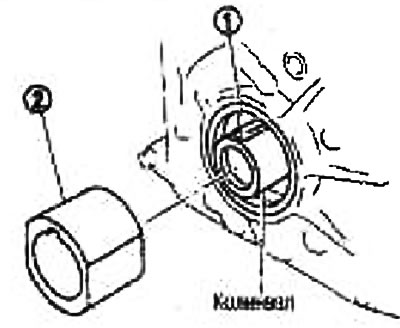
Pull out at a right angle using long pliers or two screwdrivers, etc.
Caution: Be careful not to damage the surface of the oil pump drive bushing.
- b. Carefully remove the front cover.
Remove bolts A-C as shown.
Attention:
- To avoid bending or damaging the front of the cylinder head gasket, remove it so that it neatly separates from the top of the front cover and the bottom of the gasket.
- If damaged, replace the cylinder head gasket.
- With. Remove the O-ring from the cylinder block.
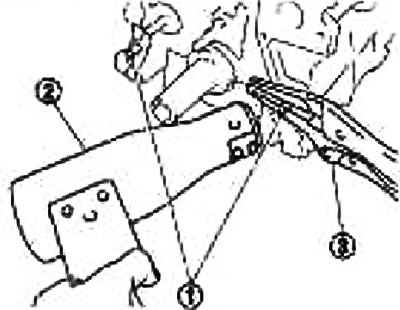
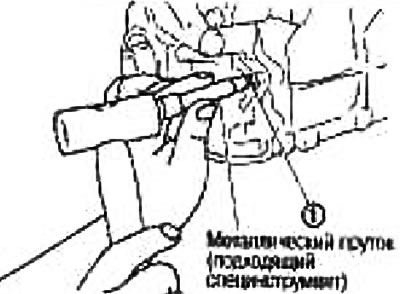
12. Remove dowel pins (1) front cover from the cylinder block.
Heating dowel pins with fan heater (2), take them out with tongs (3).
Note: This operation is performed in preparation for installing the front cover. If the timing chain is to be removed, it can be done later.
13. Remove the front oil seal from the front cover.
Insert a screwdriver behind the gland, pry and remove.
14. Set the intake camshaft sprocket to the maximum advanced position. See section «camshaft».
Note: The following operations are performed to remove the timing chain and other related components.
15. Remove the timing chain tensioner. See section «camshaft».
16. Remove the sprocket from the camshaft. See section «camshaft».
Note: Marking between camshaft sprocket and timing chain is not required.
17. Remove the timing chain, chain guide at the bend, and tensioner guide.
18. Remove the sprocket from the crankshaft.
Check after removal
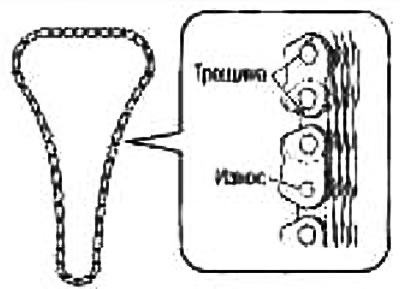
Check for cracks or excessive wear on the timing chain. Replace if necessary.
Installation
Attention:
- Using a scraper, completely remove the sealant from the contact surfaces and wipe with clean gasoline.
- After installation, remove the protruding sealant.
1. Perform the following operations and put on the timing chain and install related components.
When installing sprockets, timing chains (1) and other components refer to the figure.
Place the sprockets with the alignment mark on the front side of the engine.
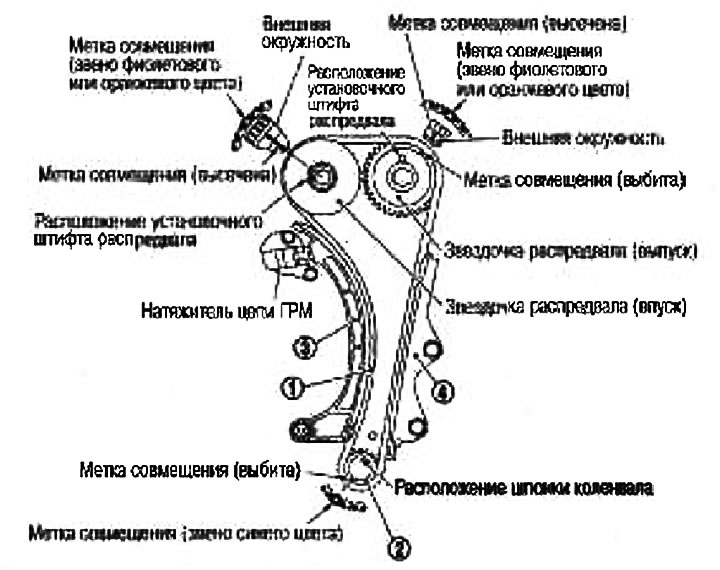
- A. Install timing chain and crankshaft sprocket (2).
You can verify that cylinder #1 is at TDC on the compression stroke by checking to see if the crankshaft key is pointing straight up.
Place the timing chain behind the front end of the camshaft so that it does not fall.
- b. Install the chain guide at the bend (3) and tensioner guide (4).
- With. Install the sprockets on the camshafts. See section «camshaft». When performing this operation, align the marks on the camshaft sprockets and timing chain.
- d. Install the timing chain tensioner. See section «camshaft».
- e. Check again that the registration marks have not moved.
- f. Temporarily install the oil pump drive bush, crankshaft pulley, and finger-tighten the crankshaft pulley mounting bolt until the crankshaft can be rotated.
- g. Rotate the crankshaft clockwise as viewed from the front of the engine. Set the intake camshaft sprocket to the maximum retard position. See section «camshaft».
- h. Turn the crankshaft clockwise several times and check for any abnormalities.
- i. Remove the components temporarily installed in par. «f».
2. Press the front oil seal into the front cover.
Press the marking on the stuffing box towards the front of the engine.
Using a suitable drift, press in the gland until it is flush with the end face of the cover.
Check that the outer lip of the seal is not damaged or burred.
3. Install the front cover as follows:
- A. Install the o-ring (1) into the cylinder block.
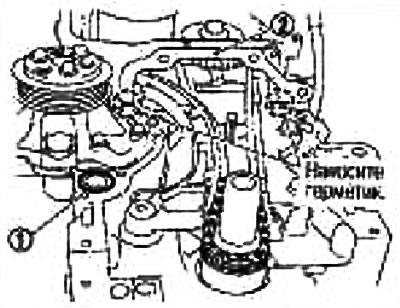
- b. Using a screwdriver, apply sealant to the contact surface between the bottom surface of the cylinder head gasket (2) and cylinder block (two places shown in the picture).
Use branded sealant or equivalent.
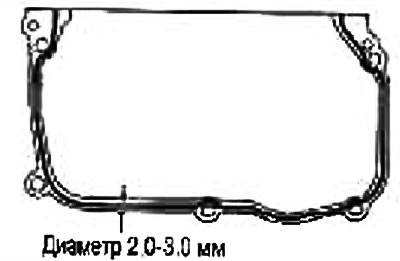
- With. Apply sealant evenly to the back of the front cover (the place shown in the picture).
- d. Apply a thin, even coat of sealant evenly to the entire top surface of the front cover.
Use branded sealant or equivalent.
- e. Putting the inner gear of the oil pump with a recess on top of the crankshaft [with a gap between the top of the front cover and the bottom of the cylinder head gasket (3)], slide the front cover (1) as close as possible to the cylinder block (left side of the picture).
- f. Lift the front cover at an angle and position it so that it simultaneously touches both the bottom of the cylinder head gasket (3), and the front of the cylinder block (2) (right side of the picture).
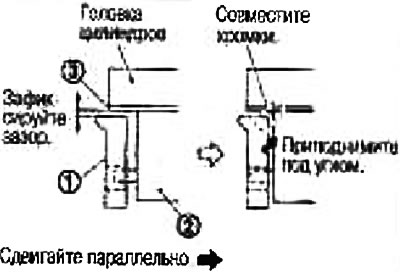
Attention:
- Do not damage the cylinder head gasket (3).
- When installing, do not allow the bead of sealant to be interrupted due to displacement away from the indicated area.
- g. Install the front cover by hand-tightening the bolts so that it does not move.
- h. Press in dowel pins (1) into the cylinder block through the front cover.
- i. Tighten the front cover mounting bolts by hand.
A (stem length under head: 25mm), IN (40 mm), WITH (50 mm).
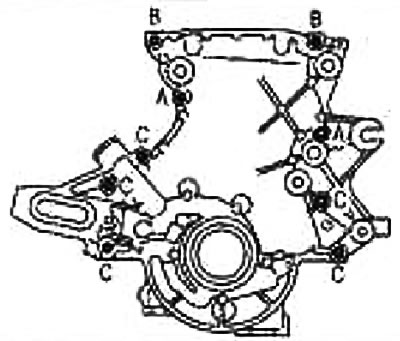
- k. Tighten the auxiliary cylinder head bolts by hand.
- l. Tighten the front cover mounting bolts and the cylinder head auxiliary bolts to the correct torque.
4. Install the oil pump drive bush (1).
When installing, align with the flats of the inner gear of the oil pump.
If they do not align, turn the inner gear with a screwdriver.
Attention: Be careful not to damage the seal lips.
5. Install the drive belt idler pulley bracket assembly. See section «Drive belts».
6. Push the pulley onto the crankshaft.
When installing, make sure the lip of the front oil seal is not upside down and that the collar compression spring is in place.
Fix the crankshaft in the same way as when removing and tighten the fixing bolts.
Caution: The seating surface of the bolts has a special torque stabilizing lubricant, so do not wipe it off or apply oil.
7. Install the front cover on the cylinder head.
Apply sealant evenly as shown.
Use branded sealant or equivalent.
8. Install the right engine mount bracket and right engine strut. See section «Removal and installation».
9. Install the remaining components in the reverse order of removal.
Check after installation
In order to allow the sealant to cure, test at least 30 minutes after the last operation of placing the components on the sealant.
After warming up the engine, check for engine oil leakage from the components.