


Removal
The components of the timing drive and the fastening parts of its covers are shown in the accompanying illustration.
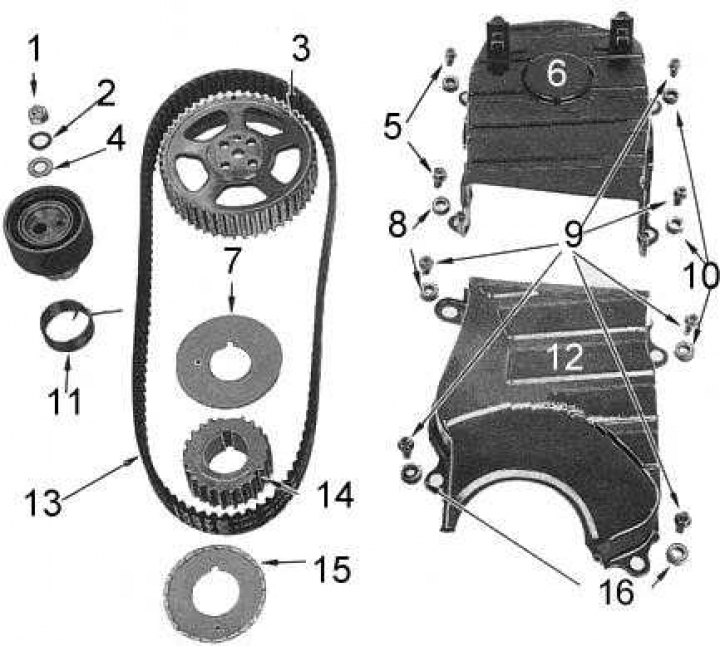
1 - nut; 2 - wave washer; 3 - distribution place; 4 - washers; 5 - bolts; 6 - top cover; 7 - guide plate; 8 - washers; 9 - bolts; 10 - washers; 11 - spring; 12 - bottom cover; 13 - timing belt; 14 - distribution mark; 15 - guide plate; 16 - washer
1. Turn the crankshaft, bringing the engine to the TDC position of the end of the compression stroke of the first cylinder. In this position, the mark on the crankshaft pulley will be aligned with the pointer on the timing belt cover, and the distributor runner will turn its nose towards the location of the high-voltage wire terminal of the spark plug of the first cylinder.
2. Disconnect the negative cable from the battery.
3. Drain the cooling system and remove the radiator and fan assembly.
4. Remove the drive belts from the steering pump, alternator and air conditioning compressor pulleys (if the latter is included in the vehicle's equipment).
5. Loosen the crankshaft pulley mounting bolt. You can use an old drive belt and a lever to prevent the pulley from turning.
6. Using a puller, remove the crankshaft pulley from the engine.
7. Release the high voltage wires from the clips on the upper timing belt cover.
8. Disconnect the carbon canister and distributor hoses from the tubes at the front of the timing belt cover and move them to the side, removing them from the work area.
9. Loosen the mounting bolts of the upper timing belt cover, move the high-voltage wires to the side and remove the cover from the engine.
10. Loosen the mounting bolts and remove the front lower timing belt cover from the engine.
11. Remove the timing belt guide plate from the crankshaft gear and make sure that the timing mark on the gear is aligned with the corresponding mark on the oil pump housing.
12. If further use of the timing belt is intended, mark its direction of rotation with an arrow. Also mark the location of the timing marks of the crankshaft and camshaft gears relative to the belt.
13. Loosen the timing belt tensioner lock nut, then turn the tensioner using a suitable bar wrench and re-secure it with the lock nut.
14. Remove the timing belt from the crankshaft and camshaft gears.
Caution! After removing the timing belt, do not allow the crankshaft and camshaft to turn to avoid damaging the pistons and valves when they hit each other.
15. Loosen the timing belt tensioner lock nut and remove the tensioner with the spring from the engine. Try to remember the order of installing the wave and flat washers of the tensioner.
16. Remove the cylinder head cover and loosen the rocker arm axle mounting bolts. This procedure is necessary to ensure the timing belt is properly tensioned when installed.
Checking the status
1. Wipe the timing belt and tensioner components with a clean, dry cloth.
2. Inspect the belt for characteristic defects (see accompanying illustration).
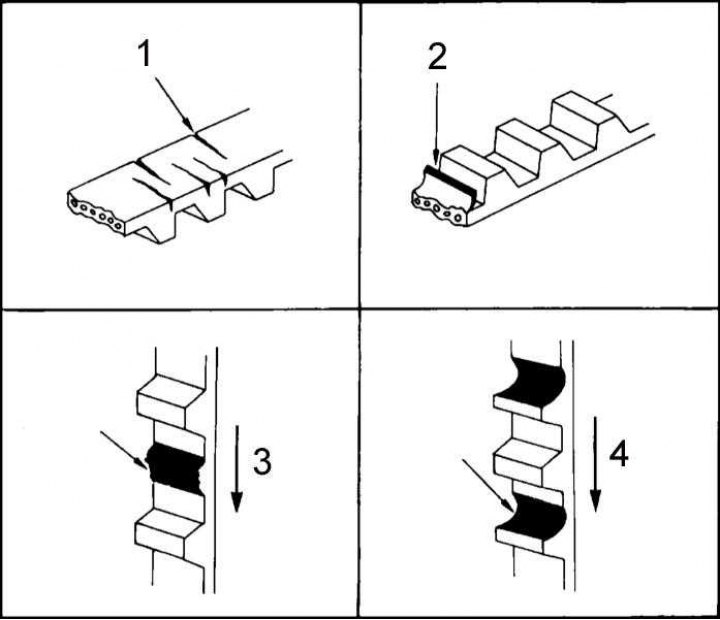
1 - cracks; 2 - stratification; 3 - loss of teeth; 4 - wear of teeth
3. Check the tensioner spring for signs of wear, deformation or other damage.
4. Manually check the freedom of rotation of the tension roller, thereby assessing the condition of its bearing.
5. Check the condition of the contact surface of the tension roller.
6. Check if the mounting bolts are damaged.
7. Replace all worn or defective components.
Installation
1. Make sure that the engine is still in the TDC position of the end of the compression stroke of the first cylinder. If necessary, adjust the position of the crankshaft.
2. Make sure that the guide pin on the camshaft is at the top point of its movement pattern.
3. Install the tensioner with the spring on the front of the cylinder block. Make sure that the end of the spring engages with the stud so that the belt is tensioned.
4. Install the flat washer first, then the wave washer (with the concave side facing the tensioner). Using a rod wrench, move the tension roller away from the belt and temporarily tighten the lock nut.
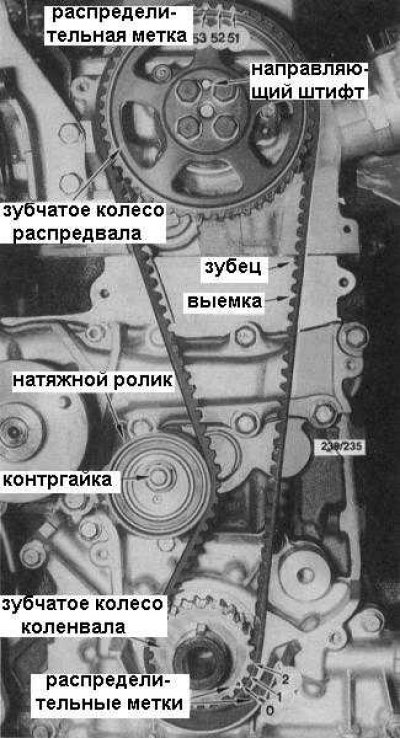
5. If a new belt is being installed, it must be fitted with seating marks. Otherwise, mark one of the notches between the belt teeth and count back 53 notches from that position. Mark this 53rd notch as well (see accompanying illustration).
Note: When installing the old belt, make sure to maintain the same direction of rotation.
6. Put the timing belt on the toothed wheels of the camshaft and crankshaft, making sure that the marks on the belt are aligned with the marks on the wheels and that the belt rotates correctly (if the old one is installed).
7. Loosen the tensioner lock nut and allow the tensioner to tighten the belt.
Note: The rocker arm assembly mounting bolts must be loosened as mentioned above, otherwise the belt tension will not be correct.
8. Using a rod wrench, swing the tensioner two or three times in both directions to ensure that the belt tension is adequate.
9. After locking the tensioner in this position with a rod wrench, tighten its lock nut to the required force.
Note: To avoid noise and/or accelerated belt wear, do not set the belt tension force greater than the force developed by the tensioner spring.
10. With the camshaft guide pin at the top of its stroke, tighten the rocker arm axle bolts for the fourth, fifth and sixth cylinders to the required torque.
11. Using a wrench placed on the crankshaft pulley bolt, turn the engine clockwise so that the guide pin drops to its bottom position. Now tighten the rocker arm axle bolts of the first, second and third cylinders to the required torque.
12. As a final check, rotate the engine further clockwise, returning the camshaft guide pin to the top position and ensure that all rocker arm shaft mounting bolts are tightened to the required torque.
13. Install the timing belt guide plate onto the crankshaft pulley, with the concave side facing outward. Install the upper and lower timing belt covers. Make sure the seals are installed correctly. Tighten the mounting bolts to the required torque.
14. Install the cylinder head cover.
15. Install the remaining components in the reverse order of their removal, paying attention to the following points:
- Install the water pump pulley, fan and radiator of the cooling system in accordance with the instructions;
- Adjust the tension of the drive belts.