


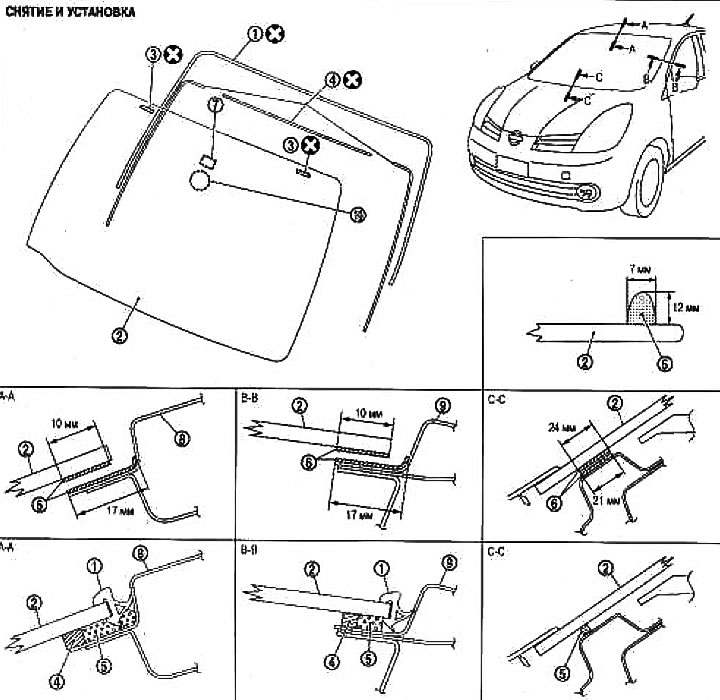
1. Windshield molding; 2. Windshield; 3. Clamp; 4. Rubber partition; 5. Sealant; 6. Primer; 7. Mirror base; 8. External roof panel; 9. Outer body panel; 10. Rain sensor base
Removal
1. Remove the interior mirror.
2. Remove the front pillar trim.
3. Remove the ceiling. See section "Interior trim".
(The full article is available on the resource: «www.NissanBook.ru»)
4. Remove the windshield wiper arms. See chapter Electrical equipment.
5. Remove the hood grille cover. See section "Exterior finishing".
6. To avoid damage to painted surfaces, apply protective tape around the perimeter of the windshield.
7. Remove the glass using a string or electric cutter (A) and an inflatable bag (B).
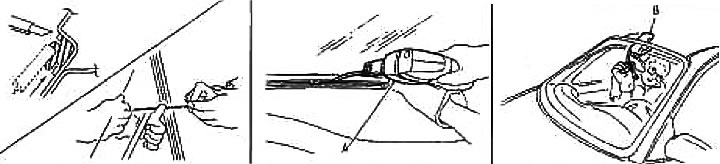
Note: If reinstalling the windshield, make marks on the body and glass.
Attention:
- When cutting glass from a car, wear protective glasses and thick gloves to prevent glass fragments from getting into your eyes or injuring your hands.
- If you are reusing the windshield, do not use a knife or power cutter.
- Be careful not to scratch the glass during removal.
- Do not stand the glass on its end. Small chips can turn into cracks.
8. Remove the windshield using suction cups.
Installation
The rubber partition should be put back in place.
Use a genuine Nissan urethane adhesive kit or equivalent and follow the instructions included with it.
While the urethane adhesive is curing, lower the window in one of the doors. This will prevent the air pressure in the car from "pushing" the windshield out when the door is closed.
The fastener and molding should be installed tightly so that it fits properly and leaves no gaps. Install the molding from the bottom to the top corner, connect the joint and then from the corner to the center.
The vehicle should not be driven until the urethane adhesive has completely cured (not less than 24 hours). Curing time depends on temperature and humidity.
Attention:
- Primers and glues are flammable. Do not store them close to heat or open flames.
- Do not swallow any materials included in the kit; they are harmful to health and can cause skin and eye irritation. Avoid contact with skin and eyes.
- Carry out work in an open, well-ventilated area. Do not inhale vapors. They may cause harm to health. If vapors get into the respiratory tract, immediately go to fresh air.
- Driving your vehicle before the urethane adhesive has fully cured may affect the performance of your windshield in the event of an accident.
- Do not use glue that has expired. The shelf life of glue is six months from the date of manufacture. Observe the expiration date or the date of manufacture printed on the packaging.
- Store primers and glue in a cool, dry place. Ideally, they should be kept in the refrigerator.
- Do not leave tubes of primer or glue unattended with the cap unscrewed or removed.
- The vehicle should not be driven for at least 24 hours or until the urethane adhesive has completely cured. Curing time is dependent on temperature and humidity. The lower the temperature and humidity, the longer the curing time.
Eliminate water seepage on the windshield.
Water leakage can be eliminated without removing and reinstalling the glass.
If water is leaking between the urethane adhesive and the body or glass, determine the length of the leak,
This can be done by pouring water and pressing the glass outwards.
To stop a leak, first apply a primer to the leaking area (if necessary), and then urethane glue.