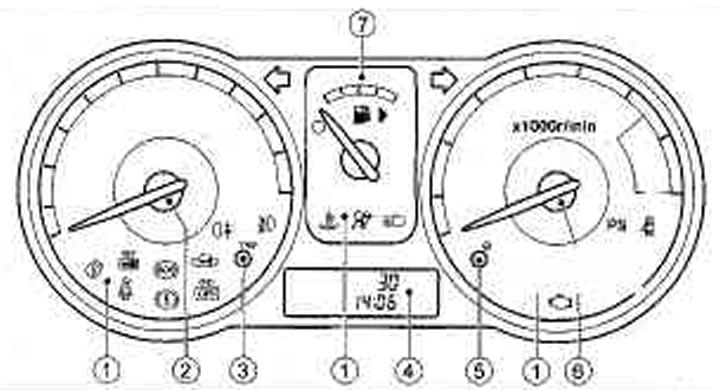
1. Control lamps and indicators; 2. Speedometer; 3. Button for resetting the meter readings; mileage/onboard computer switch*,; 4. Display: clock, odometer, odometer, on-board computer', outdoor temperature gauge, oil change odometer*; 5. Button for resetting the mileage indicator before changing the oil / button for setting the clock; 6. Tachometer; 7. Fuel gauge
* if available
Speedometer
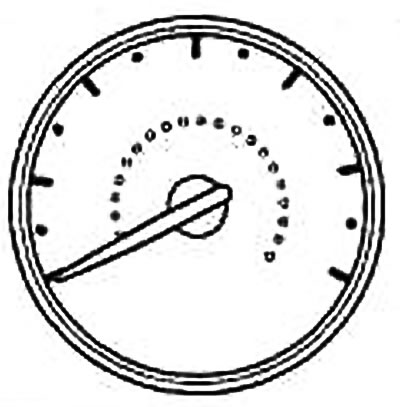
The speedometer is designed to indicate the speed of the car (km/h or miles/h). The scale scale depends on the vehicle version.
Tachometer
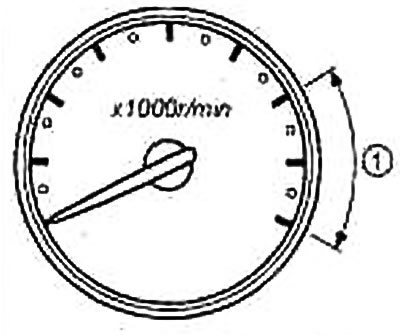
The tachometer shows the engine speed (min-1) Do not allow the engine to run when the arrow is in zone 1.
Attention: If the tachometer needle approaches the red zone of the scale, turn on a higher gear. Running the engine while the tachometer needle is in the red zone can damage the engine.
Indicator of the amount of fuel in the tank
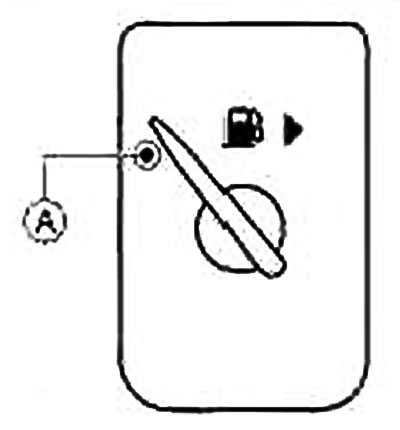
- When the engine is not running, the pointer is set to the minimum mark on the fuel level scale.
- The pointer needle may fluctuate slightly during braking, cornering, vehicle acceleration, and when driving uphill and downhill.
- D badge) >> indicates the location of the fuel filler cap on the starboard side of the vehicle,
- Ⓐ Warning lamp for critical fuel level in the tank
Note:
- Warning lamp Ⓐ of the critical level of fuel in the tank lights up when there is a small amount of fuel left in the tank. If possible, fill the tank without waiting for the pointer to drop to the lower mark on the scale. The lower position of the arrow corresponds to the reserve fuel in the tank.
- To attract the driver's attention, the first illumination of the low fuel warning light Ⓐ is accompanied by a three-time warning horn.
Attention: Fill up with fuel until it runs out completely.
Odometer / odometer for two trips
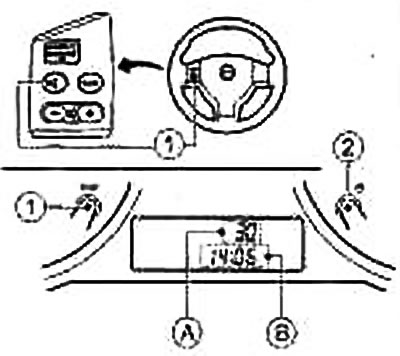
- ① Two-trip odometer switch/trip computer switch*/switch Ⓐ (information) on the steering wheel*
- ② Start oil change countdown switch / clock setting switch
- Ⓐ Total vehicle mileage (odometer) / mileage on one of the two trips / on-board computer display / outside temperature display
- Ⓑ Time display
* if available
Note: The LCD information display only works after the ignition is turned on.
Odometer. Trip counter for two trips
The odometer displays the total mileage of the car.
The trip counter displays the distance for one of the selected trips.
After the ignition is turned on, the total mileage / trip mileage is displayed in the field Ⓐ
Display switching:
Press switch Ⓘ of trip odometer/trip computer TRIP switch (if available) /switch ⓘ (information) on the steering wheel to change information in the following order: Total mileage → Mileage A → Mileage B → Trip computer modes (if available) → Outside temperature display → Total mileage
Reset trip odometer readings:
To reset the trip odometer while in Trip A or Trip B mode, press the odometer reset switch Ⓘ / trip computer TRIP switch (if available) /switch ⓘ) on the steering wheel (if available) and keep the switch pressed for at least 1 second.
On-board computer (if available)
With the ignition key in the ON position, you can enter the on-board computer mode by pressing the Ⓘ TRIP button on the on-board computer or the switch on the steering wheel console (button ⓘ) (if available). You can select the following on-board computer readings:
- Fuel range
- Average fuel consumption
- Average moving speed
- Trip duration
Fuel range (→about)
You can find out the approximate distance in kilometers that the car can travel with the remaining fuel in the tank. This indicator is calculated continuously, taking into account the amount of fuel in the tank and the actual fuel consumption.
A low fuel warning function is provided: if there is little fuel left in the tank, the mileage until the next refueling is automatically displayed, and the message symbols flash to attract the driver's attention, If you want to return to the mode that was activated before the low fuel warning, then press the Ⓘ TRIP switch on the trip computer or the ⓘ switch on the steering wheel console. With an extremely small amount of fuel in the tank, the display shows symbols instead of the remaining mileage «_ _ _», and the icon (→about) continues to flash.
Average fuel consumption (l/100km)
The average fuel consumption is calculated for the period since the last reset of the counter. The displayed average fuel consumption can be updated by pressing the Ⓘ TRIP button on the trip computer or the ⓘ button on the steering wheel remote control (button pressed for at least 1 second).
Average vehicle speed (km/h)
The average driving speed is calculated for the period since the counter was last reset The average driving speed displayed can be updated by pressing the Ⓘ TRIP button on the trip computer or the ⓘ button on the steering wheel remote control (button pressed for at least 1 second).
Travel time
Travel time is counted for the period since the last reset. The displayed travel time can be updated by pressing the Ⓘ TRIP button on the on-board computer or the ⓘ button on the steering wheel remote control (button pressed for at least 1 second).
Resetting all on-board computer readings
To reset all on-board computer readings, except trip A distance and fuel range, press the button Ⓘ on the trip computer or the button located on the steering wheel remote control (button ⓘ). Keep the button pressed for at least 3 seconds.
Outside temperature gauge (if available)
Outside temperature value (°C) displayed in field Ⓐ of the display when the ignition switch is in the ON position. A positive temperature value is not specially indicated, a negative temperature value is preceded by the sign «minus».
Low outdoor temperature warning
When the outside temperature falls below 4°C, the display will flash. The low temperature warning remains active until the outside temperature rises above 4°C.
Oil change indicator (if available)
- 1. Button Ⓘ TRIP on-board computer (or switch ⓘ on the steering wheel panel*)
- 2. LCD display
- 3. Start oil change countdown switch / clock setting switch
*if available
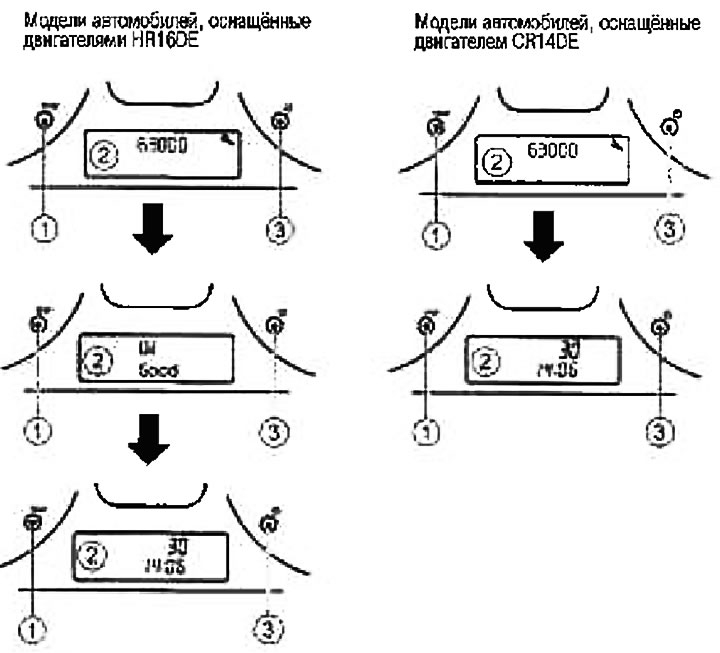
After turning on the ignition (ignition key in the ON position) on the display for 5 seconds appears the image of a wrench and the value of the mileage remaining until the next maintenance (before changing engine oil). The wrench icon and service interval are then replaced by the engine oil level indicator (for vehicles with HR16DE engines. see also below p. «Control lamp of pressure drop of engine oil». The engine oil level display then changes to the latest odometer/double trip odometer/trip computer reading (if available) / outside temperature that was displayed before the ignition key was turned to the acc, OFF or LOCK position.
Oil level indicator (models with hr16de engine)
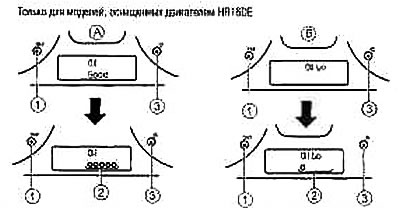
The indicator that appears on the display allows the driver to get information about the engine oil level.
If the engine oil level is sufficient Ⓐ the display shows the text for 10 seconds «Oil Good» (oil level is ok). When the oil level is low Ⓑ the display shows the text for 30 seconds «Oil L0» (low oil level), this text flashing to attract the driver's attention After a short press on the Ⓘ TRIP button on the on-board computer (or on the switch ⓘ on the steering wheel panel, if equipped) text «Oil Good» or «Oil L0» is replaced by a symbolic display of the oil level value ②.
For the procedure for changing the oil, see also the section «Maintenance and do-it-yourself operations».
Setting the oil change indicator
You can set the mileage remaining until the next engine oil change. To do this, press the button ③ of the clock setting / mileage before maintenance switch and hold this button for three seconds or more while the wrench icon and the maintenance interval are displayed, the indicated characters on the display will flash, and the previously set interval will be displayed. Press the button ③ to increase the maintenance interval.
Each press increases the interval by 1000 km. The maximum possible maintenance interval is 63,000 km, after which it returns to zero.
If no further action is taken, the display will show «Oil» (oil) and oil level indication, which confirms the successful setting of a new value for the interval before changing the oil.
If you set the oil change distance to 0, the display will not show the remaining oil change distance and wrench icon, but will directly show the status of the lubrication system («Oil Good» or «Oil L0» on vehicles with HR16DE engine). To return to the oil change mileage and wrench display, after turning on the ignition, press and hold the clock/mileage before maintenance switch button ③ for three seconds or more and set the mileage as described above.
Caution: The engine oil level should be checked regularly, at least every time you fill up with fuel. Insufficient oil will damage the engine and will not be covered under warranty.
Clock with digital display
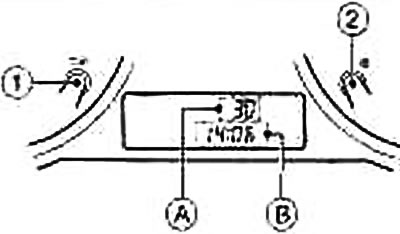
- ① Trip odometer switch/trip computer switch*
- ② Oil change start countdown switch*
- Ⓐ Total vehicle mileage (odometer) /mileage on one of the two trips/on-board computer display*/outside temperature display*
- Ⓑ Time display
* if available
After switching on the ignition, the current time is displayed in field Ⓑ of the display.
12/24 format selection Ⓑ
The 12-hour and 24-hour time indication modes are switched by briefly pressing the setting button ②. Please note that if the clock displays 0:01 in 24-hour format, then after switching to 12-hour format, the clock display will show 12:01 AM.
Setting the time in the digit of the clock Ⓑ
To switch the watch to time setting mode, press and hold the set button ② for at least three seconds. At the same time, the images of numbers in high-order digits (watch), delimiter (colon) and symbols AM or PM (if the watch is in 12-hour time display mode) start flashing at a certain frequency. Each time you press the set button ②, the clock changes by 1 hour.
In the 12-hour format, the display shows the symbol AM or PM, which alternate at noon and midnight. If the setting button ② is not pressed within 5 seconds, the watch will enter the time setting mode in minutes.
Setting the time in minutes Ⓑ
In this mode, the images of digits in the least significant digits (minutes) and separator (colon) flash at a certain frequency.
With short-term (no longer than one second) pressing button ② will change the time by 1 minute. When pressed for more than 1 second, the time changes at a rate of 4 minutes per second. When pressed for more than 3 seconds, the time changes at a rate of 8 minutes per second.
If the setting button ② is not pressed for 5 seconds, the watch will enter the time setting mode in digits of seconds.
Zeroing of readings in digits of seconds
Pressing the setting button ② resets the second digits (flashing colon).
If the setting button ② is not pressed within 60 seconds, the minutes will advance by 1 minute and the clock will return to normal operation.