


When removing the spark plugs, inspect their condition (arrows). It is recommended to remove the plugs every 10,000 km to visually assess the engine's mechanical condition.

A small sediment of light brown or gray color (or rusty red when using unleaded fuel) on a spark plug that has been running for any period of time is considered normal. Any other color or abnormal amount of sediment indicates that there is a problem with the engine. The gap between the central and side electrodes may increase by no more than 0.025 mm every 1500 km under normal conditions.
If the spark plug is installed in an engine that is running properly, the spark plugs can be removed, cleaned, adjusted (gap) and reinstalled without any damage to the engine.
If the spark plug is dirty and works intermittently, then you need to investigate the cause and clean or replace the spark plug.
Spark plugs suitable for use in an engine come in a wide variety of heat ratings. The amount of heat the spark plug absorbs is determined by the length of the lower insulator. The longer the insulator, the hotter the spark plug will be when operating; the shorter the insulator, the colder it will be. Spark plugs that absorb (or save) little heat and remain too cold, they will collect lead, oil and carbon residues because they are not hot enough to burn these residues. This leads to pollution and, consequently, interruptions in operation. Candles that absorb too much heat have no deposits. But the electrodes burn out quickly and, in some cases, the result can be premature (pre-ignition). This ignition occurs when the tip of the spark plug becomes so hot that it ignites the fuel mixture before the actual spark ignition occurs. This pre-ignition is usually the cause of detonation knocks at low speed and high load. Under severe conditions, the temperature may become sufficient to ignite the combustion mixture in the combustion chamber before it reaches the spark plug tip. In this case, great damage will be caused to pistons, rings and valves.
In most cases, the heat ratings recommended by the manufacturer are correct and will provide good performance over a wide range of operating conditions. However, if you mostly drive long distances at high speeds, you can install spark plugs that are one unit "colder" than the standard ones. If you mostly drive short distances where the engine may not always reach operating temperature, hotter plugs can help burn off the deposits that tend to build up under these conditions.
Caution: Use spark plugs recommended by the manufacturer. Don't experiment, especially with cheap counterfeits of leading manufacturers (BOSCH, etc). Otherwise, you will not be able to avoid a major engine overhaul (ahead of schedule).
Removal
Caution: When removing the spark plugs, dirt located near the mix may get into the spark plug holes. This can lead to serious engine damage.
- Use compressed air to blow out any foreign particles from the recesses around the spark plugs. If the surface around the spark plugs is oily, clean it with a suitable cleaner and then rinse with water.
- Disconnect the ignition coil plugs.
- Remove the ignition coils from the spark plugs.
- Loosen all spark plugs using a special spark plug wrench, turning them approximately two turns.
Please note: The cylinder head is made of aluminum. If possible, remove the spark plugs when the engine is cold to avoid damaging the threads.
- If the spark plugs are difficult to remove, apply motor oil or silicone spray around the spark plug seat and wait a few minutes.
- Remove the spark plugs by unscrewing them by hand. Arrange the spark plugs in order according to the cylinder numbers.
- Check the spark plugs. The condition of the spark plugs will help assess the condition of the engine and prevent possible malfunctions.
Examination
- Check the spark plugs for deposits and wear.
- If the spark plugs do not need to be replaced, clean them thoroughly. Remember that any sediment on the spark plugs reduces their efficiency. Spark plugs can be cleaned in a special spark cleaner, which is sometimes found at service stations, or they can be cleaned with a stiff brush. After cleaning, the electrodes should be processed with a flat file. Do not use sandpaper as it may leave small particles on the electrodes. The electrodes should be processed to a flat state, they should become flat and with sharp corners, rounding the electrodes reduces the voltage on them by more than 50%.
- Check the spark plug gap before installation. The ground electrode must be parallel to the working surface of the central electrode. The gap between the spark plug electrodes plays an important role, because if it is too large or too small, the spark size and its efficiency will be seriously affected. The gap should be about 11 mm.

- To set the correct gap, first measure the gap with a feeler gauge (1), and then bend the ground electrode until the gap is the desired size. Under no circumstances should the central electrode be bent, as this may crack the insulator, which will lead to failure of the spark plug.
- A special 1.1 mm thick feeler gauge should pass through the gap with a slight pinch.
- Make sure the washer is level and free of carbon deposits. Make sure the spark plug hole in the cylinder head is clean.
Caution: Never adjust the gap on working spark plugs with platinum-coated electrodes.
Gap adjustment
New spark plugs also need to have the gap (A) between the electrodes carefully checked and adjusted to ensure a reliable and powerful spark. To adjust the gap, use a special gap adjustment device with wire feeler gauges (arrow).
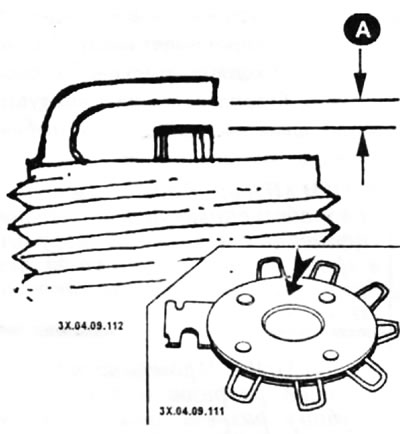
- Remove the candles from their boxes. If the spark plugs have removable caps, tighten them. If not, then replace the caps from the old spark plugs. The correct gap (A) between the spark plug electrodes should be 1.1 mm.
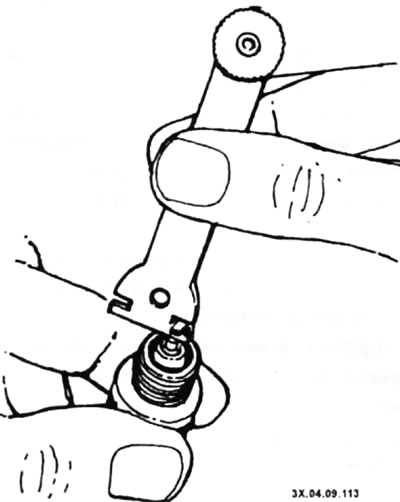
- If the gap is correct, the feeler gauge should enter with a slight sticking sound. If the probe passes through the gap without jamming or does not pass through the gap at all, then bend the side ground electrode using a special device for changing the gap.
- Be careful not to bend the side electrode too much or too often. It can break off in the engine and cause it to break down.
Installation
- Lubricate the spark plug threads with motor oil.
- Apply a small amount of aluminum-based anti-seize lubricant to the first few threads of each spark plug.
- Crank the engine with the starter for about 5 seconds to blow out all the dirt from the spark plug holes.
- Screw each spark plug in by hand until it seats. Little effort is required to screw in the spark plug. If you need to apply significant force, this means that the thread is warped. Remove the spark plug and try again.
- Tighten the spark plugs to a torque of 19.6-29.4 Nm. If there is no torque wrench, then tighten the candles with your fingers, and then pull another 1/4-1/2 turn with the candle wrench.
Caution: Do not overtighten the spark plugs.
(Information copied from the website NissanBook.ru)
- Install the ignition coils onto the spark plugs.
- Connect the negative cable to the battery.