


Table of contents: Removal and disassembly ↓ Cleaning and checking the condition ↓ Assembly and installation ↓
Note: The design of the cylinder head does not allow removal of the tappets until the head itself and its gasket have been removed. In view of the above, the procedure for removing the tappets is discussed separately in the Section dedicated to servicing the camshaft and tappets.
Removal and disassembly
1. Disconnect the negative cable from the battery.
2. Remove the air cleaner assembly.
Note: To prevent debris and foreign objects from entering the carburetor, cover its neck with a rag.
4. Mark and disconnect all hoses and cables that interfere with removal of the cylinder head cover.
5. Gradually, a quarter turn at a time, loosen the cover mounting bolts - start with the outer bolts and work inward. Remove the cylinder head cover, being careful not to allow dirt or debris to enter the engine.
6. Using a screwdriver or wrench, loosen the valve clearance adjustment screws on all valves until the load is completely removed from the valves.
7. Gradually, moving from the outside in, loosen the rocker arm axle pedestal bolts.
8. Rotate the push rods to release them from the rocker arms and carefully remove the latter assembly.
9. Remove the push rods, stacking them according to their placement on the engine - it is best to make a special template strip from thick cardboard for orderly storage of the push rods.
10. Remove the components from the rocker shaft, stacking them in the order they were placed on the assembly.
Cleaning and checking the condition
1. Wash all removed components in a suitable solvent, then dry thoroughly by blowing with compressed air.
2. Check the patency of all oil flows of the assembly components, blow out the channels and holes with compressed air.
3. Check all components for signs of wear and mechanical damage. Replace defective parts.
4. Check the condition of the rocker arm working surfaces that contact the valve stems. If signs of excessive wear are detected, replace the defective rocker arm. Light mechanical damage in the form of scratches can be repaired using a dressing stone with oil.
5. Using a suitable micrometer, measure the inside diameters of the rocker arm axial holes and the rocker arm shaft diameters at the rocker arm locations. By subtracting the first results from the second, determine the rocker arm mounting clearances. If the clearances exceed the permissible values (see size and adjustment tables at the end of the Manual) replace worn components.
The source of the article is on the website: www.NISSANBOOK.ru
Assembly and installation
Assembly and installation are carried out in reverse order.
1. Before starting assembly, generously lubricate the working surfaces of the rocker arms and their axles with engine oil.
2. Place the assembly components on the rocker shaft in the same order as before (valve train components are shown in the accompanying illustration).
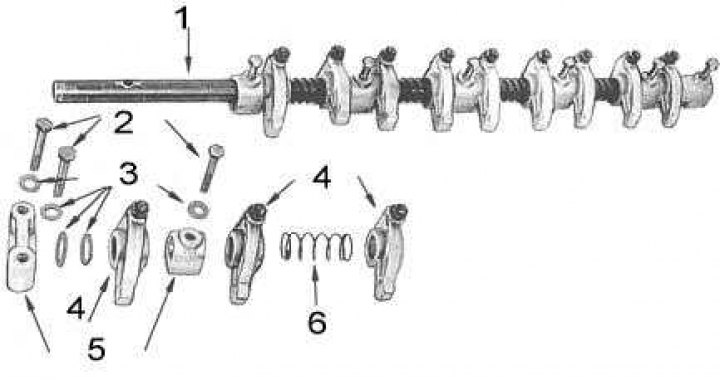
1 - rocker shaft assembly; 2 - bolts; 3 - washers; 4 - rocker arms; 5 - pedestals; 6 - spring
3. Lubricate the ends of the push rods with engine oil and insert the rods into their sockets in the cylinder head.
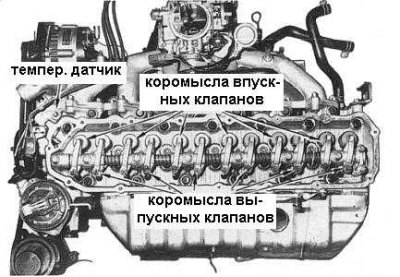
4. Install the rocker arm assembly into the cylinder head (see accompanying illustration) and tighten the mounting bolts by hand. Make sure that the spherical tips of the rocker arm screws are correctly positioned in the sockets of their pushrod seats.
5. Tighten the pedestal mounting bolts in several stages to the required torque.
6. Set the valve clearances on a cold engine. Temporarily install the cylinder head cover and air cleaner and, after starting the engine, warm it up to normal operating temperature. Check the valve clearances on a warm engine and adjust if necessary.
7. Remove the cylinder head cover and reinstall it with a new gasket, with the engine oil filler neck facing forward. Install the mounting bolts and tighten them in two stages, moving in a spiral from the inside out.
8. Reconnect all hoses and cables removed during the removal process.
9. Reinstall the air cleaner assembly.
10. Start the engine and check it for signs of oil leaks.