Note. The following special tools are required for the work described below: micrometer (for measuring the diameters of the camshaft journals), plunger type dial gauge (to check shaft runout).
Removing
Note. The camshaft can be removed from the engine installed on the car. However, you will first have to remove the grille, radiator, air conditioner condenser (if included) and a cattle breaker, which is why the compilers of this Guide recommend that if you have access to lifting equipment, you still need to remove the engine.
1. Remove the engine from the car.
2. Remove the cylinder head with gasket.
3. Remove the pushrods from the cylinder block by stacking them in the order of installation on the block.
4. Install the dial gauge with the plunger against the surface of the camshaft sprocket (see accompanying illustration), then, moving the shaft with the lever in the longitudinal direction, measure the value of its axial play. If the play is greater than 0.05 mm, replace the shaft thrust plate.
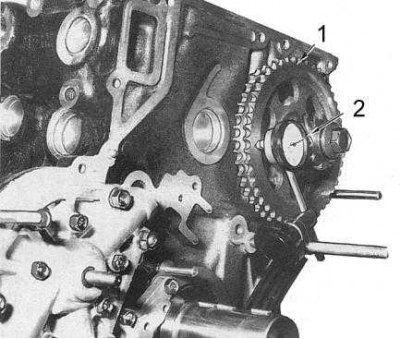
1 - camshaft sprocket
2 - dial gauge
5. Remove chains and sprockets.
6. Give bolts of fastening of a persistent plate of a camshaft. Prepare a piece of strong wire that can be inserted into the cylinder block to lift the camshaft while it is being removed.
7. Temporarily reinstall the camshaft sprocket to facilitate the removal of the latter.
8. Carefully remove the camshaft, using the prepared wire to hold the rear end of the shaft in a raised position in order to prevent damage to the soft material of the bearings.
Status check
Note. An explanatory illustration will assist in understanding the procedures described below.

1 - bolts; 2 - distributor drive gear; 3 - washer; 4 - asterisk; 5 - thrust plate; 6 - key; 7 - working protrusion of the cam; 8 - camshaft
1. Wash the camshaft and tappets in a suitable solvent, then dry them with compressed air.
2. Check the lobes and bearing journals for signs of wear in the form of cavities and wear of the surface hardened layer. Using a micrometer, measure the height of each cam and the diameters of the shaft bearing journals. Record the results and compare them with regulatory requirements (see tables of sizes and adjustments at the end of the guide). Replace the camshaft if necessary.
Note. If cavities or other signs of excessive wear are found on the cams of the shaft, it is also necessary to carefully inspect the working surfaces of the pushers. When replacing the shaft, it will be correct to replace the pushers.
3. Support the camshaft on two V-shaped blocks and use a dial gauge to measure its runout. Replace the shaft if necessary.
4. Check the camshaft bearings for scratches, nicks and loose material. If bearing wear is suspected, measure bearing diameters with a micrometer. The compilers of this Guide recommend that the replacement of bearings be carried out in a car service workshop specializing in the restoration of engines, where there is all the equipment necessary to complete this task.
5. Measure the outer diameters of all tappets and compare the measurements with the regulations (see tables of sizes and adjustments at the end of the guide). If necessary, replace pushers.
Installation
Installation is carried out in the reverse order of removal.
1. Install the camshaft in the cylinder block, as with removal, using a temporarily worn sprocket and a piece of strong wire to facilitate the procedure. Make sure that all bearing surfaces are lubricated with clean engine oil.
2. Install the pushers in their original sockets (if not replaced).
3. Install the camshaft thrust plate (a new one, if the axial play of the shaft exceeded the allowable value). Tighten the plate mounting bolts with a force of 7÷8 Nm.
4. Install other components removed during disassembly.