


Table of contents: Removal ↓ Installation ↓
Removal
Note: You will need a sealant pad cutting tool to perform the following procedures.
1. Disconnect the negative cable from the battery.
2. Jack up the front of the car and place it on supports.
3. Remove the drain plug from the oil pan and drain the engine oil into a suitable container. Screw the plug back in, tightening it securely.
4. Loosen the engine mounting bolts to the transmission reinforcement brackets, remove the brackets from the engine. Loosen the bolts and nuts securing the lower rear plate (shield) of the engine to the flywheel housing.
5. Gradually, in several stages, loosen the engine oil pan mounting bolts. Move in a spiral from the edges of the pan to the middle.
6. If the pan is installed without a gasket, use a special tool to cut through the sealing sealant cushion through which the pan is attached to the engine crankcase. To avoid damage, do not use this tool to release the rear oil seal holder under any circumstances
7. The tray installed on the gasket should be tapped with a soft-faced hammer to release it.
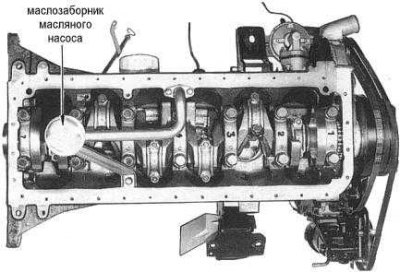
8. If necessary, loosen the mounting bolts and remove the oil intake from the engine (see accompanying illustration - the numbers mark the main bearing caps). Discard the O-ring.
Installation
Installation is carried out in reverse order.
1. Clean the mating surfaces of the oil pan and crankcase, carefully removing all traces of old gasket/sealant material.
2. Carefully inspect the pallet, checking it for mechanical damage. Perform the necessary repairs or replace the defective pallet.
[The article was obtained from the portal www.NISSANBOOK.ru]
3. Wash the inside surfaces of the oil pan and the oil pickup assembly with a suitable solvent, completely removing all traces of carbon deposits and sludge.
4. Install the oil pump oil intake with a new sealing ring and tighten its mounting bolts with a force of 16÷19 Nm.
Note: Either a gasket or a sealant pad can be used to seal the oil pan to the crankcase. If you are not sure that the mounting flange is absolutely flat, the authors of this Manual recommend that you use a gasket to avoid future problems with oil leaks.
5. When using a sealant, place a cushion of quality sealant with a cross-section diameter of 3.5÷4.5 mm in the flange groove and around the bolt holes in it. Within no more than five minutes after applying the sealant, press the tray to the block, trying not to disrupt the continuity of the cushion. Then screw in the fastening bolts and tighten them with the required force in a diagonal order, moving from the center outward.
6. Install the reinforcement brackets, tightening their mounting bolts to the required force.
7. Fill the engine with fresh oil, then start the engine and check for leaks.
Note: If sealant was used to seal the oil pan, do not begin adding oil to the engine until at least thirty minutes after installing the oil pan.