Note. A puller is required to perform the work described below (to remove the crankshaft pulley).
Timing chain cover seal
1. Disconnect the negative cable from the battery.
2. Empty the cooling system and remove the radiator.
3. Remove drive belts from steering pump, alternator and air conditioning compressor pulleys (if the latter is included in the vehicle)..
4. Give a bolt of fastening of a pulley of a cranked shaft. You can block the pulley from turning with the help of an old drive belt and a suitable lever.
5. Remove the large washer from the bolt, then screw the bolt back in order to protect the end of the shaft pin from damage when the puller rests against it.
6. Install a puller on the crankshaft pulley and remove the pulley from the engine.
7. Using a special puller or a flat-bladed screwdriver, carefully remove the oil seal from the timing belt cover, taking care not to damage the contact surfaces in the cover and on the crankshaft trunnion.
8. Clean out the seat, lightly grease the new oil seal, and seat it in the bonnet with a suitable mandrel or piece of wood.
Note. The stuffing box must be installed in the cover with the main jaws forward (towards the engine), and the outer end surface of the oil seal should be flush with the surface of the timing belt cover.
9. Check the condition of the surface of the crankshaft pulley in contact with the oil seal, remove the detected small burrs and roughness from it with fine sandpaper. In case of gross defects, the pulley should be restored or replaced.
10. Lightly lubricate the inner surface of the crankshaft pulley with sealant around the perimeter and seat the pulley on the shaft trunnion with a soft-faced hammer. Lubricate the thread and washer of the fixing bolt with sealant and tighten the latter with a force of 142÷152 Nm.
11. Prime the cooling system, start the engine and check for leaks.
Rear oil seal
Note. To provide access to the rear crankshaft oil seal, it is necessary to remove the engine or transmission. The choice is determined by the availability of the necessary lifting equipment.
1. Disconnect the negative cable from the battery.
2. Remove the transmission from the car, or remove the engine.
3. On models with a manual transmission, remove the clutch assembly from the flywheel.
4. Remove the oil pan from the engine.
5. Give fixing bolts and remove the holder of a back epiploon from the engine. Remove all traces of liquid gasket material from the holder.
6. Lay the holder on wooden blocks and knock out the gland from it (see accompanying illustration) with a hammer and a suitable punch.
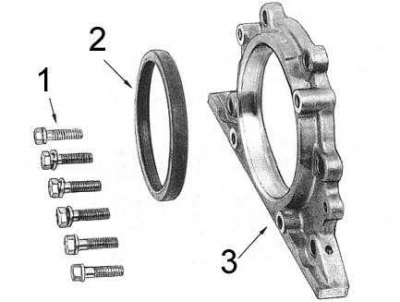
1 - bolts
2 - stuffing box
3 - holder
7. Lightly grease the lips of the new seal with oil and place the sleeping bag in the holder using a suitable mandrel or a block of wood.
Note. The stuffing box must be installed in the holder with the main jaws forward (towards the engine), and the outer end surface of the stuffing box should be flush with the surface of the holder.
8. Place a pad of sealant with a cross section of 2÷3 mm into the groove on the holder, then press the holder against the engine for five minutes. In several stages, tighten the fixing bolts with a force of 21÷26 Nm.
Note. Allow the sealant to dry for about thirty minutes before starting the engine.
9. Replace all components removed during disassembly.