Note. The following special tools are required for the work described below: A puller designed for the vibration damper (to remove the crankshaft pulley), a tool for cutting sealant pads.
Removing
1. Disconnect the negative cable from the battery.
2. Empty the cooling system, remove the radiator and fan.
3. Loosen the clamps and disconnect the bypass and lower heating hoses from the cover of the gas distribution mechanism drive (timing chain cover).
4. Remove the drive belts from the steering pump pulleys, alternator and (if provided) air conditioner compressor.
5. Give the fixing bolts, remove the steering pump and, without disconnecting the hoses, move it to the side, freeing up the working space.
6. On models with an air conditioner, give the nuts and bolts of the compressor on the bracket, remove the compressor and fix it on the mudguard of the left wing. Give fixing bolts and remove an arm of the compressor from the engine.
7. Remove the distributor cover and, turning the engine in the direction of normal rotation, turn the slider towards the location of the spark plug wire segment of the first cylinder in the distributor cover. At the same time, the timing mark on the crankshaft pulley must align with the TDC mark on the timing chain cover scale. Now the engine is in the TDC position of the end of the compression stroke of the first cylinder.
8. Remove the distributor from the engine.
9. Give a bolt of fastening of a pulley of a cranked shaft (see accompanying illustration). You can prevent the pulley from turning by wrapping the drive belt around it and pulling it with a lever. Remove the large washer from the bolt and screw the bolt back into the end of the shaft journal in order to prevent damage to the latter by the puller.
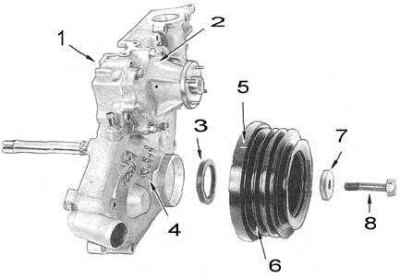
1 - gas distribution chain cover; 2 - water pump; 3 - stuffing box; 4 - distribution scale; 5 - distribution mark; 6 - crankshaft pulley; 7 - washer; 8 - bolt
10. Using a puller, remove the crankshaft pulley.
11. Drain the engine oil and remove the oil pan.
Note. If the sump is sealed to the crankcase with a gasket instead of a sealant, the timing chain cover can only be removed by tilting the front of the sump.
12. Give forward bolts of a head of cylinders and bolts of a cover of a gas-distributing chain and carefully remove a cover from the engine. Be careful not to damage the cylinder head gasket and chain cover mating surfaces.
Note. An explanatory illustration will assist in understanding the procedures described below.
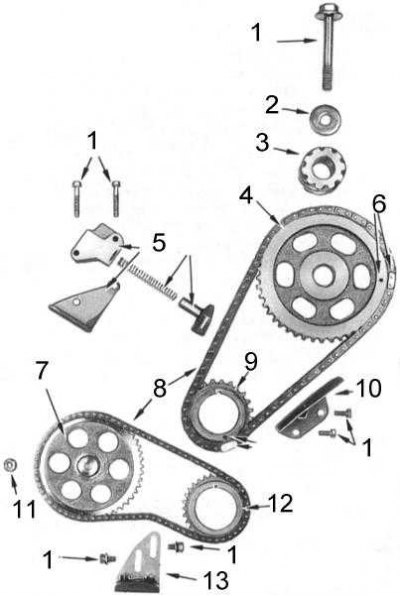
1 - bolts; 2 - washer; 3 - distributor drive gear; 4 - camshaft sprocket; 5 - tensioner assembly; 6 - marks; 7 - oil pump drive sprocket; 8 - chains; 9 - inner sprocket of the crankshaft; 10 - chain guide; 11 - nut; 12 - outer sprocket of the crankshaft; 13 - chain tensioner
13. Loosen the bolts securing the oil pump drive chain tensioner to the engine block. Block the pump drive sprocket and give the fixing nut. Remove the chain assembly, pump sprocket and crankshaft outer sprocket from the engine. Remove tensioner.
Note. If the sprockets are too tight on the shafts, they will have to be carefully pry off with two levers to remove them.
14. Give bolts of a natyazhitel of a gas-distributing chain of a drive of a camshaft and bolts of fastening of a directing chain. Remove the tensioner guide - try not to lose the spring.
15. Block a camshaft asterisk and give a fixing bolt. Remove the timing chain from the engine, as well as the camshaft sprockets, the inner crankshaft and the distributor drive.
Attention! After removing the chains, try not to crank the engine, as this is fraught with damage associated with the impact of the valves on the pistons.
Status check
1. Wash all components in a suitable solvent and dry with compressed air.
2. Check chain links, sprockets, tensioner and guide pads for signs of excessive wear. Replace defective components.
3. Make sure the plunger moves freely in the tensioner housing in both directions. Replace if necessary.
4. Remove traces of sealant from the timing chain cover and cylinder block. Check the cover for signs of deformation with a flatness tester (ribs of steel ruler) and a blade type probe. Replace cap if necessary.
5. Check the patency of the oil supply nozzle at the front of the engine. If necessary, clean the nozzle with a wire or blow it out with compressed air.
6. Using a beard, remove the crankshaft oil seal from the timing chain cover. Take care not to damage the walls of the gland seat. Fill a new epiploon with sponges towards a cranked shaft.
Installation
Installation is in the reverse order.
1. Make sure that the engine is still at TDC of the end of the compression stroke of the first cylinder. This means, in particular, that the trunnions of the crankshaft and camshaft must be turned with the keyways upwards. If necessary, slightly correct the position of the shafts.
2. Put the gas distribution chain on the camshaft sprockets and the inner crankshaft. In this case, the shiny chain links should be opposite the distribution marks on the sprockets (see accompanying illustration).
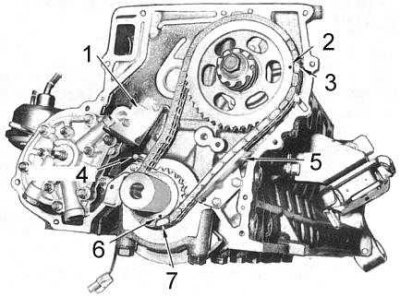
1 - tensioner assembly; 2 - distribution label; 3 - shiny link; 4 - oil supply nozzle; 5 - chain guide; 6 - distribution mark; 7 - shiny link
3. Install the sprocket chain assembly onto the engine, being careful not to misalign the shiny chain links with the timing marks.
4. Block the camshaft sprocket and tighten the fixing bolt with a force of 132÷142 Nm.
5. Install the chain tensioner assembly and tighten the bolts of its fastening with a force of 7÷8 Nm.
6. Install the guide plate, adjust the tensioner clearance to 0 mm using the chain slack, and tighten the fixing bolts with a force of 7÷8 Nm.
7. Put the oil pump drive chain on the pump sprockets and the outer crankshaft. Make sure that the pump sprocket is facing the long protruding part of the hub towards the timing belt cover.
8. Install the sprocket chain assembly to the engine. Block the pump sprocket and tighten the fixing bolt to 24÷28 Nm.
9. Install the oil pump drive chain guide pad, then press it with your finger to take up the slack in the chain. Tighten the lining bolts with a force of 7÷8 Nm.
10. Apply a continuous pad of quality sealant with a cross section of 2÷3 mm to the mating surface of the timing chain cover. Within five minutes of applying the sealant, press the cover against the cylinder block, being careful not to disturb the continuity of the pad.
11. In several stages, tighten the cover fastening bolts with a force of 21÷26 Nm.
12. Lightly lubricate the inner surface of the crankshaft pulley with sealant around the perimeter, then put the pulley on the shaft trunnion with a soft-faced hammer. Lubricate the threads and washers of the mounting bolts with sealant and screw in the latter, tightening them with a force of 142÷152 Nm.
13. Install the oil pan.
14. Install the distributor.
15. Refill the cooling system, start the engine and check for leaks.