Note. The following diagnostic procedures require a hand held vacuum pump with a vacuum gauge.
Hot air system
Operating principle
The combustion efficiency of the air-fuel mixture is determined by the constancy of the temperature of the air sucked into the carburetor through the air cleaner, regardless of the temperature inside the engine compartment. To fulfill this condition, an intake air temperature control device is included in the air path between the dust separator and air cleaner assemblies.
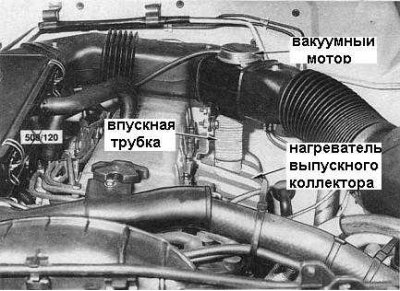
When the engine is cold and when the intake air temperature is below a certain set value, the bimetal spring closes the thermostatic valve in the air cleaner (see illustration below - 4.2 L models). In this case, the intake pipe vacuum is applied to the vacuum motor, which closes the air intake damper. When the damper is closed, hot air enters the air cleaner through a separate inlet, which is now open, through a flexible metal tube. Air is heated in a heater located on the exhaust manifold (the accompanying illustration shows the components of the intake air temperature control system on 4.2L models).
As the temperature in the air cleaner rises, the bimetallic spring of the thermostatic valve gradually opens up the access of atmospheric air by reducing the depth of vacuum applied to the vacuum motor. At the same time, the spring-loaded hot air damper closes.
Function test
1. Remove the air intake sleeve from the air cleaner assembly.
2. Make sure the intake flap is in the cold air position when the engine is off. Manually move the shutter, checking the freedom of its movement.
3. When idling a cold engine, the damper should be closed, allowing hot air to enter. Disconnect the vacuum hose from the vacuum motor - the damper should open quickly, allowing cold air to enter. Plug the vacuum hose with your finger and make sure the vacuum reaches the vacuum motor.
4. The correct functioning of the thermostatic valve can be checked by artificially cooling it with compressed air and artificially heating it with a hair dryer.
5. The performance of the vacuum motor is checked by connecting a manual vacuum pump with a vacuum gauge to it. The intake flap should begin to open at a vacuum depth of 72 mmHg. Art. on models 4.2 l and 50±15 mmHg. Art. on 3.0 l models. Full opening of the damper should occur at a vacuum of 146 mm Hg. Art. on models 4.2 l and 100±25 mmHg. Art. on 3.0 l models. If necessary, replace the motor.
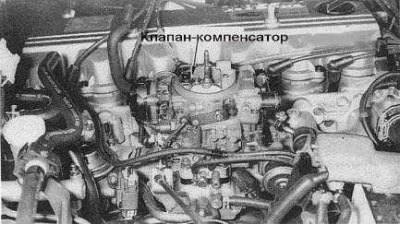
Stabilizer (compensator valve) warm engine speed
The valve is a temperature-sensitive valve that provides additional air to the intake manifold of a hot engine (see accompanying illustrations - 4.2 l engines and 3.0 l engines). In this case, the mixture is depleted, which increases the stability of the idle speed and reduces the emission of hydrocarbon compounds into the atmosphere.
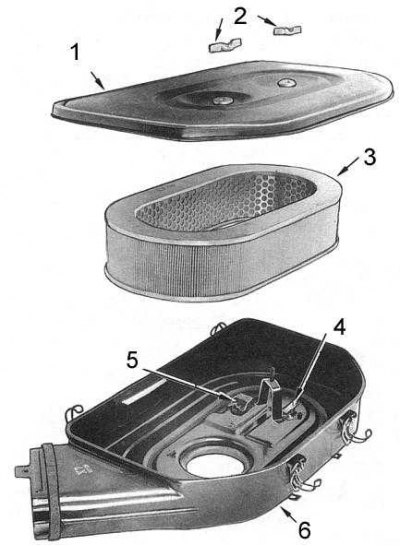
1 - top cover; 2 - wing nuts; 3 - filter element; 4 - hot idle air compensator valve; 5 - thermostatic valve; 6 - body
Functional Check - 4.2L Models
1. Remove the air cleaner assembly.
2. When the surrounding temperature is below 60°C, the compensator must be closed.
3. Using a hair dryer, heat the compensator block to 74°C and blow into the fitting. Air must pass freely through the valve, otherwise replace the compensator.
Function Check - 3.0L Models
1. Remove the air cleaner assembly.
2. When the surrounding temperature is below 60°C, the compensator must be completely closed.
3. Using a hair dryer, heat the compensator block to a temperature of 75°C, the compensator valve must open completely, otherwise replace the block.
Air/Fuel Preheating System - 3.0L Models
Operating principle
The system consists of a relay and a heating element assembly located between the carburetor base and the intake manifold.
When the engine is started, the heater is energized, providing heating of the air-fuel mixture passing through it. This increases the intensity of fuel atomization and reduces the emission of carbon monoxide (SO).
Function test
1. With a cold engine, turn on the ignition (key in ON position).
2. Place your palm on the carburetor throttle body and check for a rise in temperature.
3. If there is no heating for several minutes, check for battery voltage at the heater electrical connector.
4. If voltage is present but no heating, replace heating element.
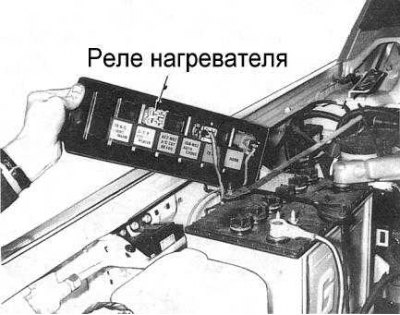
5. If there is no voltage, check the relay (see accompanying illustration) and the condition of the heater wiring.
6. Upon completion of the test, turn off the ignition.