


Table of contents: Removal ↓ Installation ↓
Note: To perform the following procedures, you will need the following special tools: 30 mm socket wrench (to remove the front drive flange); 32mm head (to remove the rear drive flange); dial gauge, puller kit, press with support plates and TORX T45 head (for disassembling the box); press with support plates and head T45 (for assembling the box).
Removal
1. Drive the car onto the ramp with its rear wheels, firmly set the parking brake and block the rear wheels with wedges.
2. Jack up the front of the car and place it on supports.
3. Remove the plug and drain the oil from the transfer case. Lubricate the threads of the drain plug with sealant, screw in and tighten the plug securely.
4. Mark the position of the front and rear propeller shafts relative to each other, as well as their position relative to the final drive pinion flange, transfer case flange and parking brake drum.
5. Loosen the bolts and nuts and remove the drive shafts from the vehicle.
6. If the transfer case is subject to disassembly or the seal requires replacement, move the gearshift lever to position 4H and, using a 30 mm socket, loosen the front drive flange mounting nut.
7. If necessary, remove the front drive flange using a puller. Remove the oil seal from the transfer case (use a puller or a sliding hammer).
8. Using a 32 mm socket, loosen the nut securing the rear drive flange to the box and mark the position of the flange in relation to the parking brake drum.
9. Release the parking brake, remove the drum of its mechanism, then use a puller to remove the rear drive flange.
10. Loosen the parking brake mechanism rear shield mounting bolts and remove the brake assembly from the transfer case. Secure the assembly to the side to prevent the drive cable from being pulled out.
11. If necessary, remove the rear drive flange seal from the transfer case housing (use a puller or a sliding hammer).
12. Bend back the rubber protective cover, unscrew the nut securing the shift rod to the transfer case control lever, remove the washer and spacer sleeve. Disconnect the shift rod from the control lever.
13. Disconnect the ventilation hose, disconnect the electrical connectors and release the electrical wiring from the mounting clamps on the transfer case.
14. Place a jack under the transmission and support it, taking its weight together with the weight of the transfer case.
15. Loosen the bolts securing the transmission support crossmember to the vehicle chassis frame and carefully lower the jack until it is possible to remove the upper bolts securing the transfer case to the transmission.
16. Remove all mounting screws except the bottom ones.
17. Raise the jack placed under the transmission and screw in the cross member mounting bolts.
18. Place a trolley jack under the transfer case and secure the latter to it with a chain or strap.
19. Remove the remaining mounting bolts and remove the transfer case from under the vehicle (the appearance of the transfer case assembly removed from the vehicle is shown in the accompanying illustration).
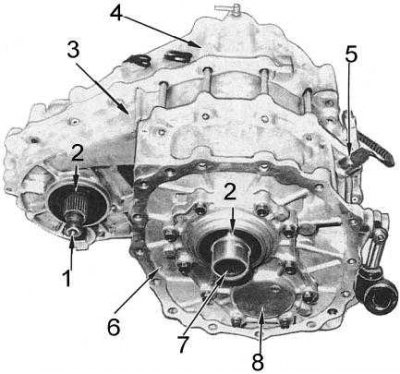
1 - front output shaft; 2 - oil seal; 3 - central crankcase; 4 - rear crankcase; 5 - 4WD switch sensor (all-wheel drive mode); 6 - front crankcase; 7 - input shaft; 8 - bearing holder
Note: The transfer case weighs approximately 50 kg and attempts to remove it without using a trolley jack may result in injury and damage to components.
Installation
Installation is carried out in reverse order.
1. If necessary, lubricate the seal lips of the drive flanges with a general-purpose lithium-based grease and install the seals into the transfer case.
2. Tighten the transfer case mounting bolts to the required torque.
3. Tighten the parking brake mechanism rear shield bolts to the required torque. Engage the parking brake and tighten the flange mounting nuts to the required torque.
4. Install the cardan shafts (in accordance with the marks made during dismantling).
5. Fill the transfer case with the required amount of oil of the required grade (see size and adjustment tables at the end of the Guide).
6. Carry out road tests of the vehicle, checking the proper functioning of the transfer case. Check the oil level in the box, add if necessary.