


Attention.
- Park the vehicle on a flat, firm surface.
- Place wheel chocks in front of and behind the rear wheels.
- Install the lifting eyes described in the spare parts catalog, if not supplied with the vehicle.
- Strictly follow the instructions in this manual. Avoid activities not covered by this manual.
- Do not start work until the cooling system and exhaust system have completely cooled down.
- If work is performed outside the engine compartment, observe the precautions described in the relevant chapter for the component or system in that area.
- Use only approved lifting points to raise the vehicle.
- To raise the vehicle, use a two-point or full-height lift. If for any reason it is necessary to use a conventional jack, it is necessary to install support stands under the vehicle before starting work.
1. Relieve fuel pressure in the power system (see chapter «Supply system»).
2. Drain the coolant from the radiator.
Attention.
- This operation is performed on a cold engine.
- Do not allow coolant to come into contact with drive belts.
3. Remove the following parts:
- Protective pallet of the engine.
- Facings of forward wheel arches.
- Front wheels of a car.
- Rechargeable battery with a shelf.
- Attachment drive belt.
- Air intake duct and air cleaner housing assembly.
- Upper and lower radiator hoses.
- Front exhaust pipe.
Left in engine bay
1. Disconnect all engine wiring connectors around the left engine mounting pad, and then temporarily secure the wiring harness to the side of the engine.
Attention. It is necessary to protect the connectors from foreign particles entering them during operation with plastic bags.
2. Disconnect the fuel supply line from the engine side.
3. Disconnect the heater hoses and replace them with plugs to prevent coolant leakage.
4. Disconnect the control rods from the gearbox.
5. To remove a cable of weight from outside a transmission.
Right in the engine compartment
1. Remove the earth cable between the front cover and the vehicle.
2. Remove the generator with the bracket.
3. Disconnect the expansion tank hose.
4. Without disconnecting the hoses, remove the air conditioning compressor from the engine. Temporarily secure the A/C compressor to the vehicle body with rope or wire to relieve the A/C lines from the weight of the compressor.
Under the car
1. Remove the left and right ABS wheel sensors from the steering knuckles.
2. Without disconnecting the hose, remove the brake caliper assembly from the steering knuckle. Temporarily fix the brake caliper to the vehicle body with a rope or wire to relieve the brake hose.
3. Remove the anti-roll bar.
4. To turn away bolts and nuts of fastening of a rotary fist.
5. Disconnect the outer tie rod socket (see chapter «Steering»).
6. Remove the left and right drive shafts, as well as the center bearing bracket (see chapter «Drive shafts and axles»).
7. Disconnect the steering column intermediate shaft assembly (see chapter «Steering»).
8. Remove the rear torsion bar.
9. Remove the front suspension arm (see chapter «Suspension»).
10. Perform preparatory work to disconnect the gearbox: unscrew the connecting bolts of the gearbox, located at the rear from below and passing through the top of the engine oil pan.
Withdrawal
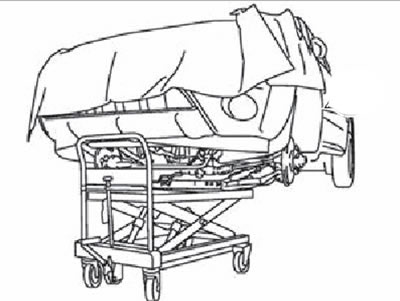
1. Using a power lift truck or similar device, securely support the engine and gearbox from below.
Attention. Place a block of wood or similar under the engine/gearbox assembly to hold them securely in one position.
2. Remove the right engine mounting pad (1), right engine mounting bracket (2) and engine mount (3).
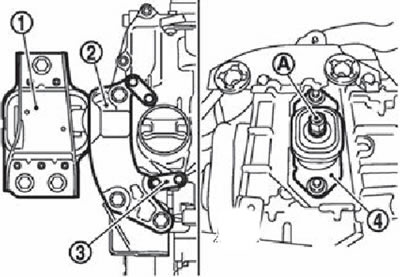
1. Right subframe engine mount.
2. Right engine mounting bracket.
3. Engine mount.
4. Left engine mounting pad.
3. Loosen the self-locking nut (A) through bolt of the left engine mounting pad.
4. Carefully lower the jack or raise the winch to remove the engine/gearbox assembly.
Attention.
- Make sure that no part of the engine is in contact with the vehicle body.
- Beforehand, and then also during lowering of the engine, be convinced that all connectors of wires are disconnected.
- In the process of removing the engine, take all possible measures to ensure the stability of the vehicle, the center of gravity of which is shifting at this time.
- If necessary, support the vehicle with a jack or similar at the rear.
Detachment
1. Install lifting eyes on the cylinder head on the front left side (A) and rear right side (IN).
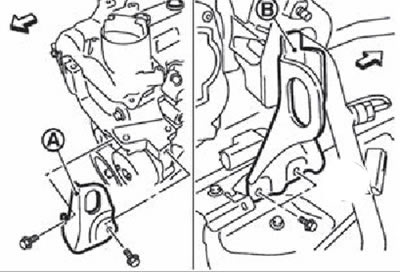
Note.
- The arrows in the figure indicate the front of the engine.
- Tightening torque for the lifting eye bolts: 25.5 Nm.
2. Remove the starter.
3. Using a winch, lift and disconnect the engine from the transmission assembly.