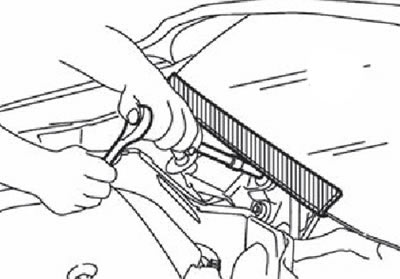
When carrying out work with the upper part of the hood panel removed, it is necessary to cover the lower edge of the windshield with a polyurethane strip or other suitable material.
Precautions when turning the steering wheel after disconnecting the battery
Note.
- All control units can be removed and installed only after disconnecting both terminals from the battery and setting the ignition switch to the position "LOCK".
- After completing the work, make sure that all connectors of the control units are securely connected, and then connect the battery terminals.
- Always perform a self-diagnosis using the CONSULT-III boundary gauge. If a DTC is found, run diagnostics on the diag- nostic switch.
- On vehicles with a steering wheel lock module, if the battery is disconnected or discharged, the steering wheel will lock and cannot be turned.
- If it is necessary to turn the steering wheel after the battery has been replaced, the following procedure must be followed before starting the repair work.
Work procedure
1. Attach both terminals to the battery.
Note. If the battery is low, you must use extension wires to connect an additional power source.
2. Using the smart or mechanical key, turn the ignition switch to the "ACC". At this point, the steering lock is unlocked.
3. Disconnect both terminals from the battery. The steering lock will remain open and the steering wheel can be turned.
4. Carry out the necessary repair operations.
5. After completing the repair, return the ignition switch to the position "LOCK" before connecting the battery. (At this point, the steering lock is unlocked).
6. Using the diagnostic tool CONSULT-III, perform a self-diagnosis of all control units.
Precautions when draining coolant and engine oil
Drain the coolant and engine oil when the engine is cold.
Precautions when disconnecting fuel lines
Before starting work, it is necessary to make sure that there is no possibility of sparking or the occurrence of an open flame in the work area.
Before dismantling, relieve residual fuel pressure in the system.
After disconnecting the pipelines, close the openings with plugs to prevent fuel leaks.
Precautions for removal and disassembly
Where there is an indication of the use of a special tool, this requirement must be met. When working, observe safety precautions, do not apply excessive force and strictly follow the instructions.
Be careful not to damage the mating surfaces of the parts or friction surfaces.
To ensure the correct relative position of the connected components, dowel pins are used. When replacing or reassembling components that use pins, check for correct alignment.
To prevent foreign objects from getting into the open engine openings, it is necessary to cover the openings with adhesive tape or plug the openings with rags.
Label and stack parts in the correct order to facilitate repair and reassembly.
When loosening nuts and bolts, follow the following basic rule: first loosen the element on one side, and then on the diagonally opposite, and so on. Strictly follow the order of unscrewing the fasteners given in the instructions. Power tool can be used at this stage (pneumatic wrench).
Precautions for Inspection, Repair and Replacement of Components
Thoroughly inspect components before repairing or replacing. Inspect new components in the same way and replace if necessary.
Assembly and Installation Precautions
Use a torque wrench to tighten bolts and nuts to specifications.
Tighten bolts and nuts evenly, in several passes, starting from the center, then on diagonally opposite sides and then in the same order. Strictly follow the tightening order given in the instructions.
Oil seals, gaskets or o-rings must be replaced after disassembly.
Thoroughly rinse, clean and blow out each part with compressed air. Carefully check the oil and coolant supply channels for blockages.
Be careful not to damage the mating surfaces of the parts or friction surfaces. Completely clean surfaces from dust, residues of rags. Thoroughly lubricate work surfaces with oil before painting (sliding surfaces).
After filling the cooling system with liquid, bleed air from the system (perform the pumping procedure).
After completing the repair, start the engine at high speed for prso-r! and tightness of cooling and lubrication systems, as well as fuel and exhaust systems.
Applying tightening to a specific angle
For the final tightening of the screw connections listed below, it is necessary to use a wrench with an angled dial (corner knob) (special tool: KV10112100 (BT8653-A)):
Bolts of fastening of sprockets of camshafts.
Bolts of fastening of a head of the block of cylinders.
Main bearing cap bolts.
Connecting bolts.
crankshaft pulley bolt (no need to use a special tool for corner tightening if there are special notches on the bolt).
Do not final tighten according to the torque value. The tightening of the specified bolts according to the torque value is used only at the preliminary stage.
Make sure the threaded and seating surfaces are clean and lubricated with fresh engine oil.
Sealant Handling Precautions
Removing old sealant
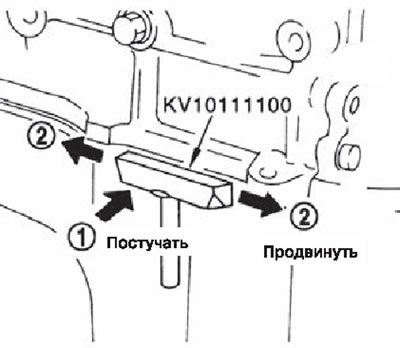
After removing the mounting bolts, separate the mating surfaces with a special knife and remove the old sealant.
Attention. Be careful not to damage the mating surfaces.
Tap the knife so that it enters between the edges, and then advance the knife along the joint with blows from the side, as shown in the figure.
Where it is difficult to use a knife, you need to separate the components with light blows of a plastic or rubber hammer.
Attention. If the use of a screwdriver becomes unavoidable for any reason, be careful not to damage the mating surfaces.
Application of sealant
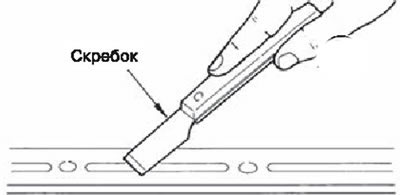
1. Using a scraper, clean the mating surfaces from the old sealant. Completely clean the grooves, mounting bolts and bolt holes from the sealant.
2. Wipe the mating surfaces of parts and gaskets with gasoline (used for household needs) to remove moisture, grease and foreign particles from the surface.
3. Insert the sealant bottle into the gun (special device).
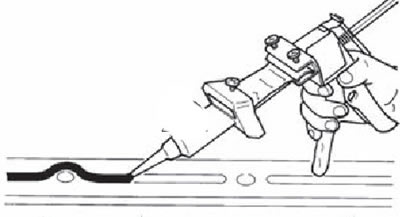
Note. Use original sealant or equivalent.
4. A bead of sealant of a certain thickness must be applied without breaks to the intended place.
If there are six or six sealant grooves, the sealant must be applied into the grooves.
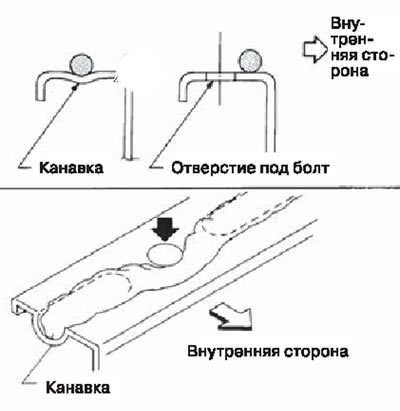
Typically, bolt holes are sealed with sealant on the inside surface. Sometimes sealant needs to be applied around the holes. Carefully read the instructions for irimonium sealant.
After applying the sealant, assemble within 5 minutes.
Remove leaking sealant immediately.
Bolts or nuts should only be tightened once (no additional tightening after installation).
Wait at least 30 minutes before filling the engine with oil and coolant.
Attention. If the description of the repair procedure contains special requirements, then they must be observed.