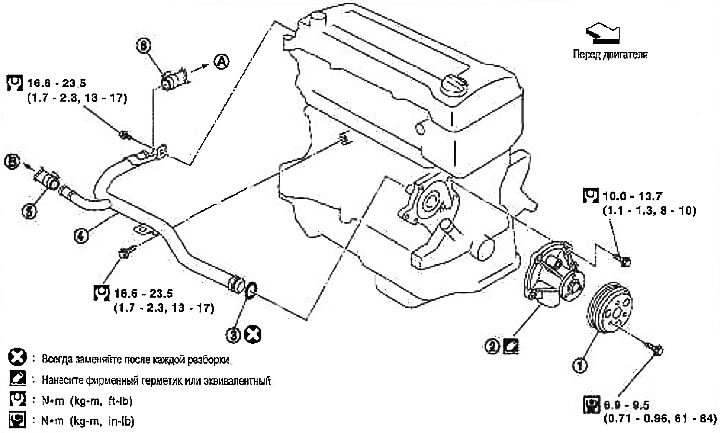
1. Water pump pulley; 2. Water pump; 3. O-ring; 4. Suction tube; 5. Heater hose; 6. Radiator hose (lower) A. To the radiator; B. To heater core
Removing
1. Drain the coolant.
Caution: Drain the coolant when it is cold. Do not remove the radiator cap when the engine is hot. High-pressure coolant splashing out of the radiator can cause severe burns.
2. Turn the front wheels to the right.
3. Remove the protective pad of the front fender (right). See chapter Body.
4. Before loosening the drive belt, loosen the water pump pulley mounting bolts.
5. Remove the drive belt from the water pump pulley. See chapter Mechanical part of the engine.
6. Remove the water pump pulley.
Note: To facilitate removal, loosen the water pump pulley mounting bolts, then the water pump belt.
7. Remove the water pump.
Place a block of wood or similar object on top of the water pump and tap it with a hammer. Separate the sealant and remove
When removed, the coolant remaining in the engine will pour out. Collect it in a container.
Caution: Do not allow water pump vanes to come into contact with other components. The water pump cannot be disassembled and must be replaced as an assembly.
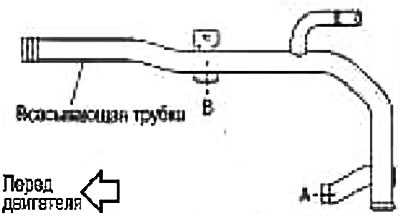
8. Disconnect the suction tube as follows:
- A. Remove the air cleaner housing assembly. See chapter Mechanical part of the engine.
- b. Disconnect the radiator hose (upper and lower) and heater hose.
- With. Move the electrical wiring away from the suction tube.
- d. Unscrew the fixing bolts and remove the suction tube towards the rear of the engine.
When removed, the coolant remaining in the engine will pour out. Collect it in a container.
Check after removal
Check that there is no significant contamination or rust on the water pump body and on the vanes.
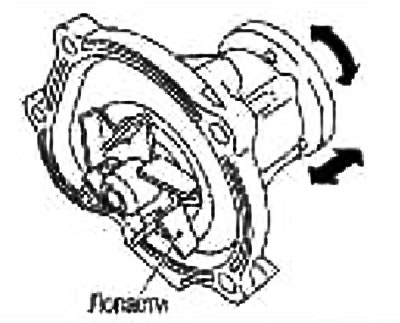
Check for play on the blade shaft. Check if the shaft rotates freely by hand.
If abnormality is found, replace the water pump.
Installation
Installation is carried out in the reverse order of removal, taking into account the following:
Suction pipe installation
1. Apply neutral detergent to the O-ring. Insert the O-ring firmly into the groove.
2. Tighten the mounting bolts as follows:
- A. Tighten the bolts in A-B order by hand.
- b. Tighten the bolts in order B-A
Water pump installation
Apply sealant as shown and install the pump.
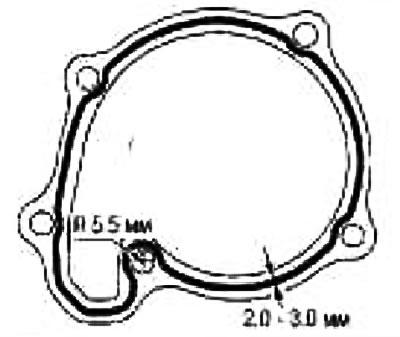
Use branded sealant or equivalent.
Caution: After installing the water pump, wait at least 30 minutes. Fill with coolant and start the engine.
Check after installation
Check for engine coolant leaks using the radiator cap adapter (special tool: EG17650301) and pump (suitable tool) (models with manual transmission without air conditioning and models with automatic transmission) or with a pump and an adapter for the reservoir cap (models with manual gearbox with air conditioning).
Start the engine and warm it up to normal operating temperature. Perform a visual check to make sure there are no coolant leaks.