


Table of contents: Stopping the car ↓ Spare tire and tools ↓ Wheel lock ↓ Removal the wheel cap ↓ Jacking up and removing the wheel ↓ Wheel installation ↓
Below are the instructions you should follow if you get a flat tire while on the road.
Stopping the car
1. Move the car away from the road carefully.
2. Turn on the hazard warning lights.
3. Park the car on a level surface and set the parking brake. Set the manual transmission lever to reverse. (If your car has an automatic transmission, set the selector handle to the "P" position.)
4. Turn off the engine.
CAREFULLY!
- To avoid the risk of the vehicle shifting under the jack, do not change wheels on a slope or in a slippery or icy area.
- You should not change your tires if oncoming traffic is passing close to your car. It is recommended to wait until the roadside assistance vehicle arrives.
- To warn oncoming drivers that you need roadside assistance, it is recommended to raise the hood.
- All passengers must exit the vehicle and wait in a safe location away from the road and vehicle.
Spare tire and tools
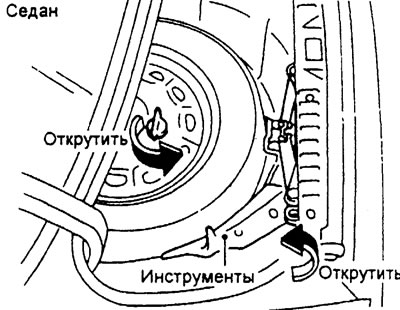
[Information copied from the website: NissanBook]
Remove the spare tire and jack from the built-in storage areas.
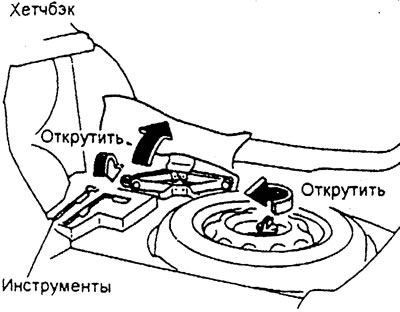
If the vehicle is equipped with an aluminum spare wheel, an adapter should be used to loosen the tie rod bolt.
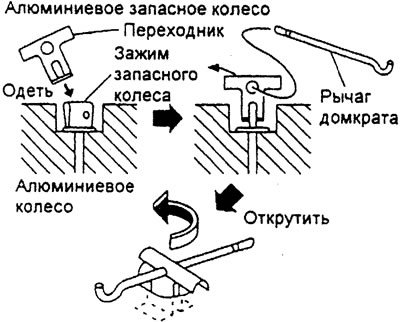
Wheel lock
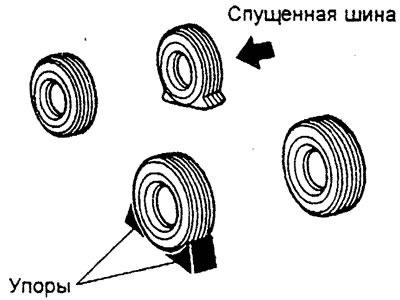
To prevent the vehicle from accidentally sliding off the jack, place adequate chocks in front and behind the wheel diagonally opposite the flat tire.
Removal the wheel cap
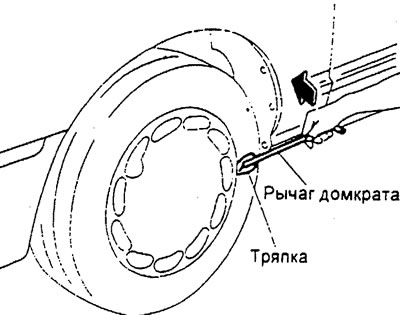
To remove the wheel cover, follow the steps shown in the figure.
Jacking up and removing the wheel
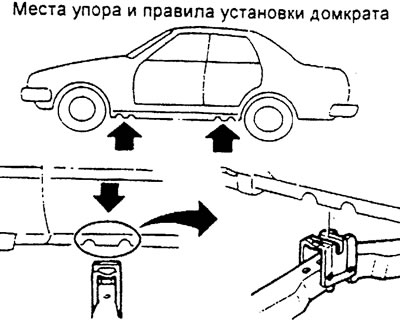
To avoid injury, carefully read the instructions on the label attached to the jack and follow these instructions:
1. Position the jack directly under the thrust point shown in the illustration and with the jack head almost touching this point. Align the center of the head with the center of the thrust socket on the body as shown. Align the line of the thrust socket with the groove on the jack head.
The jack should be used on a level and firm surface.
2. Loosen all wheel nuts by turning them counterclockwise one or two turns using a wheel lug wrench. Do not loosen the wheel nuts completely until the wheel is off the ground.
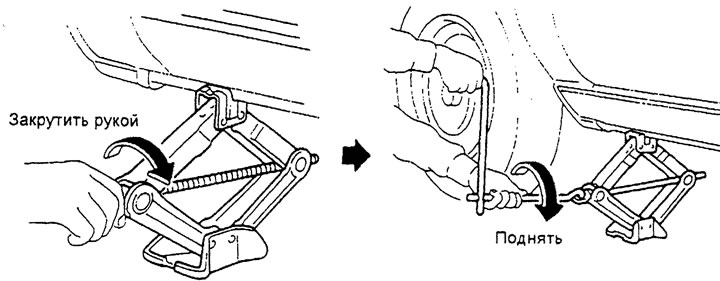
3. Carefully lift the wheel with a jack until it is off the ground. Unscrew the nuts and remove the wheel.
CAREFULLY!
- Never stand under a vehicle when it is supported only by a jack. Use a support stand for this purpose.
- It is recommended to use only the jack provided with the vehicle and not to use this jack on other vehicles. Remember that the jack is only intended for lifting the vehicle for the purpose of changing a tire.
- When raising the vehicle, hold the jack arm and pin firmly as shown.
- It is not allowed to rest the jack on any other places of the car, except for the thrust sockets intended for this purpose.
- It is not allowed to lift the car with a jack more than is necessary to remove the wheel.
- Do not start the engine when the car is raised with a jack.
- No one is allowed to be in the car when it is raised with a jack.
- It is not permitted to lift the car with a jack using a support under the front or rear bumper.
Wheel installation
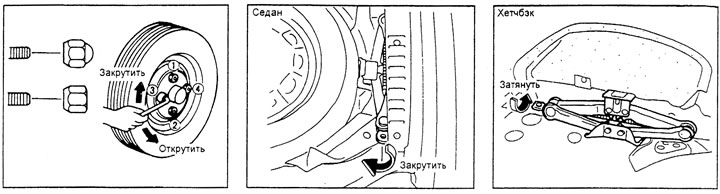
CAUTION: Before installing the spare tire, read the special instructions in the section "Wheels and tires".
1. Remove dirt from the surface between the wheel and the hub.
2. Carefully install the wheel and tighten the wheel nuts with your fingers.
3. Using a wrench, tighten the nuts alternately and evenly.
4. Slowly lower the car with the jack until the tire touches the ground. Then tighten the nuts again with the wrench in the sequence shown in the figure.
ATTENTION!
- After replacing a wheel, tighten the wheel nuts to the specified tightening torque with a torque wrench as soon as possible. Wheel nut tightening torque: 98...118 N·m (10...12 kgf·m)
- Adjust the air pressure in the tires to a value equal to the normal "cold" pressure.
Cold Pressure: Tire pressure is considered "cold" when the vehicle has been parked for at least three hours or driven no more than 1.6 km.
The normal "cold" tire pressure is shown on a plate attached to the center door pillar on the driver's side.
CAUTION! After 1000 km the wheel nuts must be re-tightened.
5. Place the removed wheel and jack securely in the appropriate places in the car.
CAUTION! After replacing, make sure that the removed wheel and lifting devices are properly stored in the appropriate places in the car.
These items, if not secured, may pose a danger in the event of a traffic accident or sudden braking of the vehicle.