


Table of contents: 3.0L models ↓ Models 4.2L ↓
If you suspect a fault with the ignition system, first make sure that all its components are clean and dry, and that the terminals are not oxidized and are securely fastened. Check the condition (charge level) batteries and correct setting of the ignition timing.
If the engine still does not start after correcting the identified defects, perform the special checks listed below.
3.0L models
1. Disconnect the high-voltage wire from the suspect spark plug and connect it to a known good spark plug. Set the spark plug gap to approximately 6 mm, ground the spark plug body securely to ground, and have an assistant crank the engine. If no spark is produced, proceed to the following tests.
2. Remove all high voltage wires and use an ohmmeter to check them for the presence of a certain (with a given resistive resistance) conductivity. Check the condition of the high-voltage wire terminals.
3. Disconnect the coil electrical connector. Turn the ignition on and check for battery voltage at terminal 1 of the harness connector (see accompanying illustration). There must be tension.
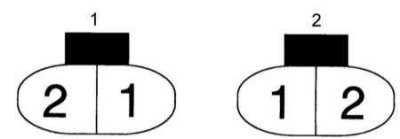
1 - connector on the harness
2 - connector on the coil
4. With the ignition off, disconnect the distributor electrical connector. Check for continuity in the wiring between the coil harness connector and the distributor harness connector (see accompanying illustration).
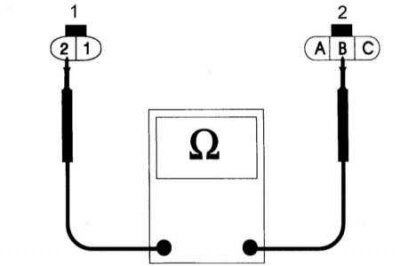
1 - coil harness connector
2 — distributor harness connector
5. Disconnect the high voltage wire from the ignition coil. Loosen the mounting bolts and remove the coil from the vehicle.
6. Using an ohmmeter, measure the resistance between the ignition coil terminals. The required value is 0.8÷1.0 Ohm.
7. Measure the resistance between terminal 1 of the coil connector and the high-voltage terminal of the coil wire. The required value is 7.6÷11.4 kOhm.
8. Replace the coil if necessary.
9. Remove the distributor cap. Turn the engine over until the signal rotor blade aligns with the protrusion on the inductive sensor. Using a clean blade-type feeler gauge, measure the air gap between the rotor blade and the sensor protrusion. If necessary, loosen the mounting screws and adjust the sensor position accordingly.
10. If no faults are found during the above checks and the engine does not start, remove the spark plugs and check their general condition and the size of the interelectrode gap.
Models 4.2L
1. Disconnect the high-voltage wire from the suspect spark plug and connect it to a known good spark plug. Set the spark plug gap to approximately 6 mm, ground the spark plug body securely to ground, and have an assistant crank the engine. If no spark is produced, proceed to the following tests.
2. With the ignition on, use a test lamp to check for power at the positive terminal of the primary circuit of the ignition coil. If there is no power (the lamp is not on), check the wiring between the battery, ignition switch and coil for continuity.
3. Remove all high voltage wires and use an ohmmeter to check them for the presence of a certain (with a given resistive resistance) conductivity. Check the condition of the high-voltage wire terminals.
4. Disconnect the negative battery cable and the wiring from the ignition coil.
5. Using an ohmmeter, measure the resistance between the positive and negative terminals of the primary coil circuit. The required value is 1.08÷1.32 Ohm.
6. Measure the resistance between the positive terminal of the primary circuit and the high voltage terminal of the ignition coil wire. If the measurement result is outside the range of 9.0÷13.4 kOhm, replace the coil.
7. If no faults are found during the above checks and the engine does not start, remove the spark plugs and check their general condition and the size of the interelectrode gap.