


Note: The following procedures require a plunger type dial gauge and a heat source (for example a blowtorch).
Note: To access the flywheel, either the engine or transmission must be removed from the vehicle. The choice depends on the availability of lifting equipment.
Removal
1. Remove the engine or transmission.
2. Mark the position of the clutch basket on the flywheel. Gradually loosen and remove the mounting bolts, remove the basket from the flywheel guide pins and remove the clutch from the vehicle (clutch components are shown in the accompanying illustration).
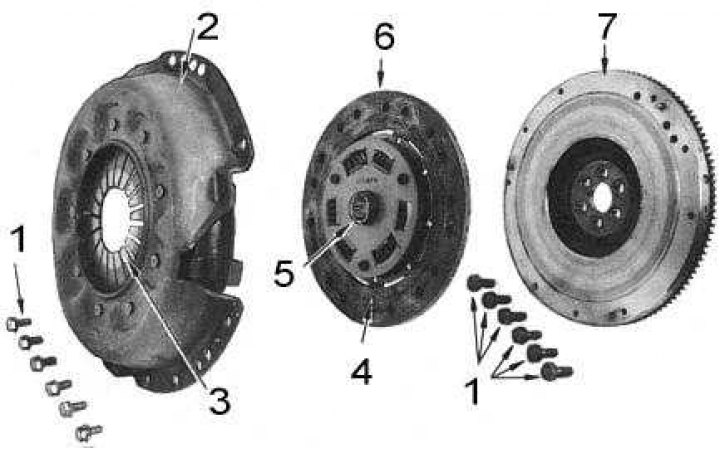
1 - bolts; 2 - assembly of the basket with the pressure plate; 3 - diaphragm spring; 4 - friction lining; 5 - hub; 6 - driven disk; 7 - flywheel
3. Lock the flywheel from turning and unscrew its mounting bolts.
4. After marking the position of the flywheel on the crankshaft, carefully remove it.
Installation
Installation is carried out in reverse order.
(Material borrowed from the website: «nissanbook.ru»)
1. Carefully align all the mounting marks made during dismantling and tighten all fasteners to the required torque (see size and adjustment tables at the end of the Guide).
2. Center the clutch slave disk on the crankshaft guide sleeve using a spare transmission primary shaft or a special tool. Gradually tighten the basket mounting bolts in a diagonal order.
Checking the status
1. Measure the runout value of the working (contacting the clutch disc) flywheel surface. If the measurement result exceeds 0.1 mm both on the flywheel mounted on the crankshaft and on the flywheel removed from it, the latter should be replaced.
2. Check the flywheel working surface for cracks, burrs and deep scratches.
3. Inspect the ring gear teeth for chips, cracks and other damage. The ring gear must be replaced separately from the flywheel.
Replacing the ring gear
1. Remove the flywheel from the car and drill a ø 3 mm hole between the two teeth of the ring gear.
Note: The hole should not be through to avoid damage to the flywheel flange.
2. Place the chisel over the drilled hole and use sharp hammer blows to split the crown.
3. Remove the ring gear from the flywheel, then remove any burrs and burrs left during removal from the mounting surface.
4. Polish several areas on the new ring gear with sandpaper and begin heating the latter until the polished areas acquire a dark blue tint.
5. Quickly place the ring gear on the flywheel with the chamfers of the teeth facing up and away from the flywheel flange. Make sure that the ring gear fits securely and is pressed tightly against the flange.
Attention! Let the crown cool naturally, do not pour water on it under any circumstances!