


Table of contents: Front oil seal ↓ Rear oil seal ↓
Note: To perform the work described below, you will need a puller (for removing the crankshaft pulley).
Front oil seal
1. Disconnect the negative cable from the battery.
2. Drain the cooling system and remove the radiator.
3. Remove the drive belts from the steering pump, alternator and air conditioning compressor pulleys (if the latter is included in the vehicle's equipment).
4. Loosen the crankshaft pulley mounting bolt. You can block the pulley from turning using an old drive belt and a suitable lever.
5. Using a special puller (to remove the torsional vibration damper) remove the crankshaft pulley from the engine.
6. Remove the timing belt.
7. Remove the timing belt toothed wheel and rear guide plate from the crankshaft journal.
8. Remove the gear key from the shaft journal.
Note: If the key is not removed, the oil seal will be damaged when the oil pump is removed.
9. Loosen the bolts securing the oil pump to the cylinder block. Tap the bottom of the inner surface of the pump to remove it from the crankshaft journal. Discard the gasket.
10. Using a special puller or a flat-blade screwdriver, carefully remove the seal, being careful not to damage the pump.
11. Check the cleanliness of the gland seat, lightly lubricate the new gland with sealant around the perimeter. Place the gland in the seat flush with the end of the pump body.
Note: The seal must be installed with the main lips facing the engine and flush with the oil pump housing.
12. Apply sealant to both sides of the new pump gasket.
13. Lightly lubricate the seal lips and place the pump assembly on the crankshaft journal, ensuring that the internal gear flats engage correctly with the crankshaft.
14. Align the pump assembly and its gasket on the cylinder block and screw in the mounting bolts. Tighten the bolts to 9÷11.8 Nm.
15. Check the condition of the crankshaft pulley surface in contact with the seal, use sandpaper to remove minor defects such as burrs, burrs and scratches. If deep damage is detected, the pulley must be subjected to restorative repair or replaced.
16. Apply a thin layer of sealant around the perimeter of the inner surface of the crankshaft pulley and seat the pulley on the shaft with light taps of a soft-faced hammer. Lubricate the threads and washers of the mounting bolts with sealant, screw in the bolts and tighten them with a force of 142÷152 Nm.
17. Fill the cooling system, start the engine and check for leaks.
Rear oil seal
Note: To gain access to the rear crankshaft seal, the engine or transmission must be removed. The choice is left to the contractor, depending on the availability of the necessary lifting equipment.
1. Disconnect the negative cable from the battery.
2. Remove the engine from the vehicle or remove the transmission.
(The original is available on the web page: «www.NissanBook.ru»)
3. Remove the clutch from the flywheel.
4. Remove the oil pan from the engine.
5. Remove the oil pan from the engine.
6. Loosen the mounting bolts and remove the crankshaft rear oil seal holder from the engine (the components are shown in the accompanying illustration). Remove all traces of liquid gasket from the holder.
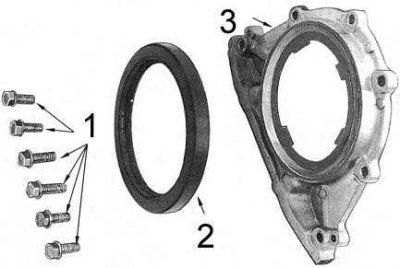
1 - bolts
2 — oil seal
3 — holder
7. Place the holder on a couple of wooden blocks and knock the seal out of it using a suitable punch and hammer.
8. Lightly oil the new seal and seat it in the holder using a suitable mandrel or wooden block.
Note: The seal must be installed with the main jaws facing the engine and flush with the outside surface of the holder.
9. Place a Ø 2÷3 mm sealant pad into the holder groove and press the holder assembly to the engine. Tighten the mounting bolts in several stages with a force of 21÷26 Nm.
Note: Wait at least half an hour before starting the engine to allow the sealant to dry thoroughly.
10. Install all removed components in the reverse order of disassembly.