


Attention: Before starting work, it is necessary to carefully read the safety precautions when performing work on the vehicle's fuel system.
Note: The procedures below are described using modifications with gasoline engines as an example. Operations for diesel modifications are almost identical.
1. Check the fuel level using the indicator. If the fuel level indicator shows a level higher than that shown in the figure (complete or almost complete), it is necessary to drain the fuel from the tank to the level shown in the figure.
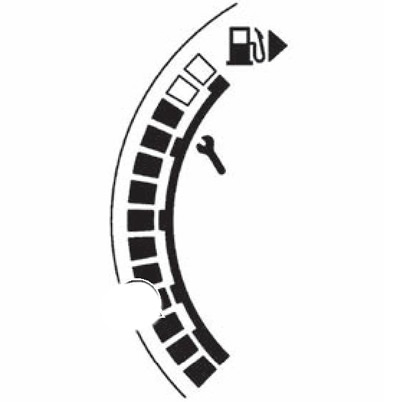
Note.
- If this is not done, then when removing the main and additional fuel sensors, fuel will spill out of the tank.
- For reference: the fuel level sensor will take the position shown in the figure after draining approximately 15 liters of fuel from the tank.
- If the fuel pump does not work, you must perform the following procedure:
- To drain fuel from the filler neck, it is necessary to insert a hose with a diameter of no more than 20 mm into the filler neck.
- Disconnect the filler neck hose from the filler neck pipe.
- Insert the hose into the tank through the filler neck to drain the fuel from the fuel tank.
2. Relieve the pressure in the fuel lines (see chapter "Engine management system").
3. Open the fuel filler cap.
4. Loosen the filler cap to release the pressure inside the fuel tank.
5. Remove the rear seat cushion.
6. Using a screwdriver, turn the fasteners 90° and remove the service hatch cover.
7. Disconnect the electrical connector (A) and the fuel supply line quick release connector (B).
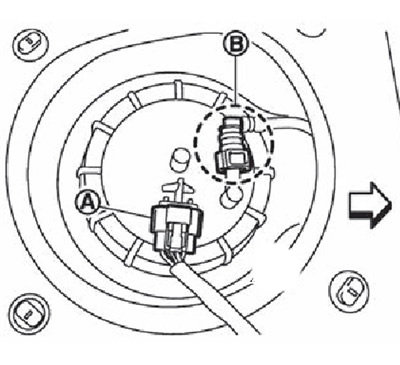
Note: The arrow in the figure shows the front of the vehicle.
Note.
- Removal the quick-release connector is done as follows:
- Use your fingers to squeeze the square parts (A) and pull the quick release connector.
- If the quick release connector is stuck, move the connector back and forth several times to loosen it and remove it.
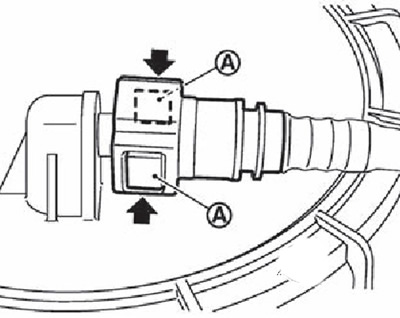
Attention.
- The quick release connector can only be removed after the latches are fully compressed. Do not twist the connector more than necessary.
- Do not use a tool to remove the quick release connector.
- Do not allow polymer pipelines to heat up. Exercise particular caution when performing welding work near polymer pipelines.
- Avoid contact with acids (for example, battery electrolyte) on polymer pipelines.
- Do not bend or twist polymer pipes during installation or disconnection.
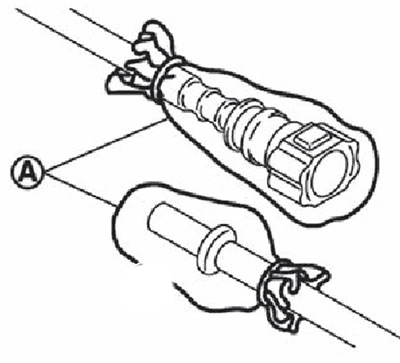
- To prevent damage and foreign particles from getting into the connectors, they must be completely covered with plastic bags (A) or something similar.
- Do not insert plugs to avoid damaging the sealing rings of the quick-release connectors.
8. Using the special tool, remove the retaining ring of the fuel level sensor module, fuel filter and fuel pump assembly by turning it counterclockwise.
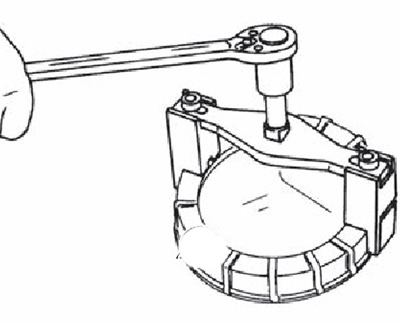
Note: To install the retaining ring in its original place before removing it, it is recommended to mark its relative positions.
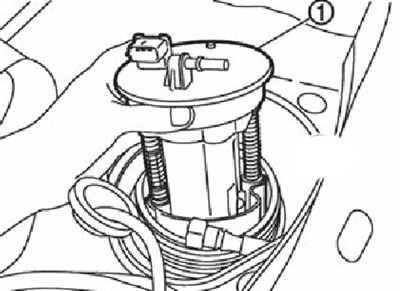
9. Remove the fuel pump module (1) with the main fuel level sensor and fuel filter.
Attention.
- Be careful not to bend the float lever during removal.
- Be careful not to hit or drop parts.
- Do not allow foreign objects to enter the fuel tank. Use a linen cloth when removing parts.
10. If equipped: Remove the auxiliary fuel level sensor assembly.
Attention.
- Do not remove the fuel line from the auxiliary fuel level sensor assembly.
- Be careful not to bend the float lever during removal.
- Do not allow foreign objects to enter the fuel tank. Use a linen cloth when removing parts.
- Do not drop or hit the sensor.