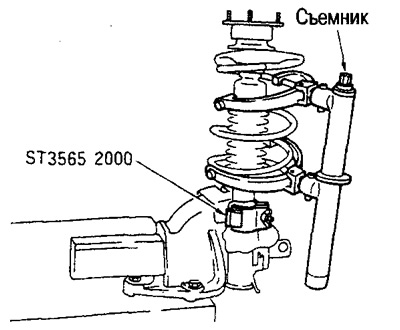
Caution: To prevent damage to the stand, wrap the stand with a cloth before installing the attachment.
Models with active suspension: with a wrench for the hub locknut (special tool) or other tool, unscrew the mounting nut of the actuator sleeve and remove the sleeve and seal.
2. Slightly loosen the piston rod jam nut.
Caution: Do not completely loosen the piston rod locknut. Otherwise, the spring will come off and cause serious injury.
3. Compress the spring with a suitable puller.
Caution: Compress the spring only after making sure that both puller arms are securely engaged.
4. Making sure that the spring has moved away from the upper and lower sockets, unscrew the piston rod jam nut.
5. Remove small parts from the stand.
Standard Suspension Models: Remove the spacer, insulator, bracket, bearing, top seat, and rubber spring seat. Then remove the spring from the strut.
Models with active suspension: remove the spacer, insulator, bearing, boot and spring seat. Then remove the spring from the strut.
6. Remove the striker from the spring seat.
7. Gradually loosen the puller and remove the spring.
Examination
Check the strut assembly for deformation, cracks or damage and replace if necessary.
Check the piston rod for damage, uneven wear and distortion and replace if necessary.
Assembly
1. Compress the spring with a puller and install it on the rack.
Attention:
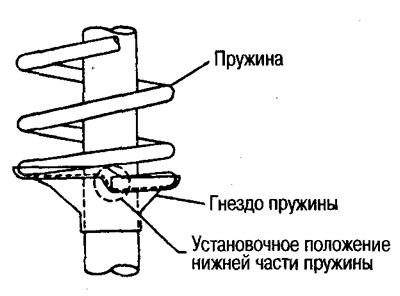
Install the spring with the tube side down. Position the lower end on the spring seat as shown.
Compress the spring only after making sure that both grips of the puller are securely engaged.
2. Insert bumper and rubber socket (models with standard suspension) into the top spring seat.
Attention:
Install the bumper firmly into the spring seat.
When pressing the fender, use soapy water, not lubricating oils.
3. Install the small parts on the stand.
Standard Suspension Models: Install upper spring seat and bearing, bracket, insulator and spacer. Tighten the piston rod locknut by hand.
Active Suspension Models: Install spring seat, boot, bearing, insulator and spacer. Tighten the piston rod locknut by hand.
Caution: Do not reuse the piston rod locknut.
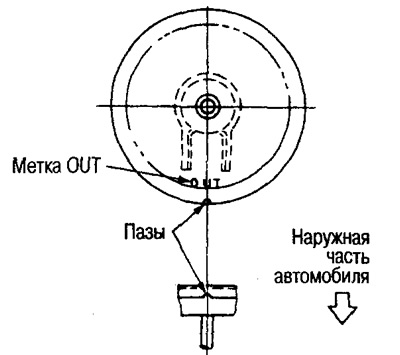
4. Make sure the label «OUT» on the upper seat of the spring is directed towards the outside of the vehicle, as shown in the illustration.
5. Make sure the spring is firmly seated in the rubber seat (models with standard suspension). Gradually loosen the spring puller.
6. Tighten the piston rod locknut to specification.
Active Suspension Models: Install seal in insulator, secure with hub locknut wrench (special tool) or similar tool, install the drive bushing and tighten the drive mounting nut.
7. Remove the nozzle (special tool) from the rack.