Engine Mount Parts
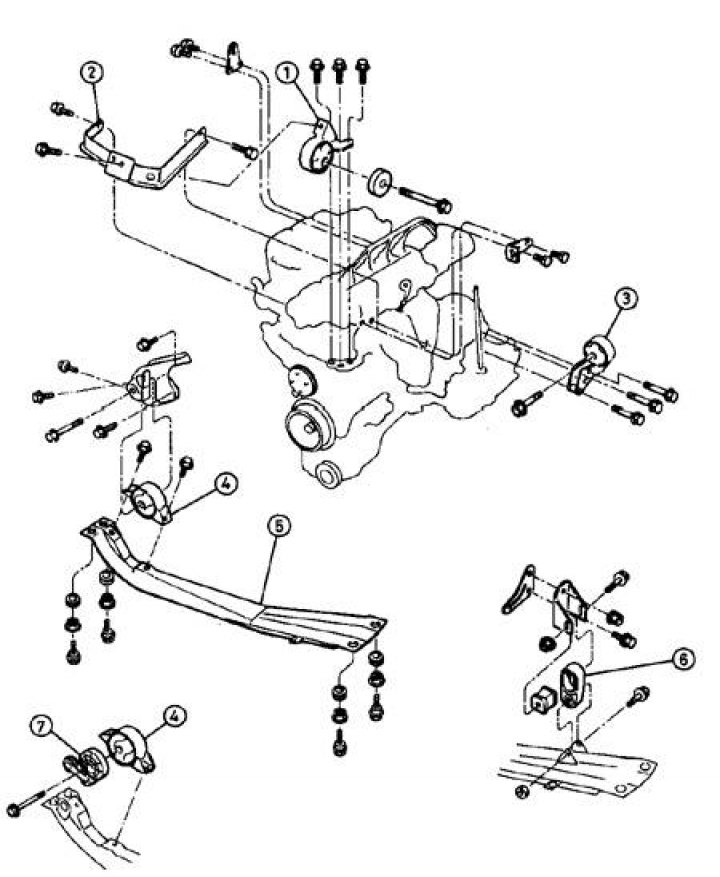
1. Right support.; 2. Right bracket.; 3. Front support.; 4. Rear support.; 5. Spar.; 6. Front support (for manual transmission).; 7. Torsion (for manual transmission).
Examination
1. Raise the car and put it on stands.
2. Check the suspension mounts for cracks, hardening, peeling of rubber from the metal base. At detection at least one and the specified damages of a support replace.
3. Using a torque wrench, check the tightness of all threaded connections of the supports.
4. Check the wear of the mounts by jiggling the engine or mount. If a large play is found in the supports, then replace the worn parts, after checking the tightness of the bolts and nuts.
Replacement
Right support
1. Disconnect the battery from the ground.
2. Raise the engine with a jack.
3. Turn away three bolts and remove an arm of the right support.
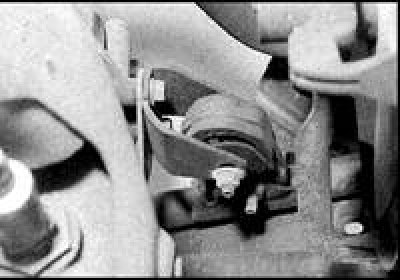
4. Turn away a nut, a coupling bolt and three bolts, remove the right support. Take out the rubber pads.
5. If necessary, unscrew the bolts and remove the right support bracket.
6.Carefully check for signs of wear or damage on all parts of the support, replace worn parts.
7. Install the bracket, tighten the bolts.
8. Install the rubber pads, make sure the pad pins fit into the corresponding holes in the bracket. Establish a support, tighten bolts with the set moment.
9. Align the support with the body bracket, insert the tie bolt and tighten the nut to the specified torque. Remove the jack.
10. Establish the top bracket of the right support and tighten bolts of fastening of an arm with the set moment.
11. Connect the battery to ground.
Left support
1. Remove the battery (see subsection 7.2).
2. Raise the engine with a jack.
3. Turn away a nut, a coupling bolt and three bolts of fastening, remove the right support. Take out the rubber pads.
4. Carefully check for signs of wear or damage on all parts of the support, replace worn parts.
5. Install the bracket, tighten the bolts.
6. Install the rubber pads, make sure the pins of the pads go into the corresponding holes in the bracket, install the support. Tighten bolts of fastening of an arm to a check point with the set moment.
7. Align the left foot with the bracket, insert and tighten the pinch bolt.
8. Remove the jack, install the battery.
Front support
1. Put the car on the handbrake, raise the front of the car and place it on stands. Disconnect the battery from the ground.
2. On manual transmission vehicles, mark the position of the front mount pinch bolt on the bracket.
3. Raise the engine with a jack.
4. Turn away a nut and get a coupling bolt.
5. Turn away bolts and remove an arm of a forward support.
6. Carefully check for signs of wear or damage on all parts of the support, replace parts if necessary. On vehicles with manual transmission, press out the cushion from the center side member (if necessary) and install a new cushion, moistening with soapy water.
7. Install the bracket on the engine, tighten the bolts to the specified torque.
8. Insert the support pinch bolt, lightly tighten the nut. Orient the power unit so that the coupling bolt is exactly aligned with the mark made before removal, tighten the coupling bolt to the specified torque.
9. Remove the jack.
10. Lower the car, connect the battery to ground.
Rear support
1. Put the car on the handbrake, raise the front of the car and place it on stands. Disconnect the battery from the ground.
2. Turn away a nut and get a coupling bolt.
3. Turn away bolts and remove an arm of a back support.
4. Unscrew the two bolts and remove the support from the central side member. Remove the torsion (on vehicles with manual transmission).
5. Carefully check for signs of wear or damage on all parts of the support, replace damaged parts.
6. Install the rear support on the side member and tighten the bolts.
7. Install the rear support bracket and tighten the bolts.
8. Align the rear support with the bracket, insert the tie bolt and tighten the nut to the specified torque.
9. Lower the car.
10. Connect the battery to ground.