


Table of contents: Removal ↓ Installation ↓
Throttle body mounting bolts fitted to 1.6L engine
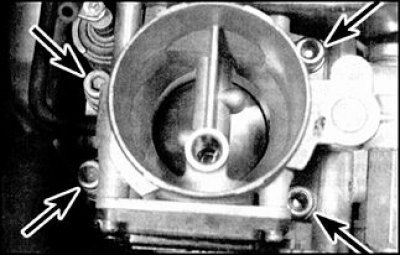
Mounting bolts - indicated by arrows
Removal
Models with 1.6 liter engine
1. Disconnect the negative battery cable.
2. Remove the air cleaner housing following the instructions in subsection 6.3.2.2.
3. Squeeze the mounting clips and disconnect the connection connectors from the throttle potentiometer, auxiliary air supply valve, air flow sensor, and engine idle speed increase solenoid valve.
4. Disconnect the accelerator cable from the throttle cam. Remove the lock nut and adjusting nut, and remove the cable sheath from the mounting bracket.
5. Note or mark the installation position of all vacuum and vent hoses so that they can be properly connected when installing the throttle body, then release the clamps (where are they installed) and disconnect the hoses from the throttle body.
6. Loosen the clamps, then disconnect the coolant hoses from both sides of the throttle body and plug the hose openings. Do this quickly to minimize coolant loss.
7. Loosen and remove the mounting bolts securing the throttle body to the intake manifold and remove the throttle body from the vehicle. Remove the gasket and discard it; when installing, use a new one. Plug the intake manifold opening with a clean cloth to prevent dirt or foreign objects from getting into it.
Models with 2.0 liter engine
8. Loosen the retaining clamp and disconnect the intake air duct from the throttle body.
9. Disconnect the connection connector from the throttle potentiometer.
10. On Phase I models, carefully disconnect the accelerator linkage rod from the ball joint on the throttle body.
11. On Phase II models, disconnect the accelerator cable from the throttle cam. On automatic transmission models, also disconnect the downshift cable.
12. On all models, loosen the clamps, disconnect the coolant hoses from the throttle body, and plug the hose openings. Do this quickly to minimize coolant loss.
13. On all models, note or mark the installation position of all vacuum and vent hoses so that they are properly connected when installing the throttle body, then release the mounting clamps (where are they installed) and disconnect the hoses from the throttle body.
14. If necessary, remove the intake manifold mounting bracket to gain access to the throttle body mounting bolts.
15. Loosen and remove the mounting bolts securing the throttle body to the intake manifold and remove the throttle body from the vehicle. Remove the gasket and discard it; when installing, use a new one. Plug the intake manifold opening with a clean cloth to prevent dirt or foreign objects from getting into it.
Installation
1. Installation is carried out in the reverse order of removal. Before installation, check that the contact surfaces of the throttle body and intake manifold are clean and smooth.
2. Install a new gasket onto the intake manifold. Install the throttle body onto the intake manifold, then tighten all mounting bolts diagonally to the specified torque in Stage 1, then tighten them to the specified torque in Stage 2 (see subsection 6.3.2.1).
3. Check that all hoses are installed correctly and, if necessary, secure them with clamps;
4. After installation is complete, adjust the accelerator cable according to the instructions provided in subsection 6.3.2.3.
5. On models with automatic transmission, adjust the downshift cable according to the instructions in subsection 9.2.4.