


Table of contents: Removal ↓ Installation ↓
Note: To perform the procedures described below, you will need a special throne jack of the type. Performing work without its use is associated with increased risk of injury due to the significant weight of the assembly.
Removal
1. Drive the car onto the ramp with its rear wheels, apply the parking brake and block the rear wheels with wedges.
2. Jack up the front of the car and place it on supports.
3. Disconnect the negative cable from the battery.
4. Remove the front seats and center console.
5. Loosen the mounting screws and remove the door sill trims. Remove the front carpet.
6. Remove the handles from the gearshift levers and transfer case modes. Loosen the screws securing the floor panel. Remove the floor panel with rubber protective covers and take it out of the car.
7. Loosen the mounting bolts and remove the gearshift drive housing from the transmission together with the manual transmission control lever.
8. Release the parking brake, remove the clamp and remove the pin securing the drive cable to the parking brake control lever. Loosen the mounting nuts, release the cable housing from the bracket and push the cable through the floor panel.
9. Unscrew the drain plug and drain the transmission oil from the gearbox housing. After the oil has finished draining, lubricate the threads with sealant and screw the plug back in place.
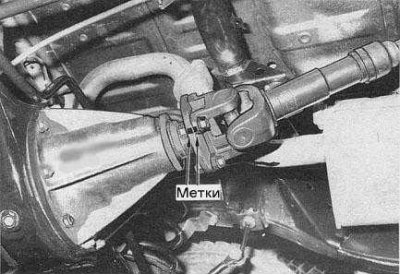
10. Mark the position of the front and rear propeller shafts relative to each other, as well as their position relative to the flange of the main gear drive pinion (see accompanying illustration), transfer case flange and parking brake drum.
11. Loosen the bolts and nuts and remove the drive shafts from the vehicle.
12. Bend back the rubber protective cover, unscrew the nut securing the shift rod to the transfer case control lever, remove the washer and spacer sleeve. Disconnect the shift rod from the control lever.
13. Loosen the bracket mounting bolts and remove the transfer case shift lever from the transmission housing.
14. Disconnect the ventilation hoses and electrical wiring from the transfer case and transmission housings.
15. Place a trolley jack under the transfer case and secure the assembly to it using a sling or chain.
16. Loosen the bolts securing the transfer case to the transmission and remove the case from the vehicle.
Note: The transfer case weighs approximately 50 kg, and therefore the authors of this Manual strongly recommend using a trolley jack to remove it.
17. Loosen the mounting bolts and remove the slave cylinder from the clutch housing. Secure the cylinder to the side by tying it with wire to a chassis element.
18. Loosen the nut and bolt and remove the rubber cushions from the exhaust system support bracket
19. Disconnect the electrical wiring from the starter, loosen the mounting bolts and remove the starter from the vehicle.
20. Where applicable, remove the PTO unit from the transmission and secure it to the side.
21. Remove the bolts securing the clutch dome to the engine, remove the reinforcement brackets and the rear engine shield.
22. Place a special jack under the gearbox housing and tie the transmission to it with a chain.
23. Support the transmission with a jack, loosen the nuts and bolts securing the crossmember to the chassis frame and transmission supports. Remove the crossmember from the vehicle.
24. Carefully lower the jack, making sure there is no tension on the wires and hoses connected to the engine, and carefully remove the transmission from under the vehicle.
Note: When removing the transmission, do not allow it to hang with all its weight on the driven clutch disc to avoid failure of the latter.
25. Check the proper functioning of the clutch.
Installation
External view of the gearbox with associated components
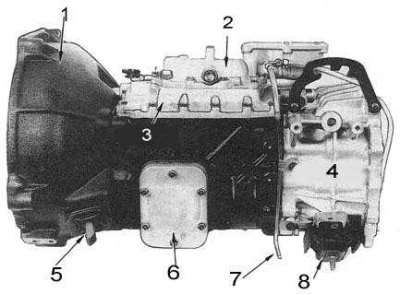
1 - clutch dome; 2 - gear shift drive (selector) casing; 3 - top cover; 4 - extension casing; 5 - off lever; 6 - PTO cover; 7 - tube; 8 - support
Installation is carried out in reverse order.
1. Apply a moderate amount of grease to the splines of the manual transmission input shaft, lubricate the contact surface of the guide sleeve with oil.
2. Check the cleanliness of the mating surfaces of the engine rear shield and clutch dome. Lubricate the flange of the latter with Loctite 587 sealant or equivalent.
3. Raise the transmission with a jack and align it with the engine, ensuring that the mating surfaces of the clutch dome and the engine backplate are parallel to each other.
4. After installing the transmission in gear, turn the secondary shaft to align the splines of the primary journal with the mating splines in the hub of the driven clutch disc.
5. Press the transmission onto the engine, tighten all bolts to the required torque and reconnect the electrical wiring and ventilation hoses to their original position.
6. Install the clutch slave cylinder in place, bleed the hydraulic system if necessary.
7. Apply a bead of sealant to the starter mounting flange and install the starter as far as possible.
8. After making sure that the landing marks are aligned, install the cardan shafts in place.
9. Connect and adjust the parking brake cable.
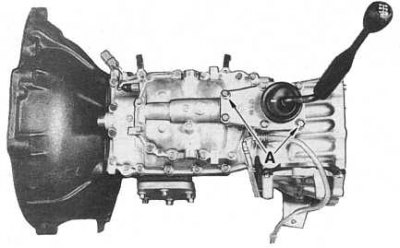
10. Install the gearshift housing assembly with the gearshift lever. Be sure to replace the gasket and ensure that the long mounting bolts are screwed into the points (A) shown in the accompanying illustration.
11. Fill the transmission with the required amount of oil of the required grade. Lubricate the threads of the filler plug with sealant and tighten it securely.