Replacement intervals (brake hoses):
- When using the car individually: do not change
- For commercial vehicle use: every 4 years
Attention:
Do not bend or twist hoses during installation.
When turning the steering wheel in both directions, the tubes and hoses must not touch other parts.
If a brake fluid leak is found, disassemble the related component. Replace with a new one if necessary.
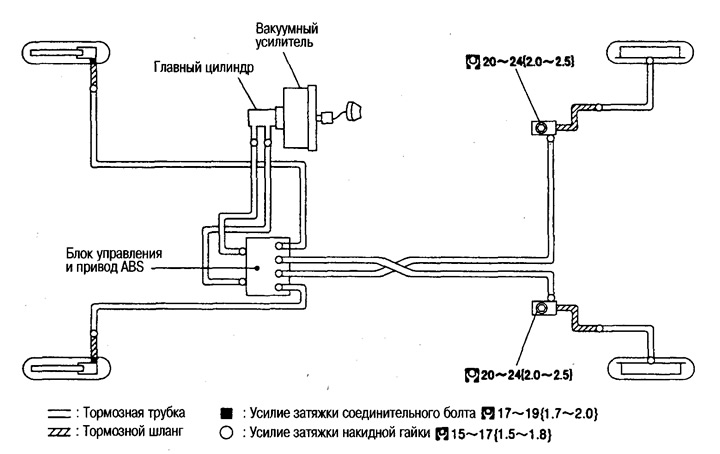
Front wheel brake hoses
Removing
1. Drain the brake fluid.
Caution: Do not allow brake fluid to come into contact with painted surfaces.
2. To prevent dust and other foreign matter from entering the brake fluid, plug the brake line connections.
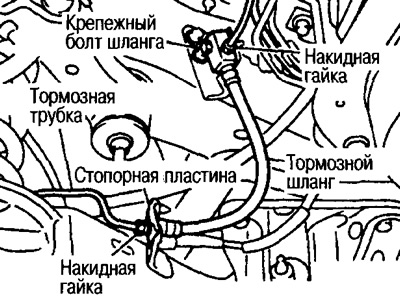
3. Using a spanner wrench, unscrew the cap nuts and disconnect the brake pipe from the hose.
4. Turn off a connecting bolt and disconnect a brake hose from a support in gathering.
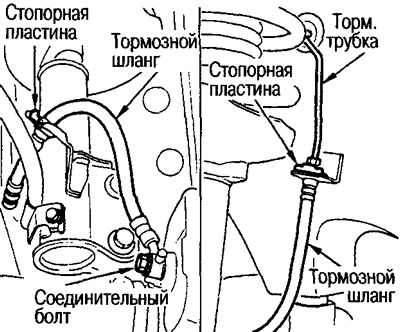
5. Remove the retaining plates from the brake tube and from the mounting area on the rack. Then remove the brake hose.
Installation
1. Connect the brake hose to the caliper assembly and tighten the connecting bolt to the required torque.
Attention:
Firmly insert the hose into the bore of the cylinder body.
Do not reuse copper washers for connecting bolts.
2. Connect the brake hose to the strut and secure with the retaining plate.
3. Connect the brake hose to the brake pipe. Tighten the union nut by hand and secure with a lock plate. Using a torque wrench, tighten to the correct torque.
4. Upon completion of work, perform pumping.
Rear wheel brake hoses
Removing
1. Drain the brake fluid.
Caution: Do not allow brake fluid to come into contact with painted surfaces.
2. Plug the brake line connections to prevent dust and other foreign matter from entering the brake fluid.
3. Using a spanner wrench, unscrew the cap nuts and disconnect the brake pipe from the hose.
4. Remove the lock plate, then remove the hose.
Installation
1. Connect the brake hose to the tube. Tighten the union nut by hand.
2. Secure the hose with the lock plate. Tighten the fixing bolt to the required torque.
3. Using a ring wrench, tighten the union nut to the required torque.
4. Upon completion of work, perform pumping.