Attention:
Follow the safety rules and do not do unnecessary actions.
Do not start work until the exhaust system and cooling system have completely cooled down.
When performing work not related to the engine, see the relevant chapters for the work to be carried out.
When lifting the engine, hook it only on the places specified for this purpose.
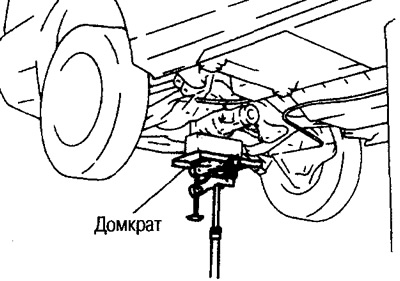
To raise the vehicle, use a two-arm lift with the stops as wide as possible. Jack up the rear axle due to the inevitable rearward shift of the center of gravity during engine removal.
Summary of works
Engine with gearbox and transfer case (4WD models) assembly is lowered down under the vehicle and then the engine is separated from the gearbox.
Preparatory work
1. If you can hang the engine, remove the engine hood cover.
2. Drain the coolant from the radiator.
3. Remove the following parts.
Battery, front wheels, underbody guard, left and right mudguards, drive belts, alternator, alternator bracket, radiator fans assy, radiator, intercooler, engine cover, outside air intake duct, air cleaner housing.
On the left side of the engine compartment
4. Disconnect all electrical wiring going to body mounted parts and wires «masses».
5. Disconnect the vacuum hose from the vacuum pump side.
6. Disconnect the two connectors from the side of the fuse and relay box, disconnect the electrical wiring from the car body and fix it on the engine.
7. Disconnect the supply hose and fuel return hose.
Caution: Install plugs to prevent spillage of fuel.
8. Disconnect the heater hoses and install plugs so that coolant does not spill.
10. Disconnect the automatic transmission control cable from the transmission and move to the side.
On the right side of the engine compartment
10. Remove the electrical wiring of the air conditioning compressor and generator and move it to the car body.
11. Disconnect the two steering pump tubes (high pressure side and low pressure side) on the connection with the body and install plugs on them.
12. Remove the air conditioning compressor from the bracket, move and tie with a rope to the body.
Under the bottom of the car
13. Remove the front exhaust pipe along with the catalyst diffuser.
14. Remove cardan shaft (4WD models).
15. Remove the electrical wiring in front and behind the center support beam and from the suspension beam (4WD).
16. Remove the ABS wheel sensors, disconnect the brake calipers from the steering knuckles and hang with a rope to the car body.
17. Disconnect the steering knuckles from the pillars.
18. Disconnect the steering column shaft from the steering rack.
19. Remove the hose installed between the automatic transmission oil cooler and the gearbox.
Inside the front passenger side
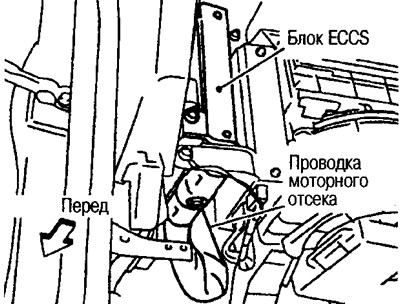
20. Remove the wiring from the left side of the center console going into the engine compartment and disconnect all connectors of the ECCS control unit, pull the wiring into the engine compartment.
Note: It is difficult to remove and slide the electrical wiring from the right side of the engine.
To keep foreign matter out of the wiring harness, wrap it with vinyl wrap and tie it to the engine with a rope so it doesn't get torn during engine removal.
Withdrawal process
Depending on the tools used, the removal of the engine is carried out in the following ways. Method A is described in this manual, but either method can be used to remove the engine.
- Method A: Support the engine with a winch, support the suspension beam with a jack and lower it.
- Method B: Jack up the engine and transmission oil pans and the suspension beam, lift and separate from the body.
- Method C: Support in 3 places (see method B) three jacks and lower.
21. Remove the intercooler bracket and install the lifting eyes (from repair kit) on the right front and on the left rear side of the cylinder head.
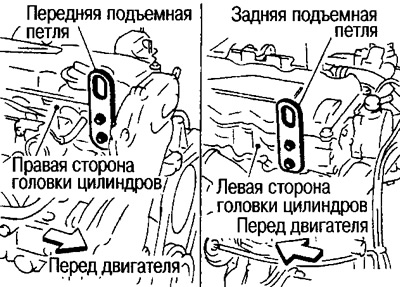
Note: The front and back loops are the same.
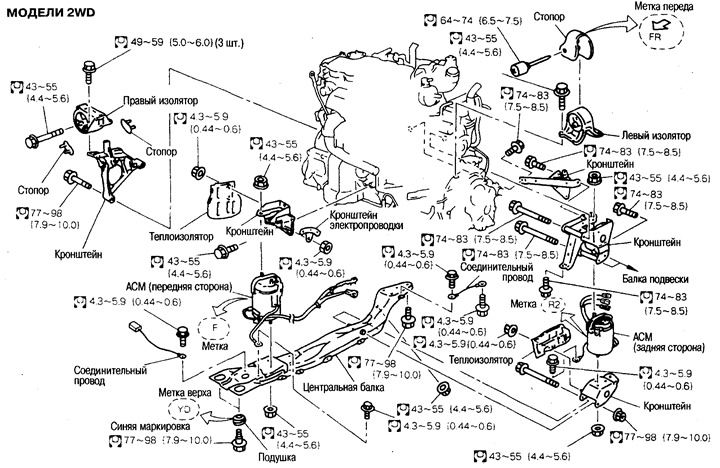
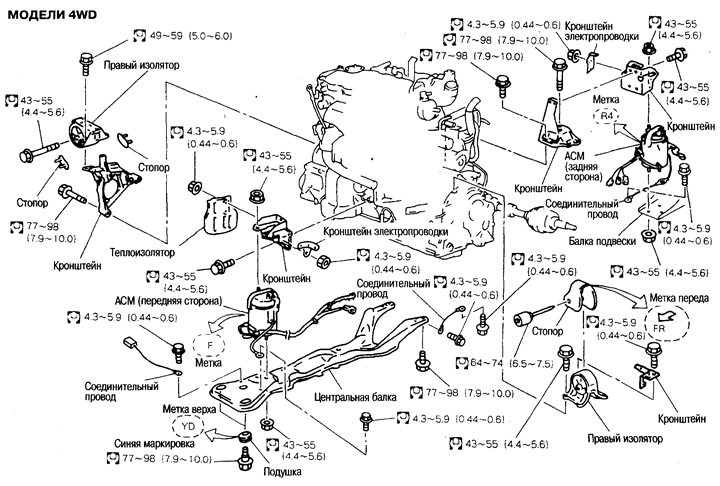
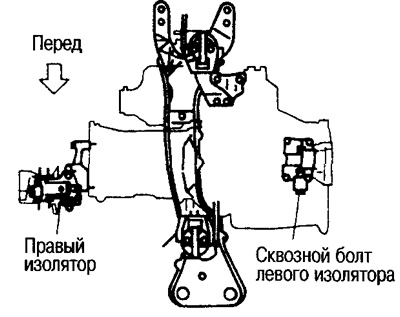
22. Remove the right engine mounting insulator (engine front).
While adjusting with a hoist or jack, remove the load from the set bolt, unscrew and remove the bolt.
23. Remove the through bolt of the left mounting insulator (gear side).
By adjusting with a hoist or jack, relieve the load, unscrew and remove the through bolt.
24. At a height convenient for work, support the suspension beam with a jack.
25. Hook the winch hooks to the lifting eyes.
26. Turn away forward adjusting bolts of the central bearing beam (2 pcs.).
Shown with 4WD model as an example
27. Turn away adjusting bolts of a beam of a suspension bracket (2 pcs.).
Shown with 4WD model as an example
28. Gently lower the winch while lowering the jack and remove the engine with gearbox assembly from the vehicle.
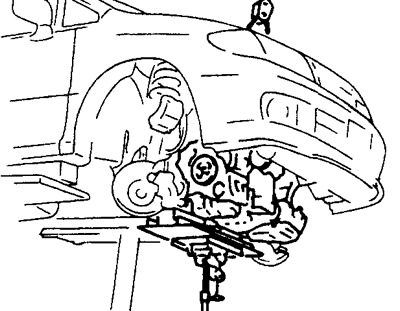
Attention:
Make sure there are no body related parts.
Make sure all necessary connections are disconnected.
Make sure that the vehicle does not fall off the lift as a result of a shift in the vehicle's center of gravity.
Engine compartment work
Work on level ground.
Attention: Support the engine from below with a wooden stand, and securely hook the winch hooks to the lifting eyes.
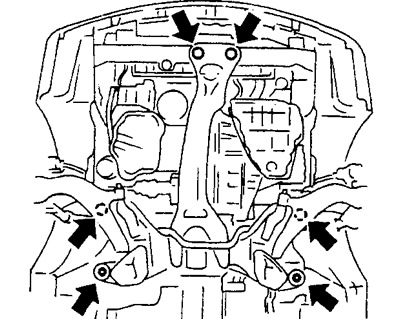
29. Remove the center carrier by removing the set nuts from the underside of the active engine mounts (below AFM) (3 pcs.).
30. Remove suspension beam assembly from engine and transmission assembly.
If the steering pump is removed from the engine, the bracket must be removed from the engine (see ch. «Steering»).
31. Separate a transmission from the engine.