


Table of contents: Preparatory work ↓ Removal and installation high…↓ Removal and installation the…↓ Removal and installation the drain…↓ Removal and installation the…↓
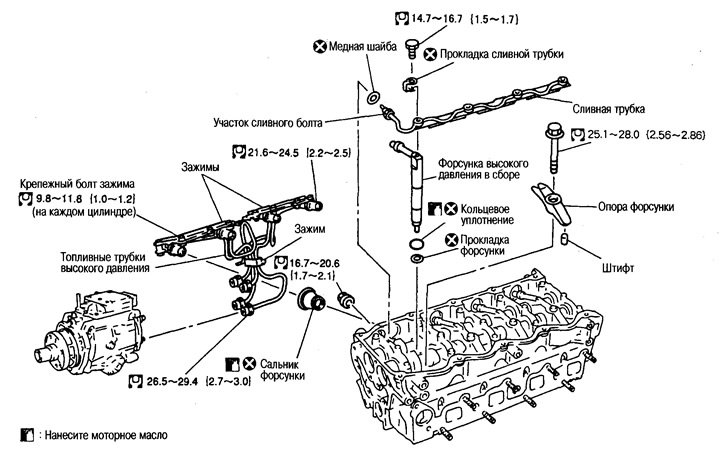
Preparatory work
Remove the intercooler, engine cover, engine underbody protection, front exhaust pipe.
Disconnect all electrical wiring, tubes and hoses and set aside.
Remove the valve cover (if the drain pipe and injectors are removed as a whole).
Removal and installation high pressure fuel pipes
Removal
Mark the cylinder numbers and then remove the high pressure fuel pipes.
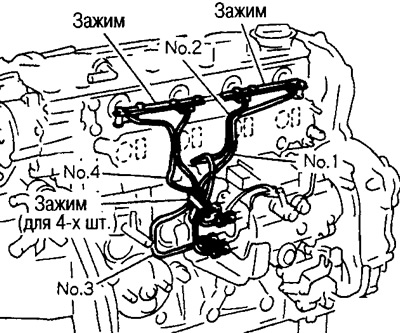
Caution: Apply marks in such a way that they are not washed off by fuel.
Remove the clamps (3 pcs.) and then remove the tubes one by one.
Note: For clarity, the intake manifold is not shown in the illustration.
Installation
Install the fuel lines on all cylinders, following the drawing and marks made before removal.
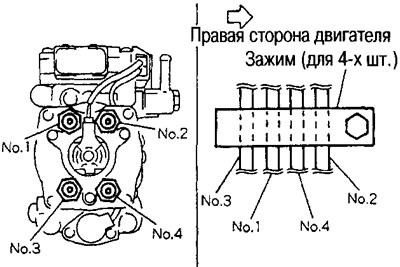
Tighten the union nuts on the cylinder head side only 2-3 turns, make sure all the pipes are installed to the pump, and then tighten the union nuts on the cylinder head side and the pump side, starting with the far pipe.
Install the clamps as shown in the figure.
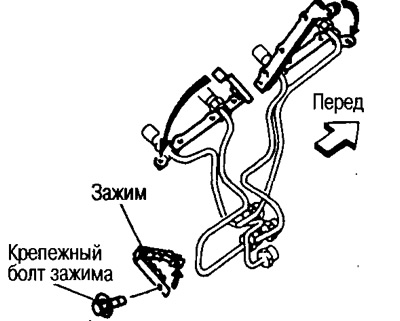
Insert the clamp bolt (for 4 tubes) from the rear of the engine towards the front.
Removal and installation the injector seal
Removal
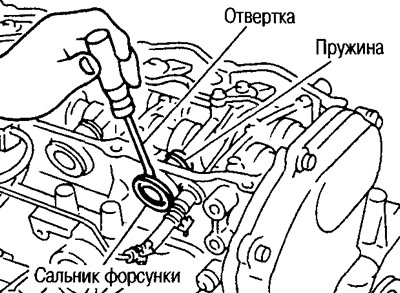
Use a screwdriver to pry the seal by the flange and remove it.
Installation
After installing the injectors as a whole, press the seals onto the outside of the cylinder head until the flange fits tightly.
Note: After removing the injectors as a whole, replace the seals with new ones (if only the high-pressure fuel lines are removed and installed, then there is no need to change the seals).
Removal and installation the drain pipe
Removal
Loosen and remove the mounting bolts and union nuts in the reverse order to that shown in the illustration.
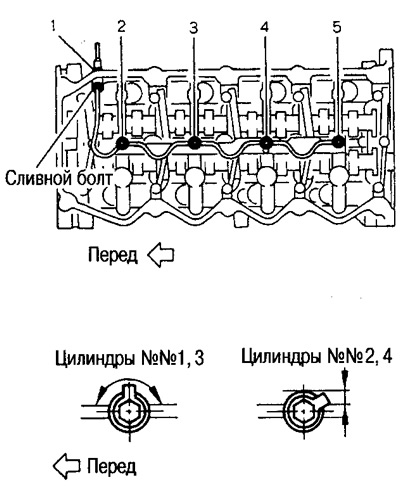
When loosening the union nut, hold the hex portion of the drain bolt with a wrench (from the inside of the head).
Installation
Tighten the union nuts and set bolts in the order shown in the figure above.
When tightening the union nut, hold the hex portion of the drain bolt with a wrench (from the inside of the head).
Tighten the mounting bolts so that the contact areas of the drain pipe gasket are in the areas indicated by arrows in the figure (pay special attention to cylinders No.2, 4).
Note: This is done to avoid contact with the valve cover.
Attention:
After installing the drain tube, be sure to check the drain tube for leaks (item 5).
After tightening the mounting bolts to the required torque, the contact areas of the gasket may tear, but this will not affect the operation.
Removal and installation the injector assembly
Removal
Remove the injector support by pulling and turning the injector assembly right and left.
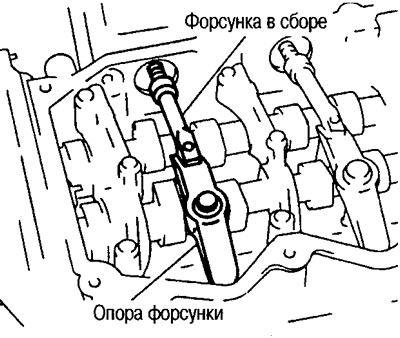
Using a screwdriver, remove the copper washer installed in the cylinder head.
Caution: Do not disassemble the injector assembly.
Installation
Install the injector gaskets into the cylinder head holes.
Install the O-ring into the injector groove and insert the injector into the cylinder head.