- Engine protection from the bottom and left mudguard
- front exhaust pipe
- Disconnect the right drive shaft from the side of the transfer case and move it aside
- Intercooler
- engine cover
- High pressure fuel lines
2. Disconnect two fuel hoses from high pressure fuel pump.
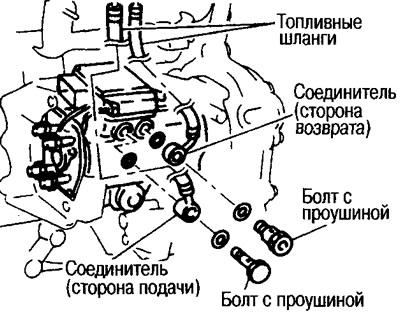
Loosen the eye bolts and remove the hose connectors.
Apply paint marks to the hose connectors and injection pump so that they can be installed in the same directions later.
3. Disconnect the wiring connector from the injection pump.
Pull out the retainer fully and remove the connector.

Note: Pulling the latch all the way out will cause the connector to move and disengage, while inserting the connector about halfway down and pressing the latch until it clicks into place will lock the connector into place.
4. Remove the rear injection pump bracket.
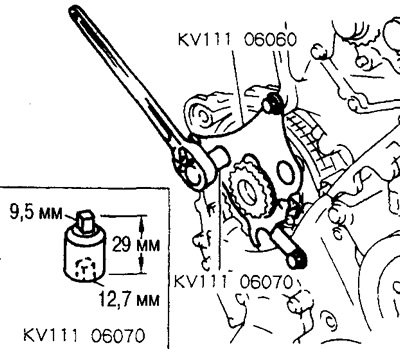
5. Remove the front chain cover.
Move the power steering reservoir away from the bracket.
Loosen and remove the set screws in the reverse order shown in the figure.
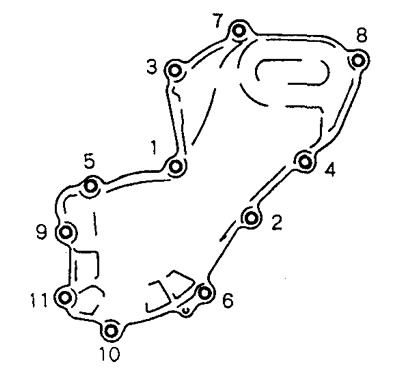
Since there is little space to remove bolts 6, 10, 11, remove these bolts together with rubber washers.
Caution: Cover exposed parts of the engine to prevent foreign matter from entering the engine when removing the front chain cover.
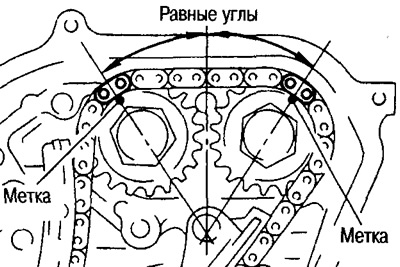
6. Set the piston of the 1st cylinder to the TDC position of the compression stroke.
By turning the crankshaft pulley clockwise, set the marks on the camshaft sprockets as shown in the figure.
Note:
There is no crankshaft pulley position indicator.
The secondary timing chain is installed according to the colors of the chain links, so there is no need for marking before removal, however, the mark on the injection pump sprocket is poorly visible, so it is better to mark.
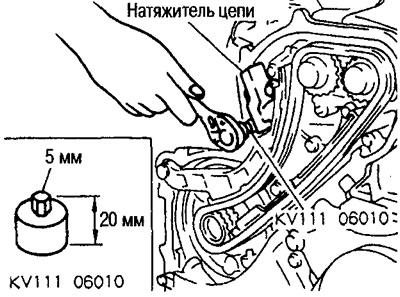
7. Remove the chain tensioner.
Shoot in the following sequence.
(1) Press the plunger of the chain tensioner and secure it with the pin.

(2) Loosen the set screws with a hex wrench (special tool, 5 mm) and remove the chain tensioner.
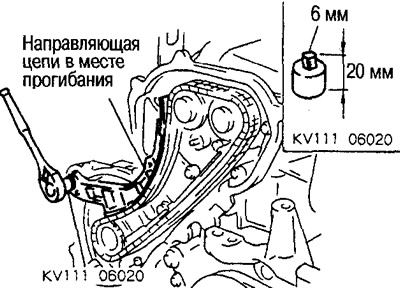
8. Remove the chain guide at the point of deflection.
Loosen the set screws with a hex wrench (special tool 6 mm, short) and remove the chain guide at the bend.
9. Remove the chain guide at the tension point.
10. Remove the secondary timing chain.
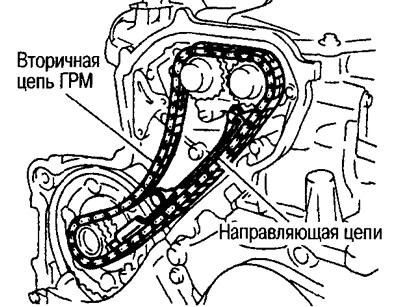
You can separately remove the timing chain without removing the sprockets.
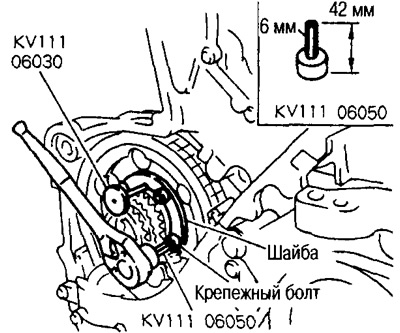
11. Fix the injection pump sprocket.
(1) Insert the installation stop (special tool) into a hole with a diameter of 6 mm in the injection pump sprocket.
(2) With TORX key (special tool) rotate the pump shaft little by little and position the sprocket precisely by aligning the holes.
(3) Lock the injection pump sprocket by pushing the mounting stopper inside the injection pump housing.
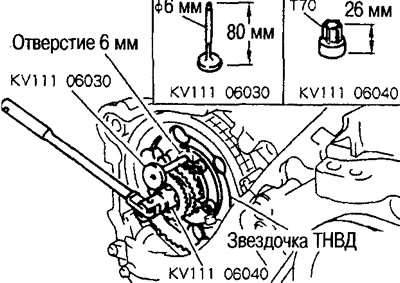
The mounting stopper is inserted until the flange with the injection pump sprocket touches.
(4) Remove the TORX key.
12. Turn away adjusting bolts of an asterisk of TNVD (4 things.) with hex key (special tool 6 mm, long).
 | 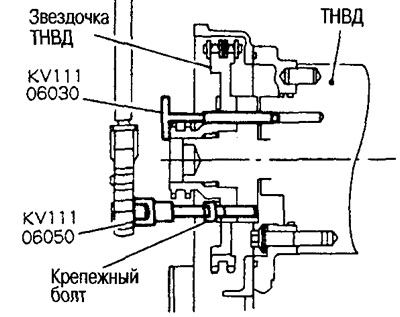 |
No need to remove the sprocket washer.
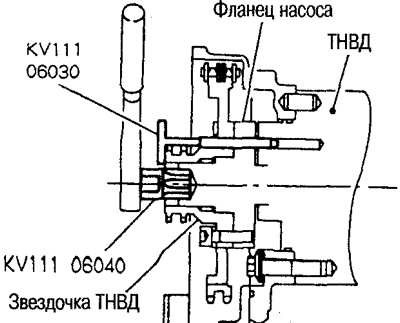
13. Fix the injection pump sprocket with the holder (special tool), so that she doesn't fall.
If the mounting stop interferes with the installation of the sprocket holder, extend it approximately 10 mm.
After preinstalling the sprocket holder, align the holes, insert the TORX wrench with extension into the 3 holes A and tighten the holder fixing bolts (3 pcs.) (for installation tool, see item 14).
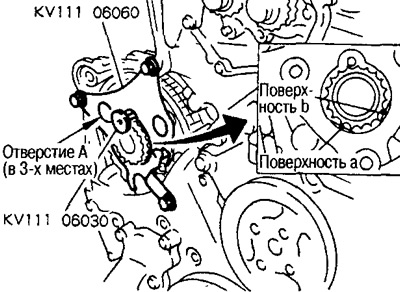
To install the sprocket holder, use MB bolts approx. 15 mm long (excluding head).
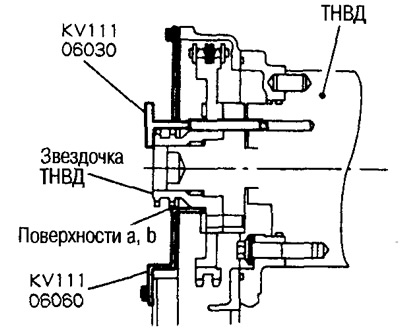
Make sure surfaces a and b of the holder are in contact with the bottom surface of the small diameter sprocket.
Attention: Do not remove the sprocket holder before installing the injection pump.
After removing the sprocket holder, remove the adjusting stopper from the injection pump sprocket.
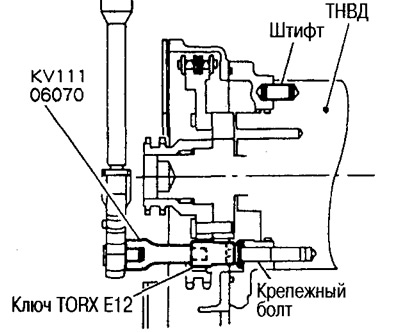
14. With extension cord (special tool, total length 43 mm) and TORX key (Q6-E12, commercially available) remove the set screws (3 pcs.) and remove the injection pump through the back of the engine.
Even if all the mounting bolts are unscrewed, the injection pump will be held on the mounting pins.
Attention: Do not disassemble or adjust the injection pump.
Note: The injection pump cannot be repaired even at a service station.
15. Turn away adjusting bolts of TNVD.
Note: Sealing washers are not reusable.
Caution: Be careful not to let the sealing washers fall into the motor.