1. Install the rear chain cover.
Install next. manner.
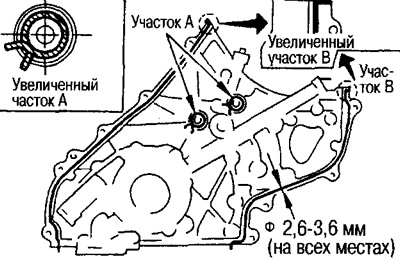
(1) Apply Three Bond 1207C in a continuous bead (KR510 00150) to the areas shown in the figure.
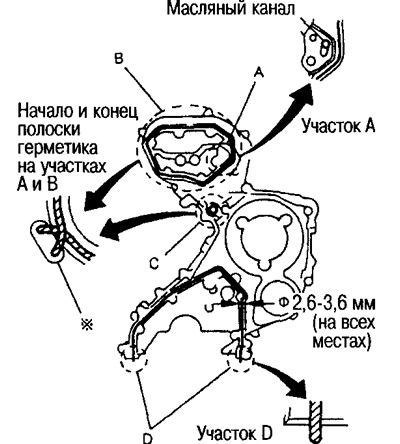
In areas marked with letters, observe the following recommendations.
- A: Apply the sealant so that it does not extrude into the oil passage.
- B, C: Try to apply sealant so that there is minimal overlap between the beginning and end of the bead of sealant, as shown in the illustration.
- D: At the beginning and at the end of the strip, apply more sealant so that it squeezes out.
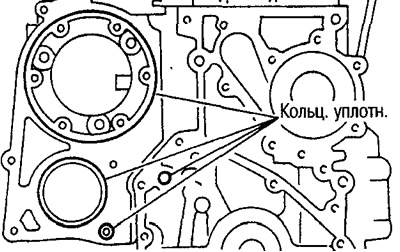
(2) Install the O-rings in the grooves of the cylinder block and injection pump bracket (4 things.).
(3) Install the rear chain cover. Align the pins with the holes.
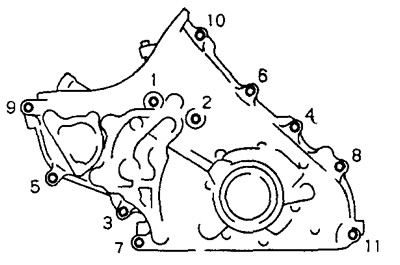
(4) Tighten the set bolts in the order shown in the figure.
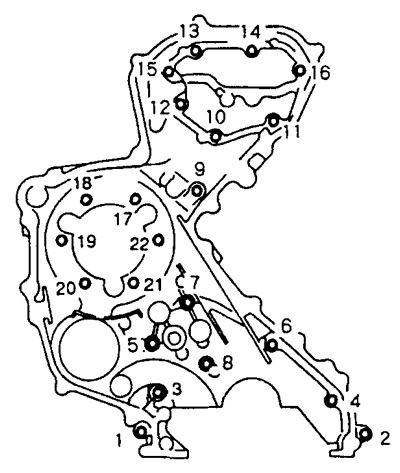
4 types of bolts are used, so be guided by fig. during installation.
Headless bolt lengths:
- 16 mm: No. 1.2, 17.18, 19, 20, 21.22
- 20 mm: No. 3.4, 6, 9, 10, 11.13, 14.16
- 25 mm: No. 12, 15
- 35 mm: No. 5, 7, 8
Note: Bolt length refers to the length of the threaded part without the guiding part of the bolt.
(5) After tightening all the bolts, tighten them in the order shown in the figure.
2. Install the steering pump.
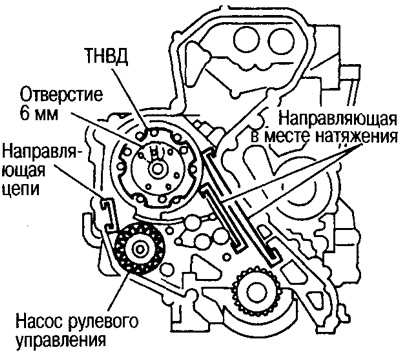
3. Install the injection pump.
Before installing, make sure that the notch on the injection pump flange is aligned with the 6 mm hole on the body.
4. Install chain guides (in 3 places).
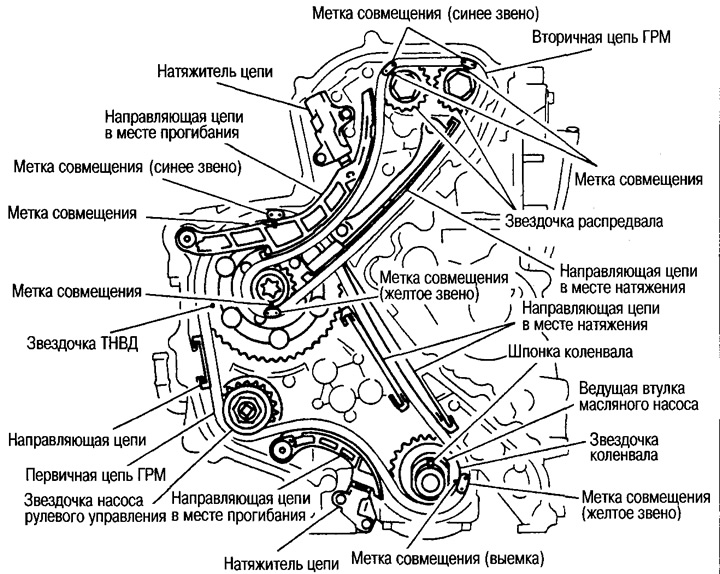
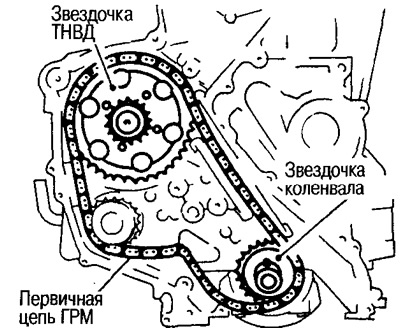
5. Install the crankshaft sprocket, aligning with the crankshaft keyway.
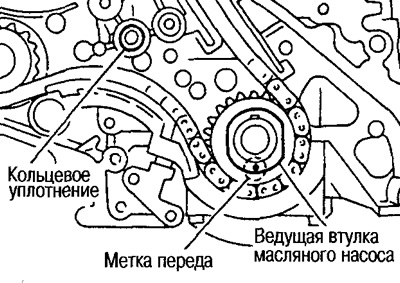
6. Install the primary timing chain together with the injection pump sprocket.
Align the sprocket marks with the chain marks.
Install the injection pump sprocket washer with the front mark F towards the front of the engine.
7. Fit the timing chain onto the steering pump sprocket and onto the chain guide.
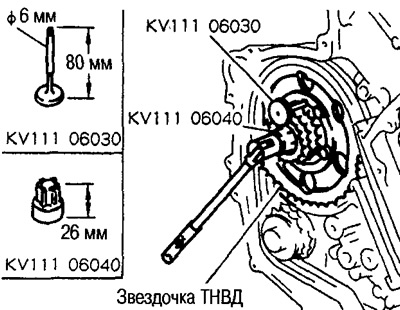
8. Tighten the injection pump sprocket set bolt, securing the sprocket with the locking pin (special tool).
Slowly turn the pump shaft with a TORX wrench (special tool), insert the installation stopper (special tool) into a hole with a diameter of 6 mm on the injection pump sprocket, inside the housing.
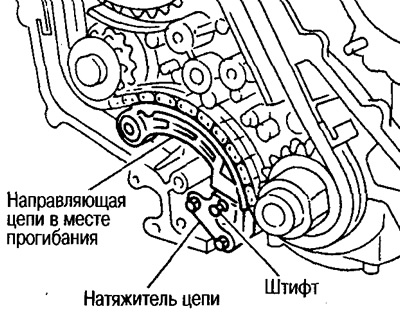
9. Install the chain guide at the deflection point.
10. Install the chain tensioner.
Press the plunger and secure it with the pin.
After installing the tensioner, remove the pin.
Note: Re-check that the marks on the sprockets are aligned with the marks on the timing chain.
11. Install the front oil seal on the oil pump.
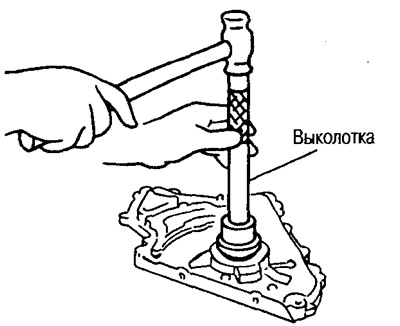
Press the oil seal in until it stops with a 62 mm drift.
Attention: Do not touch the lip of the gland, and also make sure that foreign particles do not enter.
12. Install the steering pump removal cover on the oil pump.
Apply Three Bond 1207C in a continuous bead (KR510 00150) to the areas shown in the figure.
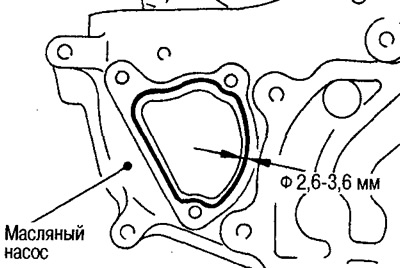
The sealant is applied from the oil pump side.
13. Install the oil pump.
Install in the following order.
(1) Apply Three Bond 1207C in a continuous bead (KR510 00150) to the areas shown in the figure.
In the places marked with letters, pay attention to the following.
- A: At the beginning and at the end of the strip, apply sealant so that it squeezes out.
- B: Apply sealant parallel to the top edge of the oil pump.
(2) Install the oil pump drive bush to the crankshaft.
Install the bushing with the mark forward.
(3) Install the O-ring into the groove of the rear timing chain cover.
(4) Install the oil pump.
Align the edges of the rotor with the edges of the oil pump drive bush.
Align the dowel pins with the holes.
(5) Tighten the set bolts in the order shown in the figure.
(6) After tightening all the bolts, tighten them in the order shown in the figure.
14. Check the difference in levels between the mounting surface of the upper oil pan.
Using a ruler and feeler gauge, check the difference in levels between the following parts.
Standard level:
- Oil pump - back cover: -0.14-0.14mm
- Rear cover - cylinder block: -0.25-013mm
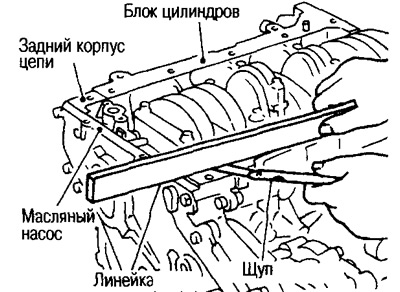
If the level difference is greater than the standard, reinstall.
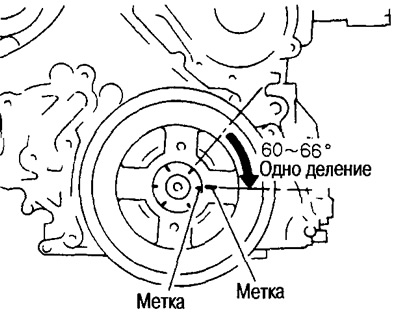
15. Install the crankshaft pulley.
Install in the following order.
(1) Install the pulley on the crankshaft.
(2) Fix the crankshaft pulley with a clamp (special tool).
(3) Tighten the fixing bolt to 19.6-29.4 Nm (2.0-3.0 kg m).
(4) Place a mark on the pulley opposite one of the 6 most easily visible marks on the mounting bolt.
(5) Retighten the set bolt 60-66° (to the next mark on the fixing bolt).
16. Install the secondary timing chain and related parts (see section «Secondary timing chain»).
17. Complete installation in the reverse order of removal.