


Table of contents: Removal ↓ Installation ↓
Cylinder head
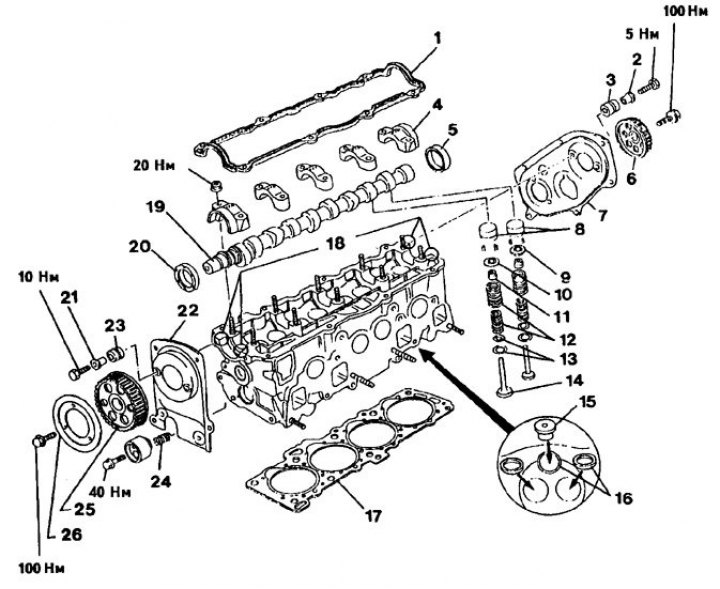
1. Cylinder head cover gasket (always replace); 2. Bearing sleeve; 3. Rubber bushing; 4. Main bearing cap; 5. Rear camshaft oil seal (always replace); 6. Rear camshaft gear; 7. Back cover; 8. Hydraulic valve lifter; 9. Valve rotary mechanism; 10. Upper valve spring plate; 11. Valve stem oil seals; 12. Valve spring; 13. Valve spring support; 14. Valve; 15. Vortex chamber; 16. Valve seat; 17. Cylinder head gasket (always replace; depending on the size of the pistons, there are gaskets of different thicknesses); 18. Places of application of sealant (apply sealant to these areas before installing the cylinder head cover gasket); 19. Camshaft; 20. Front camshaft oil seal (always replace); 21. Bearing bushing; 22. Front cover; 23. Rubber bushing; 24. Spring; 25. Front camshaft gear; 26. Side plate (for camshaft gear)
Cylinder head bolt numbering
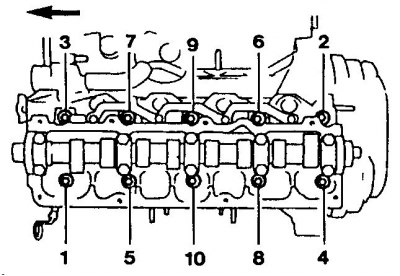
The order of tightening the bolts
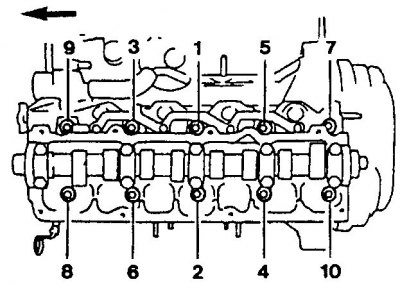
Removal
1. Disconnect the battery ground cable.
Warning! This will erase the electronic memory, such as the radio code. Before disconnecting the battery, read the instructions in subsection 7.2.
2. Drain the coolant completely and collect it in a container.
3. Remove the exhaust pipe.
4. Disconnect all cooling system hoses from the cylinder head.
5. Remove the air duct.
6. Unscrew the exhaust manifold heat shield.
7. Unscrew the exhaust manifold.
8. Remove the cylinder head cover with gasket.
9. Set the piston of the 1st cylinder to the TDC position.
Attention! After this, the position of the crankshaft and camshaft should not change.
10. Remove the timing belt.
11. Loosen the cylinder head bolts in a specific sequence in 3 passes (see fig. Cylinder head bolt numbering).
12. Loosen all bolts 1/2 turn in the given sequence.
13. Loosen all bolts another turn.
14. Remove all bolts.
Caution: The cylinder head may become deformed or crack if the bolts are not loosened in the correct order.
15. Check that all hoses and wires leading from the cylinder head to the engine and body are disconnected.
16. Remove the cylinder head with the help of an assistant.
Caution! After removal, do not place the cylinder head on the sealing surface, otherwise the fully open valves may be damaged. Place the cylinder head on 2 wooden blocks.
Installation
1. Clean the cylinder head and check for deformation.
2. Check water, oil and fuel hoses for damage or cracks and replace if necessary.
3. Check valves and valve seats for wear and damage.
4. Install the cylinder head gasket so that the holes in the cylinder block and in the cylinder head gasket align.
Attention! There are cylinder head gaskets of different thicknesses, which are designated by 1, 2 or 3 notches on the edge. If only the gasket is replaced, a new gasket of the same designation must be installed. If the cylinder block, pistons, connecting rods and crankshaft were replaced or repaired, the gasket thickness should be selected in accordance with the piston protrusion (is done in the workshop).
5. Put on the cylinder head.
6. Coat the cylinder head bolts and washers with a thin film of clean engine oil and screw in according to the markings (see fig. Bolt tightening order). Make sure that the beveled side of the washers faces the bolt heads. The flat side of the washer faces the cylinder head.
7. Screw in the cylinder head bolts by hand until they touch the flange.
8. Then tighten bolts 1 through 10 in 5 passes.
9. On each pass, the bolts must be tightened in the specified sequence.
10. Tighten bolts 1 through 10 to 40 Nm.
11. Tighten bolts 1 through 10 to 90 Nm.
12. Loosen bolts 10 through 1 completely.
13. Tighten bolts 1 through 10 to 40 Nm.
14. Tighten bolts 1 through 10 with a rigid wrench in one pass by 75°.
15. To do this you will need an angle gauge; if you don't have one, tighten bolts 1 through 10 to 90 Nm.
Attention! Tightening of bolts must be done with special care. Bolts must be tightened in 5 passes. Before tightening, check the accuracy of the torque wrench. In addition, the tightening sequence must be strictly observed.
16. Install the timing belt.
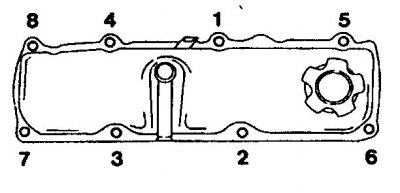
17. Install the cylinder head with a new gasket, first applying sealant to bearing caps 1 and 5.
18. Apply sealant to opposite areas of the cylinder head cover.
19. Lightly tighten all bolts to a maximum of 4 Nm.
[Information copied from the website www.NissanBook.ru]
Caution: If the bolts are tightened too much, leaks may occur.
20. Tighten the exhaust manifold to 20 Nm.
21. Screw on the exhaust manifold heat shield.
22. Install the air duct.
23. Place all cooling system hoses on the cylinder head and secure with clamps.
24. Install the exhaust pipe.
25. Connect the battery ground cable.
26. Fill with coolant.