


Checking the oil supply channel to the intake shaft sprocket
Attention.
- This check is performed only if the P0011 fault code is registered when performing diagnostics with the CONSULT tool.
- The engine must be cold to avoid burns from oil splashes.
1. Check the oil level.
2. To avoid unintentional engine starting during the test, do the following:
- Relieve residual fuel pressure.
- Remove the intake manifold.
- Disconnect the connectors from the ignition coils and injectors.
3. Remove the intake camshaft phase control solenoid valves.
4. Clean the mounting surfaces of the intake valve timing solenoid valve, then insert a clean, oil-free cloth into the oil hole (A) in the cylinder head.
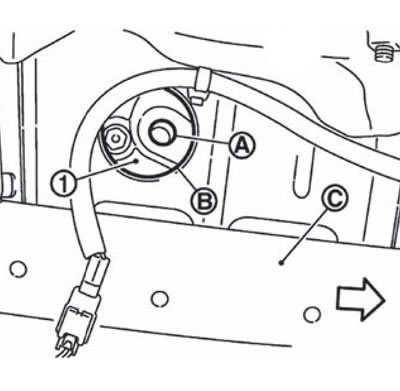
1. Front cover.
A. Oil hole.
B. Service hole.
C. Beam on the right side. The arrow indicates the front side of the engine.
5. Install the right engine mounting insulator (after removing the intake valve timing control solenoid valve and inserting a rag into the oil hole)
6. Crank the engine with the starter and check for oil coming out of the oil channel in the intake phase control clutch cover. Stop cranking after oil appears.
Attention.
- Do not insert fingers into the oil hole through the service hole of the right beam.
- Be careful not to touch rotating parts (drive belt, idler pulley, crankshaft pulley, etc.).
- Do not crank the engine unless the right engine mounting insulator is installed.
- During cranking, a significant amount of oil may be ejected from the solenoid valve seat. Use a rag to protect engine components and the engine compartment. Do not allow oil to come into contact with rubber components such as drive belts and engine mounts. Wipe up any spilled oil immediately.
7. If, when scrolling, oil does not flow from the oil channel in the intake phase control clutch cover, then the channel between the mesh filter and the electromagnetic valve must be flushed.
8. Remove the components located between the intake camshaft phase control solenoid valve and the camshaft sprocket and check all oil passages for blockage.
If necessary, flush the channels.
9. After checking, reinstall the previously removed components in the reverse order of removal.
(The source of the article is on the website: NISSANBOOK.RU)