


The parts are installed in the same places where they were before removal.
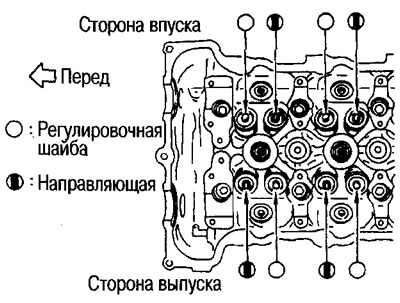
The adjusting washers and rocker arm guides are installed in the order shown in the figure.
2. Install the camshafts into the cylinder head.
Install the camshafts so that the dowel pins are positioned as shown in the illustration.
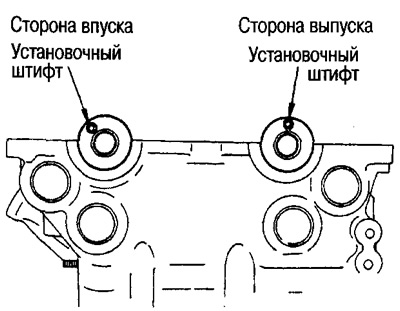
The camshaft, which has a groove for the distributor drive at the rear end, is installed on the exhaust side.
3. Install the camshaft brackets.
Install the brackets in the same places where they were before removal.
During assembly, use the marks you made before removal as a guide.
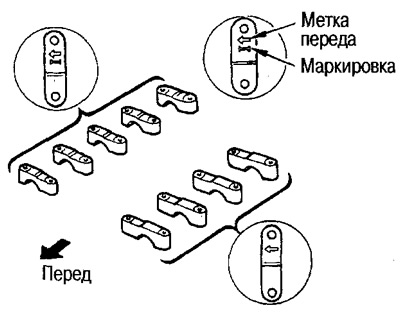
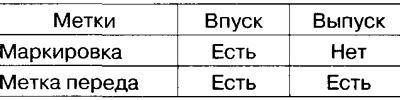
The markings of the camshaft brackets are shown in the following table:
On the back side of bracket No.5 of the exhaust camshaft (next to the distributor) apply Three Bond 1207C sealant (KR51000150).
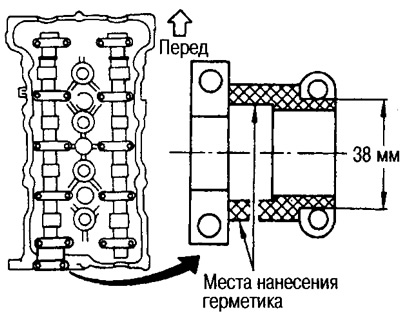
The sizes of bolts for camshaft brackets vary depending on their installation location:
- Bolt A (10 pcs.): M6x53.8mm
- Bolt B (10 pcs.): M6x37.0mm
- Bolt C (2 pcs.): M8x35 mm
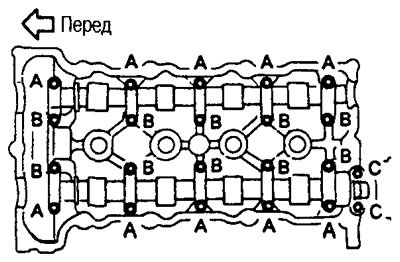
The camshaft bracket bolts are tightened in three stages in the following sequence:
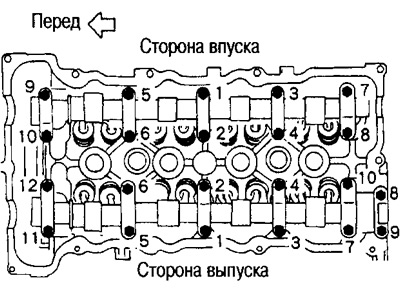
1) Intake side: tighten bolts 9, 10, then 1 through 8
Exhaust side: tighten bolts 11, 12, then 1 through 10
 : 2 Nm (0.2 kg·m)
2) Tighten in the order shown in the figure.
 : 5.9 Nm (0.6 kg·m)
3) Tighten again in the order shown in the figure.
 : 9.8-11.8 Nm (1.0-1.2 kg·m)
Attention: Tighten bolts 8, 9 on the exhaust side with a force of 17.7-25.5 Nm (1.8 - 2.6 kg·m).
4. Install the camshaft sprockets.
Align the marks on the camshaft sprockets with the marks on the timing chain.
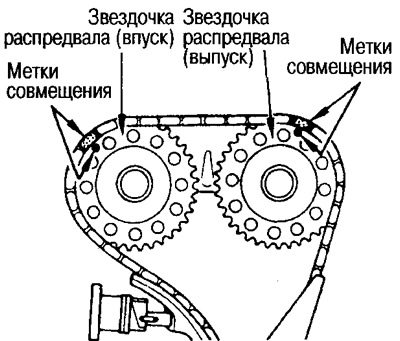
Align the camshaft dowel pins with the camshaft sprocket slots.
Secure the hexagonal portion of the camshaft with a wrench and tighten the sprocket bolt.
5. Install the timing chain tensioner.
Squeeze the tensioner and throw the hook in the following sequence:
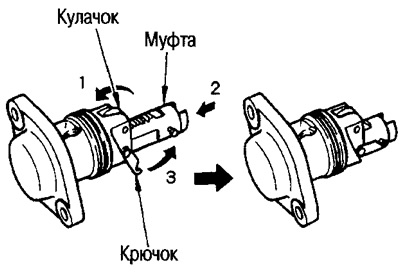
1) Press on the cam (stopper).
2) In this position, press the coupling.
3) Throw on the hook.
Note: Once secured, it will automatically swing out after the crankshaft is turned.
Install the gasket with the groove facing down.
Lubricate the chain tensioner and the mounting hole in the cylinder head with engine oil.
Do not damage the O-rings during installation.
Install the chain tensioner so that its front mark faces the front of the engine.
After installation, rotate the crankshaft by hand 180° counterclockwise, then 180° clockwise and make sure the hook swings out.
6. Install the distributor.
1) Make sure the camshaft is in the position as shown in the figure.
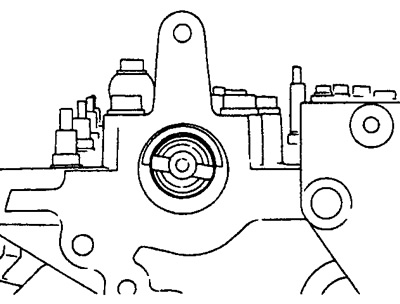
2) Install the rotor in the position as shown in the figure.
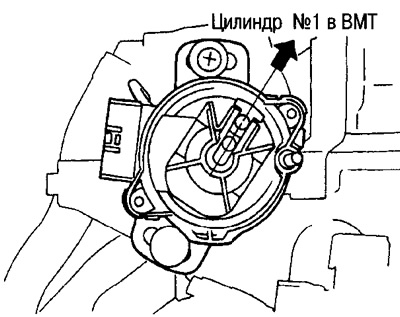
Make sure that cylinder #1 is set to TDC and the distributor rotor is in the ignition position for cylinder #1.
3) Tighten the mounting bolts.
7. Install the remaining parts in the reverse order of removal.