1. Turn the crankshaft so that the camshaft is up with the cam of the cam whose valve is to be adjusted.
2. Install compressor for valve springs (special tool) from the side of the rocker guide as shown in the figure, pull towards you, lower the valve spring plate down and use the magnetic finger to remove the rocker guide.
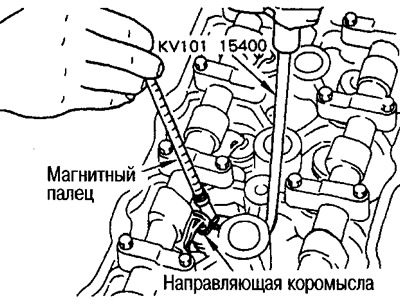
3. Slide and remove rocker.
Note: If the rocker arm is difficult to move, push the valve spring cup against the shim side, slide and remove the rocker arm.
4. Remove an adjusting washer and a hydropusher of the valve.
5. Screw the indicator onto a special stand.

6. Insert the stand with the indicator into the hole for the valve lifter as shown in the figure.
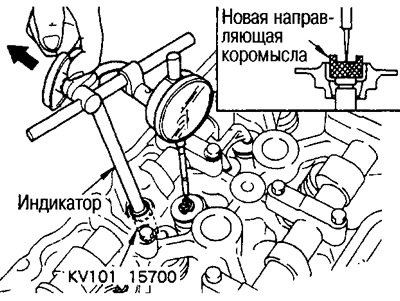
7. Install a new rocker guide and set the indicator as shown in the figure, setting its reading to zero.
Caution: During zeroing, pull slightly on the indicator rod to prevent the rack from rocking.
8. Holding the rod (so that the rack does not swing), move and install the indicator probe to the side of the shim, read the indication A on the scale.
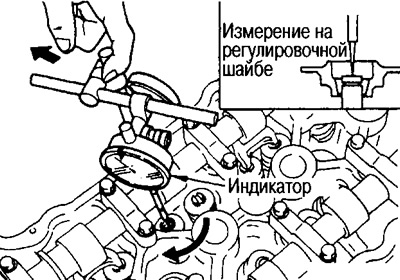
9. Select the thickness of the shim based on the following calculation:
- -0.025 mm < A - T < 0.025 mm
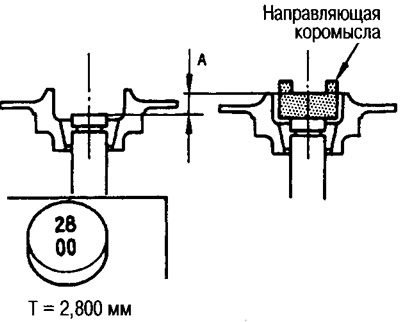
The repair kit contains 17 washers of various thicknesses from 2.800 mm to 3.200 mm in increments of 0.025 mm
After installing the shim, check with an indicator that its thickness satisfies the condition of paragraph 9.
10. After selecting a suitable shim, install the rocker in the following sequence:
1) Install the valve lifter and the selected shim.

2) With Compressor for Valve Springs (special tool) lower the valve spring head from the guide side.
3) Install the rocker.
Note: If the rocker arm is difficult to install, lower the valve spring cap from the rocker guide side and the shim side.
4) Install the rocker guide.