The planetary gear transmits torque from the engine at various gear ratios. The pressurized transmission fluid engages and disengages a number of hydraulic clutches and servo brakes in the planetary gear, thereby achieving a change in gear ratio. The liquid pressure in the system is maintained by a separate pump. Transmission control is provided by a selector lever, which is fixed in 6 positions. In selector position D, automatic change of 4 speeds is provided. For automatic transmission downshifting (increased gear ratio) at full throttle opening, a kick-down device is provided. In selector position 2, the car can move at speeds corresponding to the first two gear ratios, and in position 1, only the first gear ratio. It is forbidden to switch the transmission to positions 1 and 2 if the speed exceeds 110 km/h. The selector has a button for switching the transcendental mode (engine braking or overload). Under normal driving conditions, this switch should be in the ON position, and when driving downhill or uphill, it should be in the OFF position. Any transmission repair is carried out in a car service.
Removing
1. Raise the entire vehicle and place on stands.
2. Move the selector to position N.
3. Remove the front wheels.
4. Drain the coolant, tighten the drain plug.
5. Remove the battery.
6. On GE16DE vehicles, remove the filter air duct.
7. Disconnect wires from dual switch and solenoid.
8. Disconnect the kick-down cable from the throttle body.
9. Turn away a nut and get a cable from an arm and brackets.
10. Disconnect the cable from the transmission lever, remove the bracket and remove the cable.
11. Clamp the coolant hoses with clamps, unscrew the union and disconnect the hoses.
12. Disconnect half shafts (see subsection 10.2).
13. Remove the exhaust pipe.
14. Remove the starter.
15. Remove the lower cover of the transmission case and unscrew the torque converter bolts by turning the crankshaft.
16. Hang the engine on a hoist or jack it up.
17. Roll up the lifting platform and support the transmission.
18. Turn away a nut and get a coupling bolt of a back support of the engine.
19. Remove the three bolts and remove the bracket.
20. Remove the restrictor ring.
21. Turn away a nut and get a coupling bolt of the left support of the engine.
22. Turn away three bolts and remove a support and pillows.
23. Attach the torque converter.
24. Unscrew the transmission mounting bolts, having previously marked the location of each bolt (bolts are different lengths).
25. Make sure that all necessary parts are disconnected and cannot interfere with removal.
26. Carefully move to the left and roll out the platform with the transmission.
27. Remove the pins if they are loose.
Installation
1. Installation is carried out in the reverse order.
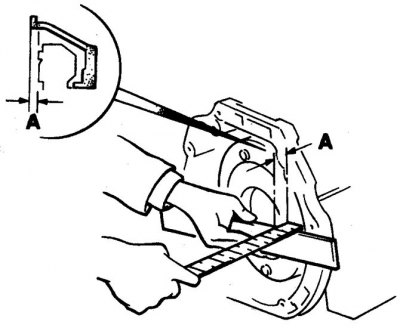
2. When installing the torque converter, check the distance from the bolt holes to the split plane of the transmission (A), which must be at least 21.1 mm.
3. Replace axle shaft seals, adjust kick-down cable.
Disassembly
Self-repair is not recommended, as high qualifications and special tools are required. A car with a faulty transmission should be taken to a car service for diagnostics of failure codes and repairs. The transmission can only be removed after the diagnostic codes have been read.