


Note: The following special tools are required to perform the following procedures:
- - Tachometer and strobe;
- - Duration meter (by angle) of the closed state of the distributor breaker contacts (for 4.2L models).
The Patrol/Maverick vehicles covered in this manual are equipped with one of two types of distributors. The 3.0L models use an electronic ignition distributor, while the 4.2L models use a contact breaker distributor.
The distributors are equipped with a special block that limits the maximum revolutions to 5000÷5400 per minute and is accordingly called a revolution limiter. The block consists of a spring-loaded rotary button and a special cover that, when the engine revolutions reach a critical value, turn off all spark plugs except for the spark plugs of the second and fifth cylinders.
Contact breaker distributors are equipped with replaceable contacts and a capacitor and require regular maintenance, lubrication of the cam and ignition timing mechanism, as well as cleaning of the internal surfaces and cover components.
The electronic ignition system does not require maintenance, except for periodic cleaning and checking the condition of the distributor cap and rotary button, as well as lubrication of the centrifugal ignition timing adjustment mechanism.
Note: When working on or near electronic ignition system components, special precautions must be taken to avoid injury from electrical shock. Remember that dangerously high voltages are present in the secondary circuits of such systems.
Before disconnecting and connecting electrical connectors, turn off the ignition (the key is in the OFF position) to avoid damage to ignition system components or electric shock.
Before making any adjustments to the ignition timing, make sure that the centrifugal ignition timing adjustment mechanism in the distributor is functioning properly.
Replacing breaker contacts
1. Remove the distributor cap and loosen the runner mounting bolt.
2. Remove the runner.
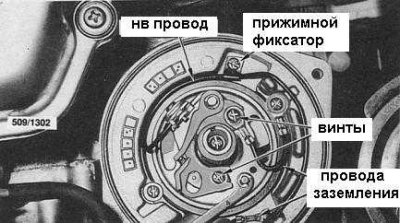
3. Loosen the contact screw and disconnect the HB wire from the insulating block on the contacts (see accompanying illustration).
4. Loosen the screws securing the fixed contact plate by about two to three turns. Only completely unscrew the screws if absolutely necessary.
5. Remove the breaker contact assembly from the mounting screw and remove the contacts from the distributor.
6. Disconnect the distributor electrical connector.
7. Loosen the clamping screw of the low-voltage wire retainer and the screw of the ground wire terminal on the distributor housing. Unscrew the fastening screw on the capacitor housing, remove the capacitor assembly with the low-voltage wire and discard it.
The text was borrowed from here NissanBook.ru
8. Install the contacts in the reverse order.
Note: New breaker contacts must be thoroughly washed in solvent before installation to remove the anti-corrosion coating.
9. Install the capacitor on the distributor and tighten its mounting screw. Make sure that the HV wire is laid correctly.
10. Apply a small amount of high-temperature grease under the heel of the rubbing block of the breaker contacts, and also apply a small amount of grease to the working projections of the cam assembly.
11. Install the new contact assembly into the breaker base plate and temporarily tighten the mounting screws, making sure the ground wire is properly installed.
12. Turn the engine so that the friction block of the moving contact is on the cam protrusion.
13. Slightly loosen the fixed contact mounting screws using a suitable screwdriver and move the contact plate in the required direction, achieving a gap of 0.45÷0.55 mm between the contacts (use a blade type feeler gauge - a blade of the appropriate thickness should pass through the gap with slight resistance). After completing the clearance adjustment, tighten the plate mounting screws.
14. Crank the engine several times and repeat the measurement.
15. Connect the breaker low voltage wire to the insulator block on the distributor wall and reinstall the speed limiter screen, rotor and distributor cap.
16.In accordance with the manufacturer's instructions, connect the distributor contact closed-loop duration meter, tachometer and strobe light to the engine and check the settings for idle speed, contact closed-loop duration and ignition advance angle.
Late-model 4.2 L models equipped with fuel injection (EFI)
The electronic system requires virtually no maintenance, although it is recommended to periodically remove, clean and check the condition of the distributor cap.
Wipe the distributor cap clean with a soft cloth and carefully inspect it inside and out for cracks. If cracks, signs of excessive terminal burnout or carbon brush wear are found, replace the cap with the rotary button.
The procedure for removing, checking the condition and installing the distributor is described in the Section on fuel injection and engine management systems in Chapter Fuel and exhaust systems.