


Table of contents: Diagnostics ↓ Setting the self-diagnostic mode ↓
All cars with injection engines are equipped with a neutralizer. The only adjustable parameter is idle speed (see subsection 2.2.2).
The fault code is indicated by a series of long (0.6 s) and short (0.3 s) flashes of the control lamp and the red indicator on the control unit housing, separated by an interval of 0.9 s. The "long" flashes indicate the first digit of the code, and the "short" flashes indicate the second. After 2.1 s, a series of flashes of the next fault code stored in memory will follow.
Diagnostics
1. Before making a conclusion about the malfunction of the injection system, check the cleanliness of the filter, the ignition setting, the gaps in the spark plugs and valves, the compression in the cylinders, make sure that the connectors are securely fastened and that there is no corrosion on them.
2. If no faults are detected, switch the control unit to self-diagnosis mode 2. The fault code is determined by the flashing of the red LED indicator on the right side of the control unit.
3. Registered fault codes are stored in the control unit memory until the 50th starter activation.
4. If the failure is no longer registered during this period, it is erased. The code can also be erased by switching the unit to mode 2 and then to mode 1, or by disconnecting the battery for more than 24 hours.
Setting the self-diagnostic mode
1. Remove the cover of the fuse box that contains the control unit connector.
2. Turn on the ignition, thereby switching the control unit to mode 1.
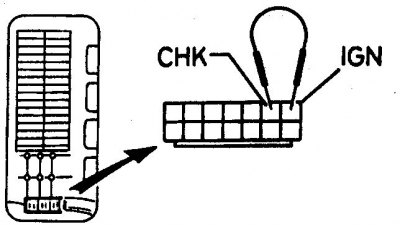
3. Connect the IGN and CHK terminals of the diagnostic connector with a jumper. After 2 seconds, the control unit switches to mode 2.
4. In mode 2, only fault codes stored in the control unit memory are read.
Caution: If codes 11 and 21 are detected, check the crankshaft sensor circuit before checking the ignition circuit.
5. If the control unit is set to mode 2 on vehicles with a neutralizer, then the exhaust gas mixture control mode is automatically activated when the engine is started.
6. If the indicators light up, the mixture is lean; if both indicators go out, the mixture is richer.
7. To check the exhaust gas sensor, start the engine, bring the speed to 2000 rpm and watch any indicator for 2 minutes. With a normal sensor, the indicators will flash at least 5 times in 10 seconds.
The material is based on data from the portal nissanbook.ru
8. When finished, exit mode 2 by connecting the IGN and CHK terminals again for 2 s with the engine stopped, or turn off the ignition and disconnect the battery from ground (with the engine running).
9. For a complete check of the injection system, take the car to a car service center.
| Code number | Faulty chain |
| 11 | crankshaft angle sensor circuit |
| 12 | flow meter circuit |
| 13 | liquid temperature sensor circuit |
| 21 | ignition signal circuit |
| 34 | knock sensor circuit |
| 43 | throttle angle sensor circuit |
| 55 | normal operation of all circuits |