


Table of contents: Removal and installation ↓ Disassembly ↓ Assembly ↓ Injection pressure adjustment ↓
Removal and installation
Removal, installation and testing of injectors are described in the chapter "Maintenance".
Disassembly
Do not disassemble injector No.1 (with needle lift sensor) in the CD20E engine.
1. Loosen the injector nut while holding the top of the injector to prevent it from turning.
2. Remove the injector parts in the order shown.
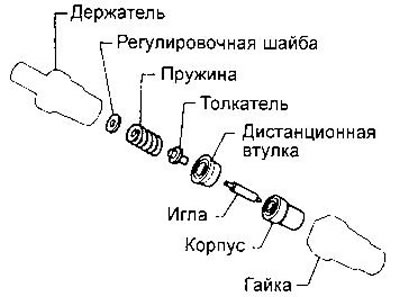
The nozzle must be replaced if the needle is damaged or melted, or if the housing, spacer sleeve, and spring are worn or damaged.
The needle, half raised from the housing, should smoothly descend into it under the action of its own weight in any position.
To clean the nozzle, use wooden sticks and a brass brush. Use diesel fuel as a cleaning fluid. Be especially careful when cleaning the needle seat, as the operation of the nozzle depends significantly on its condition.
Assembly
Assembly is carried out in the reverse order using the KV11292010 mandrel. If the injector body is installed incorrectly, the mandrel may get stuck and damage the body.
- Tightening torque of the injector nut 78-98 Nm
Injection pressure adjustment
Adjusting washers are used to adjust the pressure. The thicker the washer, the higher the injection pressure. In the CD20E engine, only injectors #2-4 can be adjusted.
A change in washer thickness by 0.04 mm corresponds to a pressure change of approximately 4.8 kgf/cm². Washers with thicknesses from 0.50 to 1.0 mm are supplied as spare parts.
The injector should not leak at a pressure of 10-20 kgf/cm² below the injection start pressure.
(Information copied from the portal: Nissanbook.ru)