English
Русский
Български
Беларускі
Український
Српски
Hrvatski
Română
Polski
Slovenský
Magyar
Bookmark
Articles
Sitemap
Contacts
Search:
Almera
Maxima
Murano
Pathfinder
Patrol
Primera
Qashqai
Serena
Sunny
Teana
X-Trail
Others
Serena 2
(1999-2005)
Home
Serena
C24
(1999-2005)
Power unit
Engine management YD25DDTi
Control unit — removal
0
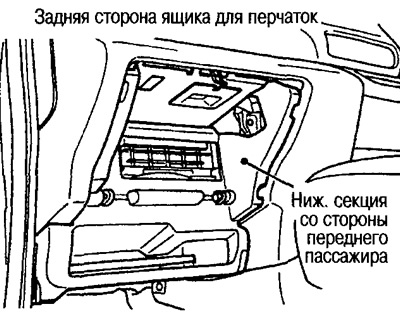
1. Remove the glove box and lower section of the instrument panel on the passenger side, see Sec.
Salon equipment
.
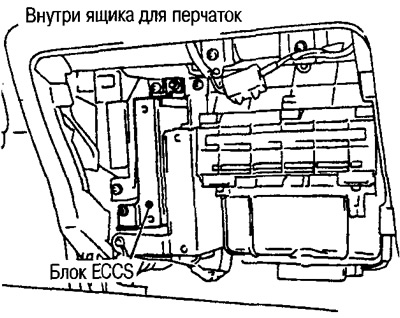
2. Disconnect the wiring connector of the ECCS unit.
3. Unscrew the 2 fixing nuts of the ECCS unit and remove it.
This article is available at:
russian
,
bulgarian
,
belarusian
,
ukrainian
,
serbian
,
croatian
,
romanian
,
polish
,
slovak
,
hungarian
Send this information to your friends:
◀ Previous
Serena 2: Engine management YD25DDTi
Next ▶
Wiring diagram for vacuum hoses and tubes
Location of components
Standard input/output voltages of the ECCS control unit
Checking the fuel filter
Checking the concentration of soot in the exhaust
Idle speed check
Self-diagnosis function
System Description
TDC sensor
Air flow weight sensor
Coolant temperature sensor
Idling switch and fully depressed accelerator pedal switch
Accelerator pedal switch — check
The switch of the accelerated warming up of the engine
Egnition lock
Stop lamp switch
ABS wheel sensors (vehicle speed signal) — check, removal and installation
Control lamp and glow relay
Similar information for other Nissan models
➜ Control unit — removal and installation
Nissan Almera 1 (1995-2000)
➜ Removal and installation of the front suspension control lever
Nissan Maxima 4 (1994-1999)
➜ Heating and air conditioning control panel — removal, installation and adjustment
Nissan Terrano 1 (1986-1995, petrol)
➜ Removal and installation of supports of the power unit
Nissan Patrol 4 (1987-1997, petrol)
➜ Removal and installation of servo control (with power steering)
Nissan Example 1 (1990-1996, petrol)
➜ Hydroelectronic ABS control unit — removal and installation
Nissan Qashqai 1 (2006-2013)
➜ Control unit — removal and installation
Nissan Sunny 7 (1990-1998)
➜ Removal and installation of the onboard control unit (BCM)
Nissan Micra 3 (2002-2010, petrol)
Link in different formats to this article
TEXT
HTML
BB Code
Article about repairing Japanese cars Nissan Serena 2 (1999-2005): Control unit — removal: https://www.nissanbook.ru/en/Serena/C24/power/manage-yd/blok-upravleniya-snyatie
<a href="https://www.nissanbook.ru/en/Serena/C24/power/manage-yd/blok-upravleniya-snyatie">Nissan Serena 2 (1999-2005): Control unit — removal</a> - article on the website www.NissanBook.ru about Japanese car repair company Nissan.
[url=https://www.nissanbook.ru/en/Serena/C24/power/manage-yd/blok-upravleniya-snyatie]Nissan Serena 2 (1999-2005): Control unit — removal[/url] - article on the website www.NissanBook.ru about Japanese car repair company Nissan.
Comments and feedback from visitors
No comments yet
How much will 38 + 41 ?
Serena 2
(1999-2005)
General information
Control devices
User manual
Power unit
Petrol engine SR20DE
Diesel engine YD25DDTi
Cooling and lubrication system
Engine management SR20DE
Engine management YD25DDTi
Power and exhaust system
Transmission
Automatic gearbox
Drive and cardan shafts
Transfer case
Chassis
Front suspension
Rear suspension
Brake system
Steering
Body
Safety system
Interior (internal elements)
Exterior (external elements)
Doors, locks and windows
Heating and air conditioning
Electrical equipment
Equipment and devices
Lighting system
Windshield wipers and washers
Electrical circuits
NissanBook.ru
© 2018–2024
·
Mobile version
·
Articles about Nissan
·
Sitemap:
EN
BG
BY
UA
RS
HR
RO
PL
SK
HU
·
Feedback
·
Site search
·
Bookmark
Almera 1 (N15)
·
Maxima 4 (A32)
·
Terrano 1 (petrol)
·
Patrol 4 (Y60, petrol)
·
Example 1 (P10, petrol)
·
Qashqai 1 (J10)
·
Serena 2 (C24)
·
Sunny 7 (B13)
·
Note 1
·
Micra 3 (petrol)
·