


Note: The coarse oil filter and oil pump are part of the oil pan (upper) and cannot be disassembled separately.
Removal
Note: When removing only the oil pan (lower), steps 2 and 3 are not required. Perform step 5 after completing step 4
1. Remove the engine protection from the bottom.
2. Remove the engine and transmission assembly from the vehicle and separate them. See section "Engine assembly".
3. Mount the engine on the stand. See section "Cylinder block".
4. Drain the engine oil. See chapter Lubrication system and engine cooling system.
5. Remove the oil pan (lower) as follows:
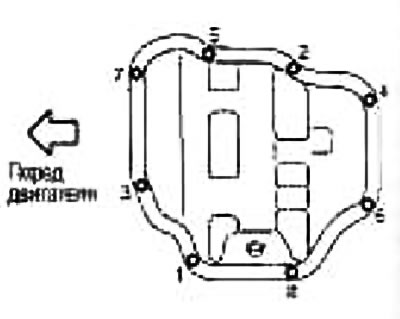
- a. Loosen the bolts in the reverse order shown in the figure.
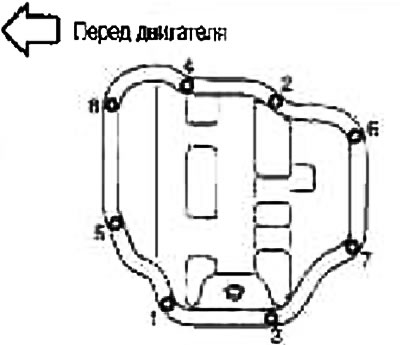
- b. Insert the cutter (special tool: KV10111100) between the upper and lower oil pans.
Attention:
- Do not damage the contact surfaces.
- When shipped from the factory, a stronger sealant is applied compared to the sealants used previously. Therefore, do not try to separate the tray with a flat-head screwdriver, etc.
6. Remove the front cover and timing chain. See the section below "Timing chain".
7. Remove the oil pump sprocket and crankshaft sprocket together with the oil pump drive chain. See section "Timing chain".
8. Remove the oil pan (upper) as follows:
- a. Loosen the oil pan (upper) mounting bolts in the reverse order of that shown in the illustration.
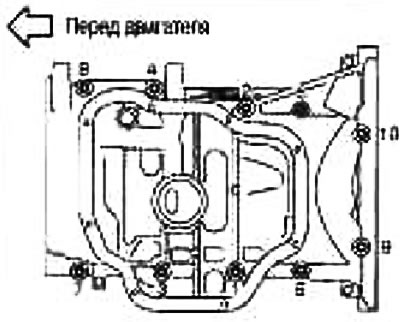
Use brand name sealant or equivalent.
- b. Insert a flat-blade, curved screwdriver into the locations marked with arrows in the figure and create a gap between the oil pan (upper) and the cylinder block.
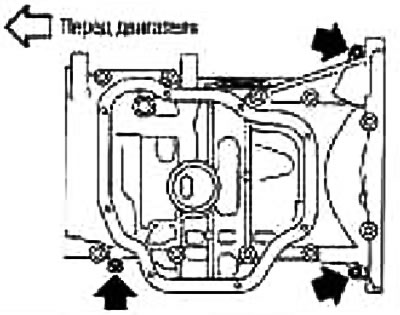
- c. Insert the cutter (special tool: KV10111100) between the oil pan (upper) and the cylinder block. Move the cutter around the perimeter, tapping its end with a hammer.
Attention:
- Do not damage the contact surfaces.
- When shipped from the factory, a stronger sealant is applied compared to the sealants used previously. Therefore, do not attempt to separate the tray with a screwdriver, etc. in areas other than those indicated.
- Do not remove the oil pump and coarse oil filter from the oil pan (upper).
9. Remove the rear oil seal from the crankshaft.
Installation
1. Install the oil pan (upper) as follows:
- a. Use a scraper to remove any remaining old sealant from the contact surfaces.
Also remove any remaining old sealant from the contact surface of the cylinder block.
Remove any remaining old sealant from the bolt holes and threads.
Caution: When removing old sealant, be careful not to scratch or damage the contact surfaces.
- b. Install the O-ring into the cylinder block.
- c. Apply sealant (C) in a continuous bead using a syringe (special tool: WS39930000) to the areas shown in the figure.
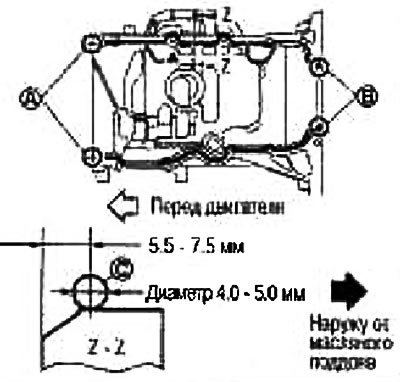
Use brand name sealant or equivalent.
A. 2 mm protruding outward
B. 2 mm protruding towards the rear oil seal installation side
Caution: Installation must be completed within 5 minutes after application.
- d. Tighten the bolts in the order indicated by the numbers in the figure.
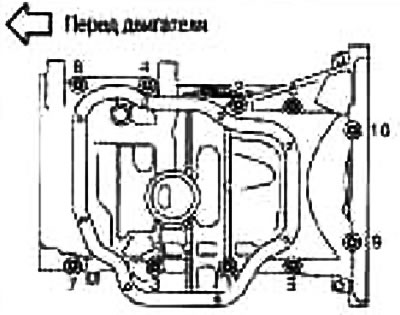
Caution: When installing, do not allow the oil pan gasket and O-ring to move.
The bolt installation locations are shown below:
- M8 x 180 mm: 9.10
- M8 x 25mm: 3.4 7.8
- M8 x 90mm: 1,2,5,6
2. Press in the rear oil seal as follows:
Caution: Install the rear oil seal within 5 minutes after installing the oil pan (upper). Do not touch the edge of the oil seal.
- a. Using a spatula, remove the sealant that has come out from the area where the rear oil seal is installed on the oil pan (upper) and the cylinder block.
- b. Apply a small amount of sealant around the entire outer area of the new rear oil seal.
Use brand name sealant or equivalent.
- c. Press in the rear oil seal using a punch with an outer diameter of 113 mm and an inner diameter of 90 mm (suitable special tool) (A)
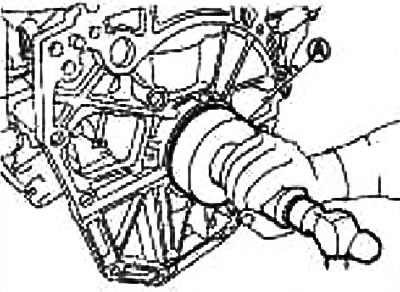
Press in according to the dimensions shown in the drawing on the next page.
Attention:
- Do not touch the grease applied to the seal lip.
- Do not damage the surface where the rear oil seal is installed on the oil pan (upper) and the cylinder block or crankshaft.
- To avoid burrs and distortion of the seal, press it in at a right angle.
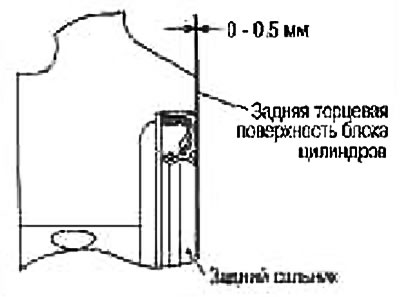
- d. After pressing in the rear oil seal, completely remove the sealant that protrudes from the rear end.
3. Install the crankshaft sprocket, oil pump sprocket, oil pump drive chain and chain tensioner. See the Timing Chain section.
4. Install the timing chain and related components. See section "Timing chain".
5. Install the front cover and related components. Refer to "Timing chain".
6. Install the oil pan (lower) as follows:
- a. Use a scraper to remove any remaining old sealant from the contact surfaces.
Also remove any remaining old sealant from the contact surface of the oil pan (upper)
Remove any remaining old sealant from the bolt holes and threads.
Caution: When removing old sealant, be careful not to scratch or damage the contact surfaces.
- b. Apply sealant (A) in a continuous bead using a syringe (special tool: WS39930000) to the areas shown in the figure.
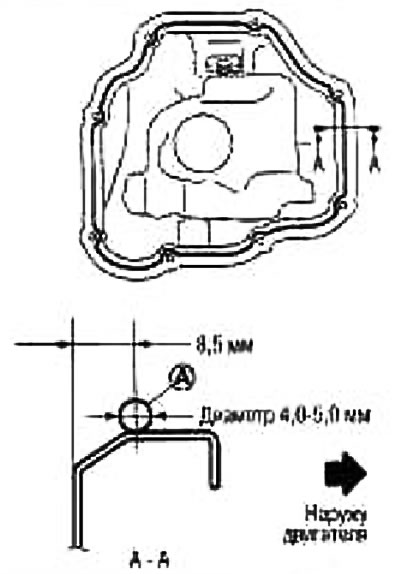
Use branded sealant or equivalent
Caution: Installation must be completed within 5 minutes after application.
- c. Tighten the bolts in the order indicated by the numbers in the illustration.
7. Screw the plug into the oil pan drain hole. The installation direction of the washer is shown in the component illustration above. After this operation, installation is performed in the reverse order of removal.
Post-installation check
1. Check the oil level and top up. See chapter Lubrication system and engine cooling system.
2. Start the engine and check for engine oil leaks.
3. Turn off the engine and wait a few minutes.
4. Check the oil level again. See chapter Lubrication system and engine cooling system.