Attention. Use only a vacuum cleaner to clean the brake pads and base plate. Do not use compressed air.
Removing
1. Remove the rear tunic of the car.
2. Fully release the parking brake and remove the brake disc.
Note. Mark the disc and wheel hub with bearing assembly for proper installation later.
Attention. Do not allow the brake disc to fall.
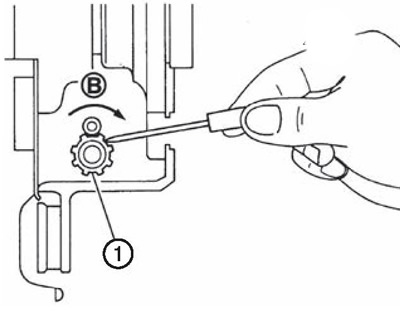
3. If the brake disc cannot be removed, do the following:
- Secure the brake disc with the wheel nuts and remove the adjusting hole plug.
- Using a suitable tool, turn the regulator (1) in the direction (IN) for compressing and loosening the parking brake pads.
4. Remove hold-down pins and return springs.
Attention. Do not drop the removal part.
5. Remove spacer, adjuster, parking brake pads and crank.
Attention.
- The front parking brake pad is different from the rear, so care must be taken not to mix up the pads.
- Do not drop removed parts.
6. If necessary, remove the base plate.
Installation
Installation is carried out in the reverse order of removal, taking into account the following:
Apply copper or silicone grease to base plate and brake pad surfaces.
Attention. The front parking brake pad is different from the rear, so care must be taken not to mix up the pads.
Assemble the regulator so that the threaded part lengthens when rotated in the papillae indicated in the figure.
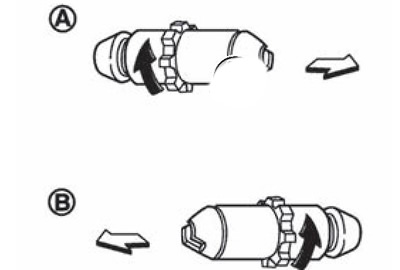
A. For right brake.
B. For left brake.
The white arrow points towards the front of the engine.
Turning in the direction of the black arrow expands the knob.
Rotate the toothed part to fully compress the regulator.
If the regulator has been disassembled, apply copper or silicone grease to the threads.
Make sure that there are no traces of grease on the working surfaces of the parking brake shoe and brake drum. Remove them if necessary.