Attention. Do not turn the engine crankshaft against the normal direction.
1. Drain engine oil.
Attention. Drain the engine oil only after the engine has cooled down.
2. Disconnect the negative battery terminal.
3. Remove the following parts:
- Protective pallet of the engine.
- Right wheel with tire.
- Right fender.
- Drive belt.
- Fuel filter.
4. Remove the crankshaft pulley:
Install the crankshaft pulley locking tool (A) (Mot. 1770 according to Renault catalog) and loosen the crankshaft pulley bolt.
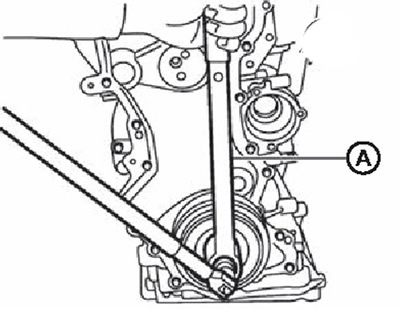
Pull with both hands to remove the crankshaft pulley with spacer.
Attention. Be careful not to damage the lips of the front oil seal.
5. Remove the front oil seal:
Install special tool hooks (A) into the grooves of the front oil seal and turn counterclockwise as far as it will go.
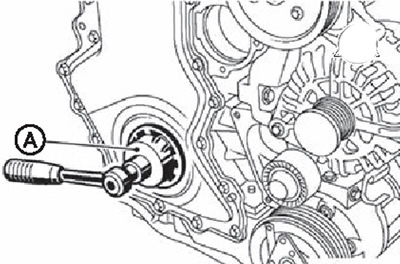
Note. The special tool comes with a new front seal.
6. Loosen the pinch bolt between the lower tie rod and rear engine mount bracket, and support the rear engine mount bracket with a transmission jack.
Attention. Do not jack up the lower engine oil pan.
7. Remove the top tie rod and right engine mounting insulator.
8. Remove mounting bracket and engine mounts (anterior and posterior).
9. Remove the water pump pulley.
10. Remove the engine front cover:
Loosen the mounting bolts in the reverse order to that shown in the figure.

Note.
- The figure shows the sequence of tightening the mounting bolts.
- Using a special knife (KV10111100) cut sealant.
Attention. Do not use a screwdriver or similar tool.
Note. Press the front cover by hand with gentle jerks, making sure that the cover is not damaged.
11. Set the piston of the first cylinder to the position of the top dead center of the compression stroke, for which turn the crankshaft to the position indicated in the figures.
Install the camshaft groove (Right side) so that the protruding part is on top.
Align setting mark (IN) clearance compensator gears (1) with ledge (A) cylinder heads.
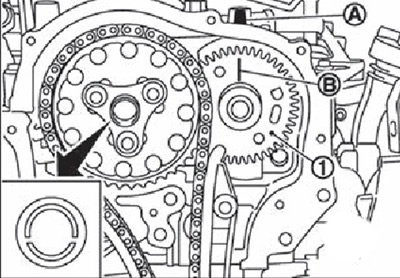
12. Remove the timing chain:
Install special tool (A) (Mot.1769 according to Renault catalog) and tighten the bolt (IN) (MB x 50 mm).

Remove special tool.
Remove the drive chain tensioner.
Compress timing chain tensioner (1) with guide (2) and insert locking pin (A) into the hole in the timing chain tensioner.
Note. Use hard metal wire with a diameter of approximately 3.0 mm as the locking pin.
Remove the guide rail and drive chain tensioner.
Remove the sprocket spacer, front sprocket, crankshaft sprocket and drive chain.
Attention.
- Do not turn the crankshaft and camshafts separately from each other with the timing chain removed. This can cause the pistons to come into contact with the valves and, as a result, damage them.
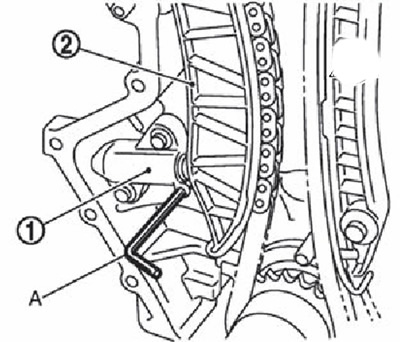
- Insert screwdriver (A) and lift the backlash compensation gear with it (2) to align two teeth of the gap compensator gear.
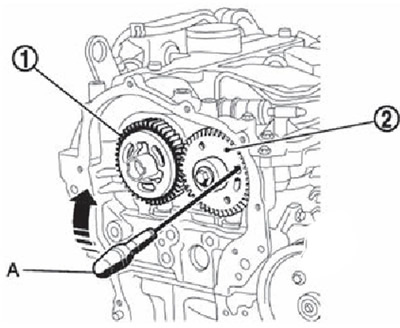
Remove rear sprocket (1) in the position described in the previous paragraph.
Remove the gap compensator gear with spacer.
13. Remove the oil pump and related parts.