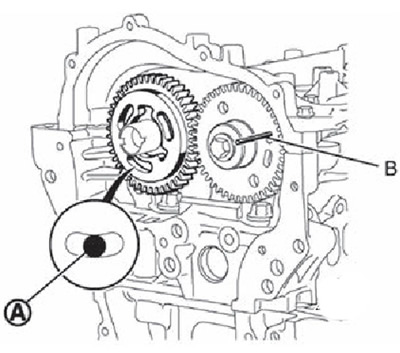
Align the groove of the crankshaft (A) with hole in cylinder block (IN).
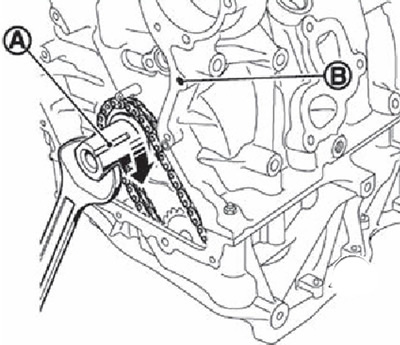
Note. This is necessary to prevent the valves from contacting the piston crowns.
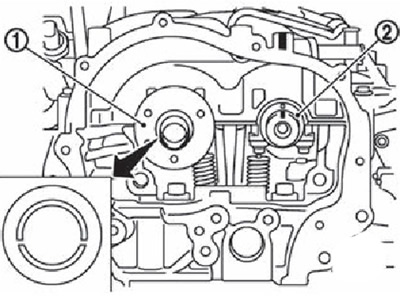
Check that the camshafts are in the position shown in the figure: Right camshaft groove (1) must be installed so that the protruding part is on top, and the alignment mark of the left camshaft (2) must align with the projection on the cylinder head.
Remove the TDC pin hole plug.
Screw in the TDC setting pin (A) (Mot. 1766 by Renault catalog). Turn the engine crankshaft counterclockwise until the crankshaft touches the TDC pin.
The arrow points towards the front of the engine
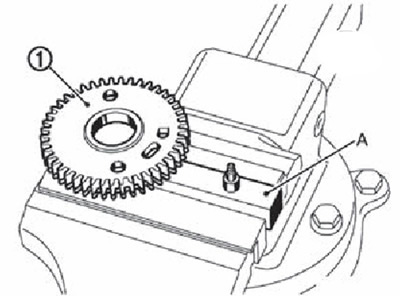
2. Install the wear compensator gear:
Install wear compensator gear (1) on the base of the positioning device (A) (Mot. 1773 by Renault catalog).
Install Lever (IN) into the teeth of the lower gear (A). By turning the lever counterclockwise, align the two teeth of the gear.
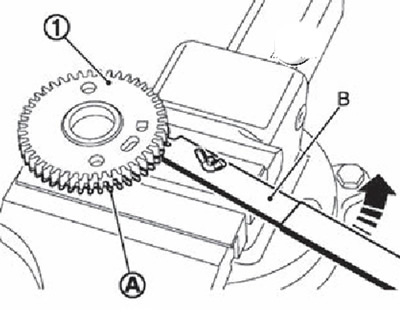
wear compensator gear
Install lock pin (A) into the gear hole.
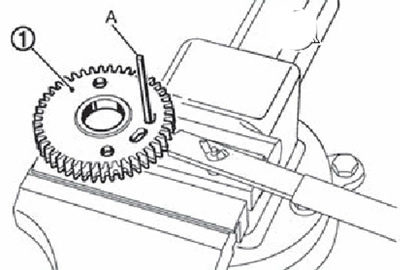
1. Wear compensator gear.
Note. Use hard metal wire with a diameter of approximately 4.0 mm as the locking pin.
Install wear compensator gear (1) with spacer (2) to the left camshaft.
Align setting mark (IN) on the compensator gear with bushing (A) on the cylinder head.
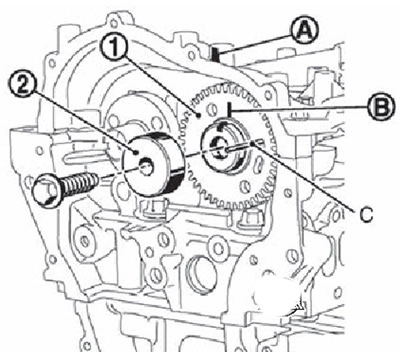
C. Locking pin.
Fit the mounting bolt.
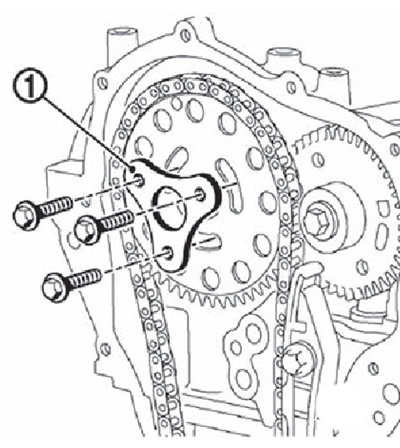
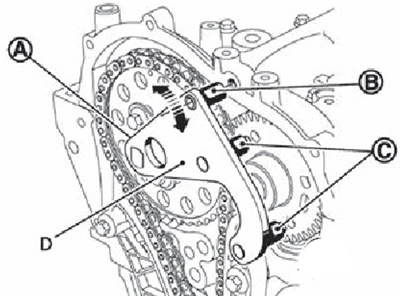
3. Install rear sprocket:
Position mounting hole (A) in the center of the opening in the rear sprocket.
Firmly install the rear sprocket onto the camshaft hub.
Remove lock pin
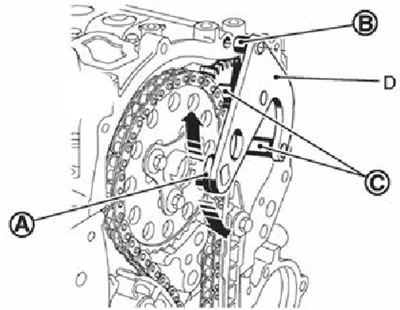
4. Install damper (2) drive chain.
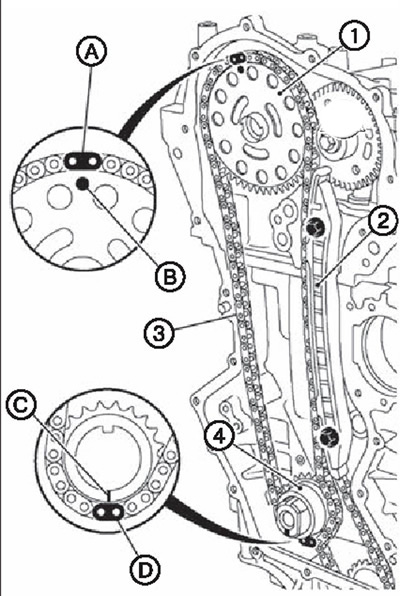
A. Mounting mark.
B. Installation mark (stamp).
C. Installation mark (groove).
D. Installation mark.
Note. Tighten the timing chain guide mounting bolts in two steps:
- First stage: tightening torque 5.0 Nm.
- Second stage: tightening torque 25.0 Nm.
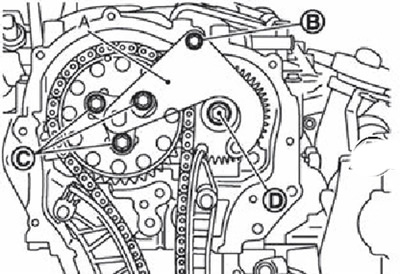
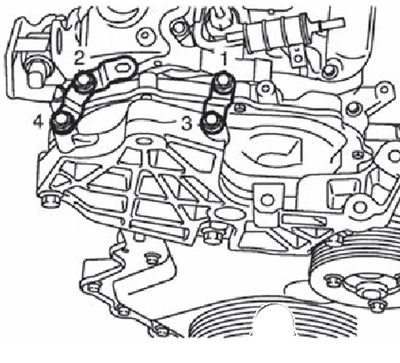
5. Install the front sprocket (1), crankshaft sprocket (4) and drive chain (3).
Note. Align the timing marks of each sprocket and drive chain.
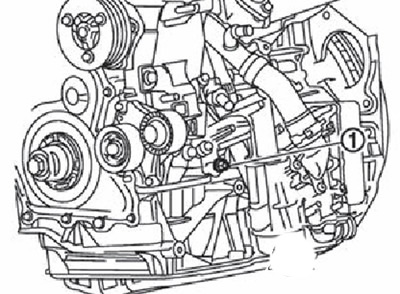
6. Install spacer (1) on the front sprocket and install the mounting bolt. Make sure the sprocket rotates freely.
7. Install the drive chain tensioner guide (2).
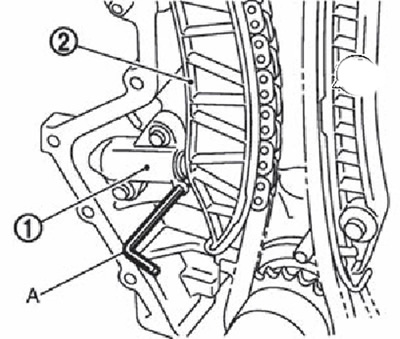
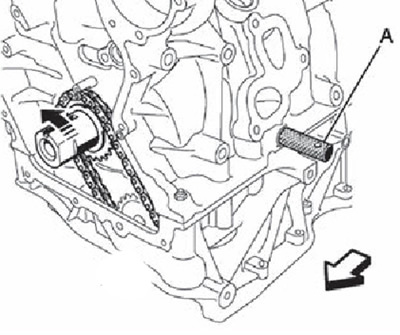
8. Install the drive chain tensioner (1):
Note.
- Before tightening the mounting bolts, make sure that the tensioner touches the cylinder block.
- Remove locking pin after installation (A) and release the plunger.
9. Tighten the bolts securing the timing gear sprockets and wear compensator gears:
Install collet (A) special device (D) (Mot. 1769 according to Renault catalog) into the groove of the right camshaft.
Rotate the fixture so that the axis of the spacer is aligned (IN) with bolt hole.
Install pins (WITH) fixtures in the holes of the wear compensator gear.
Rotate fixture (D) (Mot. 17159 according to Renault catalog) so as to align the axis of the spacer (IN) with bolt hole.
Install collet (A), without applying force, into the groove of the right camshaft.
Insert mounting bolt (IN) (M6 x 50 mm) into the fixture spacer (A) (Mot. 1769 according to Renault catalog).
Tighten the mounting bolts (WITH) camshaft sprockets with a torque of 10 Nm, then tighten by an angle of 40°.
Tighten the mounting bolt (D) gap compensator gears with a torque of 20.0 Nm, then tighten by an angle of 35°.
Attention. Use for tightening on the corner of the corner wrench (KV10112100) (IN). Do not tighten the bolt «approximately».
Remove special tool.
10. Remove TDC locating pin (Mot.1766 according to Renault catalog).
11. Apply sealant to the TDC pin hole plug and tighten to 25.0 Nm.
Note. Use original sealant or equivalent.
12. Install the engine front cover:
Apply sealant to the front cover as shown.
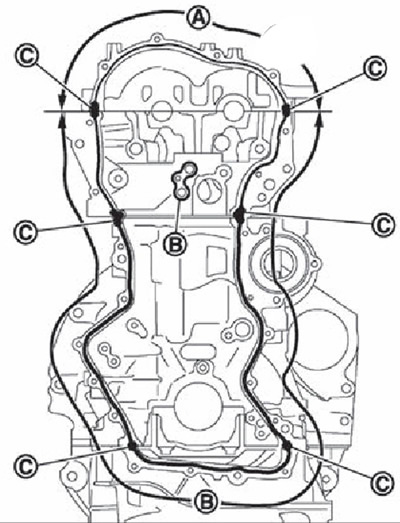
A (upper side): roller with a diameter of 2.5-4.5 mm.
IN (down side): roller with a diameter of 3.0-7.0 mm.
Region C: bead 9.0-13.0 mm in diameter and 10.0-15.0 mm long.
Note.
- Use original sealant or equivalent.
- Sealant should only be applied to the front cover.
Tighten the fastening bolts in several stages in the sequence shown in the figure:
Tighten bolts to 5.0 Nm.
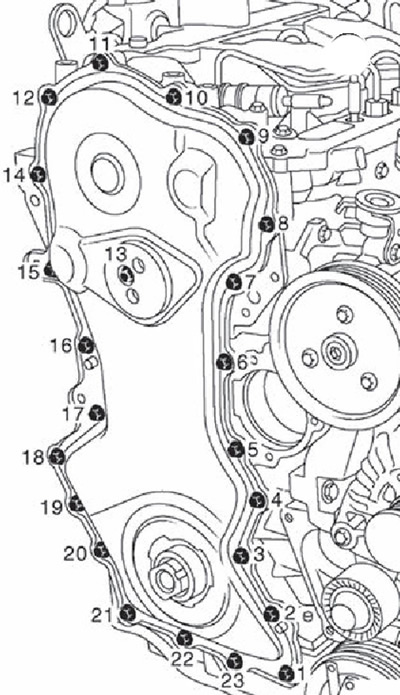
Note. Apply sealant to #23 bolt. Use original sealant or equivalent.
Tighten bolts No. 1 - 22 in the sequence shown in the figure to a torque of 16.0 Nm.
Tighten bolt no. 23 to 18.0 Nm.
Note.
Mounting bolt locations:
- M8: No. 23.
- M6: all others.
13. Install the front oil seal:
Put on protection (A) on the front seal (1).
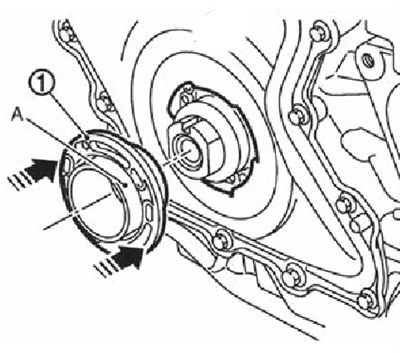
Note.
- Align the grooves of the front oil seal with the grooves of the front cover.
- The seal protector is supplied with it.
Tighten the front seal (1), using a special tool (A).
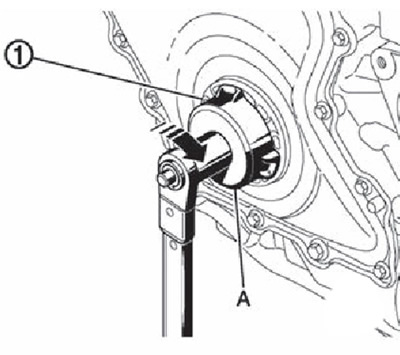
Note. A special tool is supplied with the front oil seal.
Remove seal protection.
14. Install the crankshaft pulley:
Fix the crankshaft pulley with a special tool (A) (Mot. 1770 according to Renault catalog).
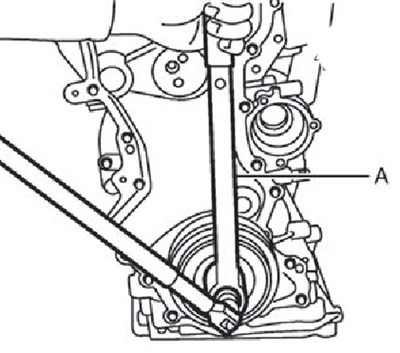
Tighten the crankshaft pulley bolt to 50.0 Nm.
Tighten bolt 85° (corner tightening).
Attention. Use for tightening on the corner of the corner wrench (KV10112100) (IN). Do not tighten the bolt «approximately».
Turn the crankshaft pulley in the normal direction (clockwise when viewed from the front) to ensure smooth rotation.
15. Install motor mounting bracket and mounts (anterior and posterior):
- Install the engine mounting bracket bolts.
- Install engine mount bolts (front and back).
- Tighten engine mount bolts (front and back) in the sequence shown in the figure.
Tighten the motor mounting bracket bolts in the sequence shown in the illustration.

16. Further installation is carried out in the reverse order of removal.