


Table of contents: Removal and installation ↓ Adjusting the position ↓
Removal and installation
Hood Installation Components
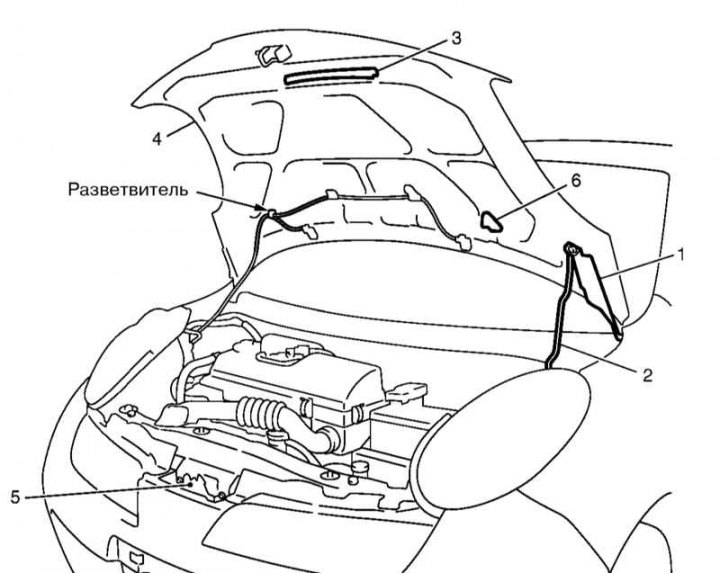
1 - Hood hinge; 2 - Rack; 3 - Radiator support seal; 4 - Assembling the hood; 5 - Hood lock
1. Open the hood and disconnect the washer fluid supply hoses from it at the branching point.
2. To facilitate subsequent installation, outline the hinges with a felt-tip pen from the hood side.
3. Unscrew the nuts securing the hood assembly to the hinges (see the upper right fragment in the illustration Hood installation dimensions (mm)).
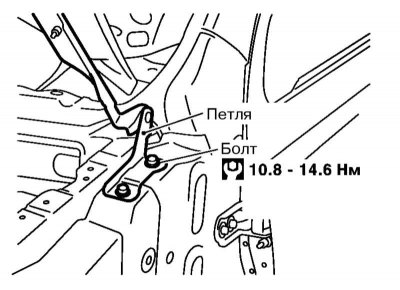
4. If it is necessary to remove the hood hinge, remove the wing (see section Removal and installation the front wing and mudguards) and unscrew the hinge mounting bolts.
5. Installation is carried out in the reverse order. Lubricate the hinges and mating surfaces with anti-corrosion grease. Finally, adjust the position of the hood as described below.
Adjusting the position
Hood installation dimensions (mm)
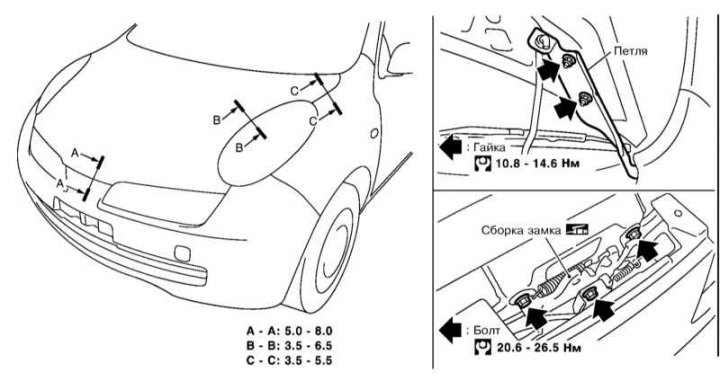
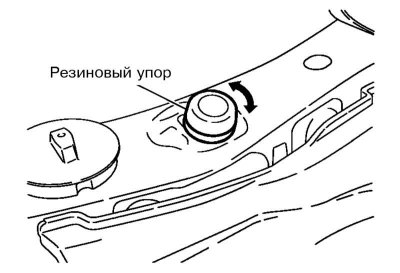
1. Remove the hood lock (see section Removal and installation hood and fuel filler flap locks) and, by rotating the rubber stops, ensure that the hood is 1÷1.5 mm (or more) below the wing.
2. After loosening the nuts securing the hood to the hinges, position it in the opening until you achieve the required dimensions.
3. Adjust the lock and engage the lock striker. Check the lock and striker for slack and tighten the lock mounting bolts. The difference between the gap values BB // CC should not exceed 1.5 // 1.0 mm, respectively.
4. Release the hood lock and adjust the height of the hood relative to the headlights (BB) and fenders (CC) using the rubber stops at a level of 1.0 and 0.2 mm, respectively.
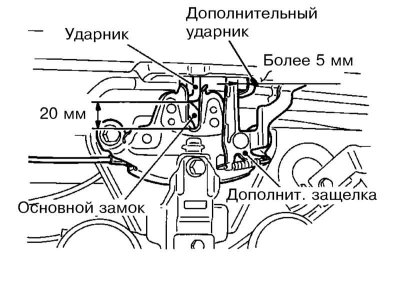
5. Install the lock and move it in the transverse direction to align the striker and the center of the lock strictly vertically relative to each other (if you look from the front).
6. Ensure that the additional bonnet latch engages securely with the additional striker when releasing the bonnet from a height of 20 mm.
Note: Do not release the hood from a height of more than 30 mm.
7. Move the lock up and down so that the striker smoothly engages with the lock when the hood is closed.
8. After adjustment, tighten the lock bolts to the required torque.