Note. Dampers, cables and components for their installation are shown in the illustration Assembly of the A/C unit for manual models. The cable drive is used only on models without automatic A/C.
Air damper
1. Remove the glove box cover (see chapter Body).
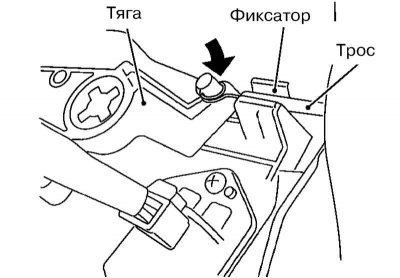
2. Release the air damper cable from the retainer.
3. Set the air control lever to the circulating position.
4. Press the air damper rod in the direction indicated by the arrow in the illustration, while simultaneously pulling the cable jacket towards the ventilation system control unit and fixing it.
Note. When fixing the cable jacket, do not move the cable core.
5. Move the air control lever to make sure it moves smoothly.
Air distribution damper
1. Remove the instrument panel rack cover (see chapter Body).
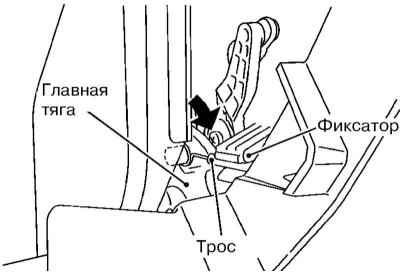
2. Release the air distribution damper cable from the retainer.
3. Set the mode selector to the ventilation position.
4. Press the main link in the direction indicated by the arrow in the illustration while pulling the cable jacket towards the ventilation control unit and fixing it.
Note. When fixing the cable jacket, do not move the cable core.
4. Move the mode selection knob to make sure that the core of the cable moves smoothly.
Air mixing damper
1. Remove the instrument panel rack cover (see chapter Body).
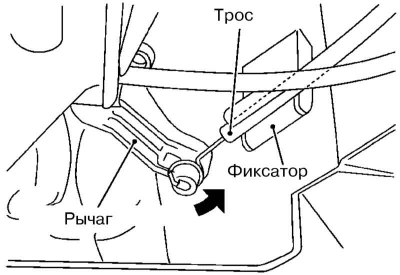
2. Release the air mixing damper cable from the retainer.
3. Set the temperature control knob to the maximum cooling position.
4. Press the damper lever in the direction indicated by the arrow in the illustration, while pulling the cable jacket towards the ventilation system control unit and fixing it.
Note. When fixing the cable jacket, do not move the cable core.
5. Move the temperature adjustment knob to make sure that the cable core moves smoothly.