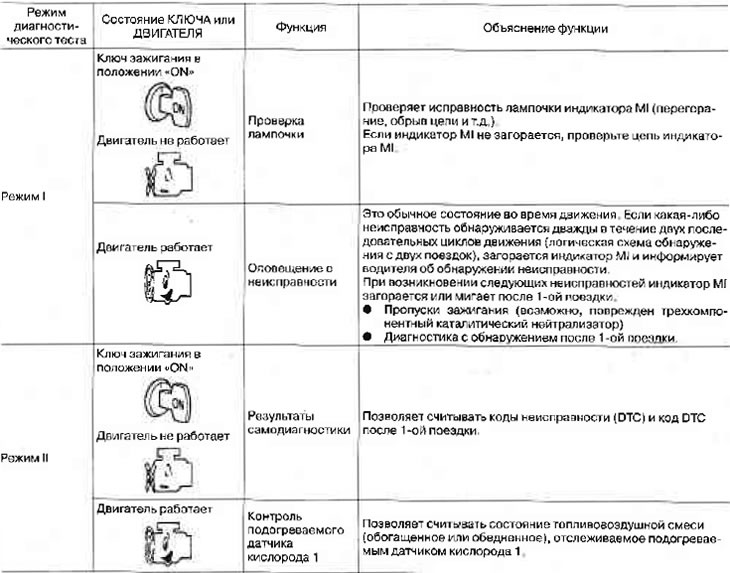
Description
Fault indicator (Ml) located on the dashboard.
1. The Ml indicator lights up when the ignition key is turned to the «ON» when the engine is not running. This is done to test the light bulb.
If the Ml indicator does not light up, see the ELECTRICAL EQUIPMENT chapter.
2. When starting the engine, the indicator Ml should go out.
If the Ml indicator remains lit, then the on-board diagnostic system has detected a malfunction in the engine.
Operation of the on-board diagnostic system
The on-board diagnostic system performs the following four functions:
When a malfunction occurs in the engine management system, the ECM cannot notify the driver by turning on the Ml indicator if there is an open in the Ml circuit.
Therefore, if an abnormal condition of the electric throttle actuator and part of the components associated with the ECM is continuously detected for 5 trips, the latter notifies the driver that a malfunction has occurred in the engine management system and an open has occurred in the indicator Ml indicator by activating the emergency mode.
The emergency operation mode is also activated when an abnormal condition of components is detected, except for the Ml indicator circuit, when driver intervention is required to correct the malfunction.
| Engine operation in emergency mode | RPM does not rise above 2500 rpm due to fuel cut |
MI indicator flashes when there is no DTC
If the ECM is in diagnostic test mode II, the Ml indicator may flash while the engine is running. In this case, check the diagnostic test mode the ECM is in.
Clearing the ECM memory clears the following emissions related diagnostic information:
- diagnostic trouble codes;
- diagnostic trouble codes after the 1st trip;
- freeze frame data;
- freeze frame data after 1st trip;
- SRT codes (system readiness test);
- test values
How to switch diagnostic test modes
Note:
- It is recommended to keep accurate timekeeping with a watch.
- If there is a malfunction in the accelerator pedal position sensor circuit, it will not be possible to enter diagnostic mode.
- After turning the ignition key to position «OFF» the ECM always returns to diagnostic test mode I.
How to switch to Diagnostic Test Mode II (self-diagnosis results)
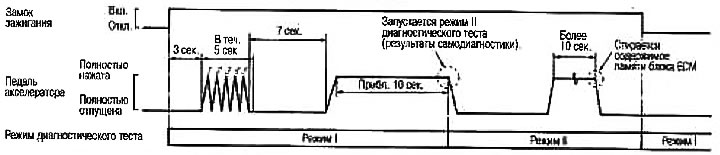
1. Make sure the accelerator pedal is fully released, turn the ignition key to the «ON» and wait 3 seconds.
2. Rapidly repeat the following procedure five times within 5 seconds:
- A. Fully depress the accelerator pedal.
- b. Release the accelerator pedal completely.
3. Wait 7 seconds, fully depress the accelerator pedal and hold it down for approx. 10 seconds until indicator Ml starts flashing.
4. Fully release the accelerator pedal.
ECM has entered diagnostic test mode II (self-diagnosis results).
How to switch to Diagnostic Test Mode II (heated oxygen sensor control 1)
1 Switch the ECM to diagnostic test mode II (self-diagnosis results).
2. Start the engine.
ECM has entered diagnostic test mode II (heated oxygen sensor control 1).
How to clear data obtained in diagnostic test mode ii (self-diagnosis results)
1. Switch the ECM to Diagnostic Test Mode II (self-diagnosis results).
2. Fully depress the accelerator pedal and hold it down for more than 10 seconds.
Emissions diagnostic information has been cleared from the ECM's backup memory.
3. Fully release the accelerator pedal and verify that DTC 0000 is displayed.
Mode I diagnostic test - bulb test.
In this mode, the Ml indicator on the dashboard should be lit. If it doesn't light up, check the light bulb. See chapter ELECTRICAL.
Diagnostic Test Mode I - Fault Alert
| MI indicator | Condition |
| Lit | When a malfunction is detected |
| Does not burn | No fault |
These DTC numbers are explained in par. «Mode II diagnostic test (self-diagnosis results)»
Diagnostic test mode II - self-diagnostic results
In this mode, the DTC and the 1st trip DTC are indicated by the number of flashes of the Ml indicator as shown below.
The DTC and the 1st trip DTC are illuminated at the same time. If the Ml indicator does not light up in diagnostic test mode I (fault alert), all displayed data are 1st trip DTCs. If, when the Ml indicator lights up in diagnostic test mode II, (self-diagnosis results) only one code is displayed, this is the DTC code; if two or more are displayed, they can be either DTCs or 1st trip DTCs The DTC number is the same as the 1st trip DTC number. These unrecognized codes can be recognized using the CONSULT-II tester or the GST scanner. Let's take any code as an example of reading a code.
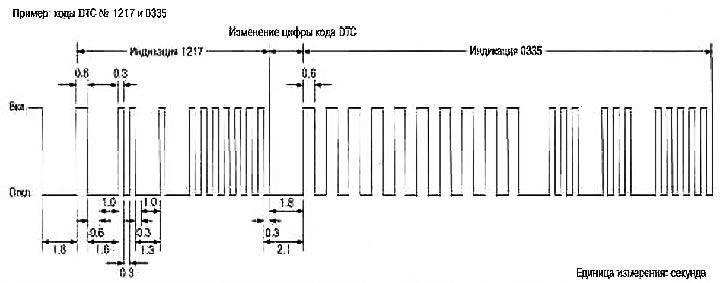
An individual fault code can be identified by the number of flashes that make up a four-digit number «Zero» indicated by ten flashes. The time interval during which (lights up and goes out) one flash of the fourth digit of the code, is 1.2 seconds, which consist of a cycle «ON» (0.5 seconds) And «OFF» (0.6 seconds).
The 3rd and other digits of the code consist of a cycle «ON» (0.3 seconds) And «OFF» (0.3 seconds).
The transition from one digit of the code to another occurs at an interval of 1.0 seconds («OFF»). In other words, the next digit is displayed 1.3 seconds after the disappearance of the previous one.
The transition from one fault code to another occurs at an interval of 1.8 seconds («OFF»).
Thus, all detected malfunctions are distinguished by the numbers that make up the DTC DTC code «0000» means there is no problem.
How to clear data obtained in diagnostic test mode II (self-diagnosis results)
The DTC can be cleared from the ECM's backup memory by depressing the accelerator pedal.
When the battery is disconnected, the DTC is cleared from the backup memory within 24 hours.
Do not erase the contents of the memory before proceeding with troubleshooting.
Diagnostic test mode II - heated oxygen sensor monitoring 1
In this mode, the Ml indicator displays the state of the air-fuel mixture (enriched or depleted), monitored by heated oxygen sensor 1.
| Ml indicator | The state of the air-fuel mixture in the exhaust gases | Feedback air-fuel ratio control status |
| Lit | lean | Closed |
| Don't Burn#Enriched | ||
| Continues to burn or not to burn * | Any state | open loop |
*: Maintains the state just before switching to open-loop control.
To test the operation of the heated oxygen sensor 1, run the engine in diagnostic test mode II and warm it up until the engine coolant temperature gauge is at the center of the scale.
Then let the engine run at about 2000 rpm for about 2 minutes without load. Make sure that when the engine is running at 2000 rpm without load, the Ml indicator lights up more than 5 times within 10 seconds.